Beat Saber is the bomb dot com
So a while back I got an Oculus Rift S and while my workstation was plenty powerful for it, my office was mighty small for my long ass arms to be swinging around - ended up punching the ceiling and my monitors more times than I’d like to admit. It was super fun though…ripping apart machines in Robo Recall, slashing and swiping in Beat Saber made me feel like a kid again, reminiscing of the days where I played Dance Dance Revolution.
My DIY TrueNAS system ended up going the way of the Dodo, which leaves me a rather powerful EPYC system available for use…so I slapped my old RX 580 in a PCIe slot and stuck it in my living room for a gaming and VR system naturally!
The base system uses Red Hat Enterprise Linux, like all of my other systems I have in my lab - outside of my primary Windows workstation and work Macbook Pro. VR systems such as the Oculus line only work on Windows so that’s where this article starts - rolling a Windows VM, passing through a GPU and USB hub, installing the Oculus suite and playing some sweet sweet Saber.
Things to Know
There are going to be a few tricks to getting this working in the easiest and most reliable fashion:
- Oculus does not work via Remote Desktop Connection so you will need an actual monitor or TV connected to the GPU for the Oculus software to finish installing.
- If there is a pending Windows Update then Oculus firmware updates will halt - make sure the device drivers and Windows installation is fully up to date.
- I’m using a PCIe USB Card and passing through the entire card to the VR VM - this allows that card to be a dedicated USB Hub that can have the VR headset, a Bluetooth adapter, and even another downstream USB Hub passed into the VM.
- At some point it the Oculus platform will be switched to the Meta-whatever, and will need a not-Facebook-new-Meta log in - UGH - make sure to have that Pi-Hole blocking all of Facebook’s network
Setting Up Libvirt
Since I’m running RHEL on this physical host I need to install Libvirt and get it configured for my network - I actually already have it running and set up, but this is how you’d do the same thing.
Installing Libvirt
First step is to install the KVM/Libvirt hypervisor:
## Check if you have virtualization enabled
VIRT_TEST=$(cat /proc/cpuinfo | egrep "vmx|svm" | wc -l)
if [[ $VIRT_TEST -eq 0 ]]; then
    echo "Virtualization is not enabled on this host.  Please enable it and try again."
    exit 1
fi

## Update base system
dnf update -y

## Install libvirt
dnf install @virt -y

## Install supporting tools [optional]
dnf install libvirt-devel virt-top libguestfs-tools cockpit-machines usbutils -y

## Enable Cockpit [optional]
systemctl enable --now cockpit.socket

## Enable Libvirt
systemctl enable --now libvirtd
Creating a Bridged Network Interface
The default network that comes with Libvirt is a NAT’d network - this is fine for most instances but I’d rather have the VMs bridged into my main network so they can connected to and from other systems on my network which will allow me to use things like Remote Desktop Connections to connect to the Windows VM from my laptop/workstation.
My network is 192.168.42.0/24 and I’ll assign a static IP to the bridge interface - change the values to match your network:
## Create a bridge from the hypervisor's physical network interface, assuming a name of bridge0
nmcli con add type bridge con-name bridge0 ifname bridge0

## Configure the bridge
## Substitute $DNS1, $GATEWAY, $IPADDR, $PREFIX, and $NETWORK_DOMAIN to match your internet-connected LAN
nmcli con mod bridge0 \
 ipv4.dns 192.168.42.9 \
 ipv4.gateway 192.168.42.1 \
 ipv4.addresses "192.168.42.46/24" \
 ipv4.dns-search "kemo.labs" \
 ipv4.method manual \
 connection.autoconnect yes \
 connection.autoconnect-slaves yes

## Add the physical device, assuming it's enp0s1
nmcli con add type bridge-slave ifname enp0s1 master bridge0

## Bring the connection up
nmcli con up bridge0

## Delete the old physical connection
nmcli con delete enp0s1
Creating a Libvirt Bridged Network
With Libvirt installed and a bridged NIC in place we can create the Libvirt bridged network that will allow the Windows VM to get an IP from the same 192.168.42.0/24 network space:
/var/lib/libvirt/bridged-network.xml
<network>
  <name>bridge0</name>
  <forward mode="bridge"/>
  <bridge name="bridge0"/>
</network>
With that XML file created, just add it to Libvirt with the following couple of commands:
virsh net-define /var/lib/libvirt/bridged-network.xml
virsh net-start bridge0
virsh net-autostart bridge0
Creating a Windows 10 VM for VR
With the hypervisor and network set up it’s time to make a Windows VM on Libvirt - there are a few tricks to doing so, such as downloading the VirtIO Drivers ISO, detatching PCIe and USB devices from the host and attaching them to the VM, so on.
Download the VirtIO ISO
Windows doesn’t come with the VirtIO device drivers built-in so we’ll need to load them and the easiest way to do that is via an ISO - grab it from here: https://github.com/virtio-win/virtio-win-pkg-scripts/blob/master/README.md
cd /var/lib/libvirt/images
wget https://fedorapeople.org/groups/virt/virtio-win/direct-downloads/stable-virtio/virtio-win.iso -O virtio-win.iso
Mapping PCIe Devices
This Windows VM will be provided a whole Radeon RX 580 via PCIe pass-through - to do this we first need to find what device address it uses. This device address won’t change unless you physically relocate the PCIe devices on the motherboard.
## List the PCIe devices, pipe to grep and match some word of the device you're using
[root@suki ~]# lspci | grep 'RX'
21:00.0 VGA compatible controller: Advanced Micro Devices, Inc. [AMD/ATI] Ellesmere [Radeon RX 470/480/570/570X/580/580X/590] (rev e7)
21:00.1 Audio device: Advanced Micro Devices, Inc. [AMD/ATI] Ellesmere HDMI Audio [Radeon RX 470/480 / 570/580/590]

## The chip number/revision isn't always the same as what is in the Hardware Specifications, but the one I use and linked to is an dual ASMedia controller card.
[kemo@suki ~]$ lspci | grep AS
05:00.0 USB controller: ASMedia Technology Inc. ASM2142 USB 3.1 Host Controller
0a:00.0 USB controller: ASMedia Technology Inc. ASM2142 USB 3.1 Host Controller
The numbers needed are the ones at the start of the lines, 21:00.0, 21:00.1, 05:00.0, and 0a:00.a - convert the colon and period to underscores and you can detach them from the host:
# Detatch Devices from host
## GPU
virsh nodedev-detach pci_0000_21_00_0
virsh nodedev-detach pci_0000_21_00_1
## PCIe USB Controller Card
virsh nodedev-detach pci_0000_05_00_0
virsh nodedev-detach pci_0000_0a_00_0
Creating the VM
Now that the hypervisor is setup, devices for PCIe passthrough are detached from the host, the Windows VM can finally be made - as defined this will create a VM as follows:
- 32GB of RAM
- 6 CPU Cores
- Windows 10 Pro ISO Mounted to the virtual CD Drive
- A Hard Disk of 250GB in the default Libvirt paths
- The VirtIO ISO mounted as an additional disk
- PCIe Passthrough of the GPU device addresses
- PCIe Passthrough of the PCIe USB Controler device addresses
- A network bridged to the interfaces created earlier so the VM can be accessible from any system on the wider network
- Remote VNC
- Automatic booting of the VM on host boot
- No automatic attachment to the console - this allows the install to complete in the background
- Full hardware virtualization with KVM
- No memory balooning and pass the host CPUs through
- Hide that this is a KVM instance
- A SCSI controller
- Specify the VM varient and type (Windows in this case)
- And just a non-destruction reboot event
# Build VM
virt-install --name=vroom \
--vcpus "sockets=1,cores=6,threads=1" \
--memory=32772 \
--cdrom=/mnt/isos/Windows10Pro64bit.iso \
--disk size=250,path=/var/lib/libvirt/images/vroom.qcow2,cache=none \
--disk /var/lib/libvirt/images/virtio-win.iso,device=cdrom,bus=sata \
--hostdev=21:00.0,address.type=pci,address.multifunction=on --hostdev=21:00.1,address.type=pci \
--hostdev=05:00.0,address.type=pci,address.multifunction=on --hostdev=0a:00.a,address.type=pci,address.multifunction=on \
--network bridge=bridge0,model=virtio \
--graphics vnc,listen=0.0.0.0,tlsport=-1,defaultMode='insecure' \
--autostart --noautoconsole \
--hvm --virt-type kvm \
--memballoon none --cpu host-passthrough \
--features kvm_hidden=on \
--controller type=scsi,model=virtio-scsi \
--os-variant=win10 --os-type=windows \
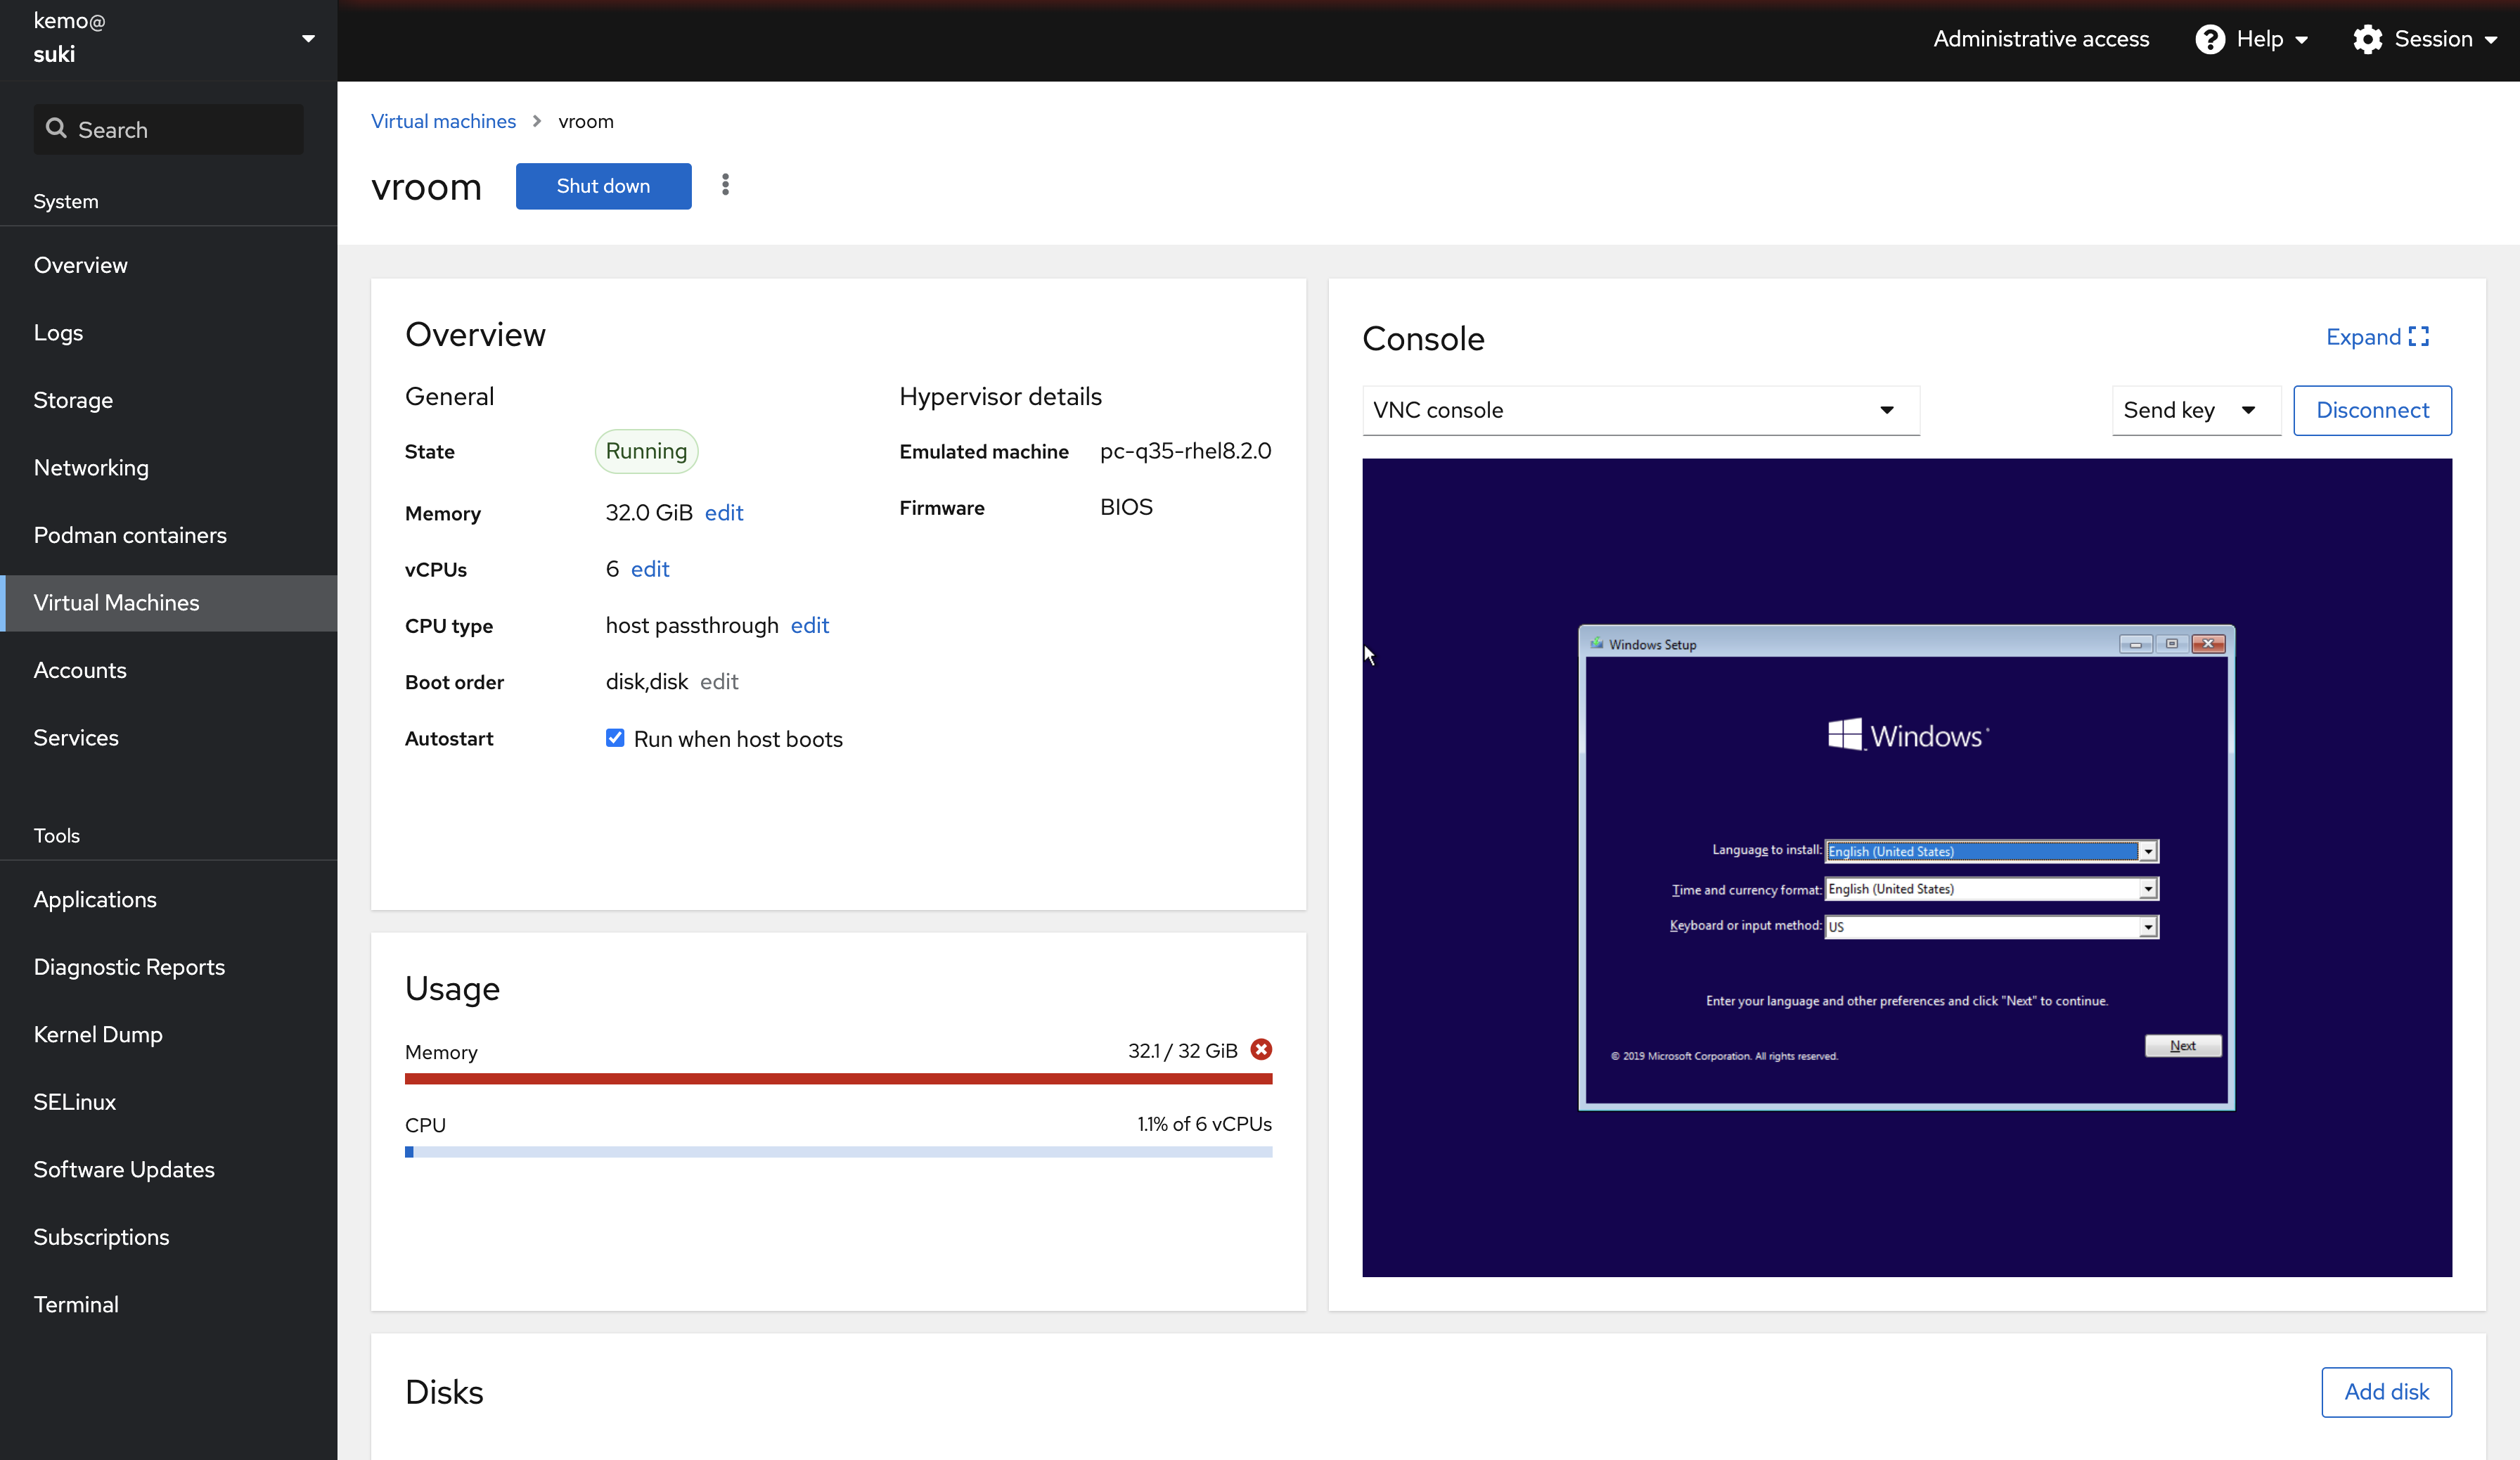
--events on_reboot=restartFrom this point, head to Cockpit at port 9090 (you’re using Cockpit, right?), dive into the Virtual Machines application, and you can complete the installation via the VNC there - or do so from the physical keyboard/monitor/mouse connected to the system and passed through via the GPU and PCIe USB card:
Bonus: Windows 10 Bootstrapping
So installing Windows is pretty straightforward - once it’s installed there are a few things I like to do that help set things up quickly:
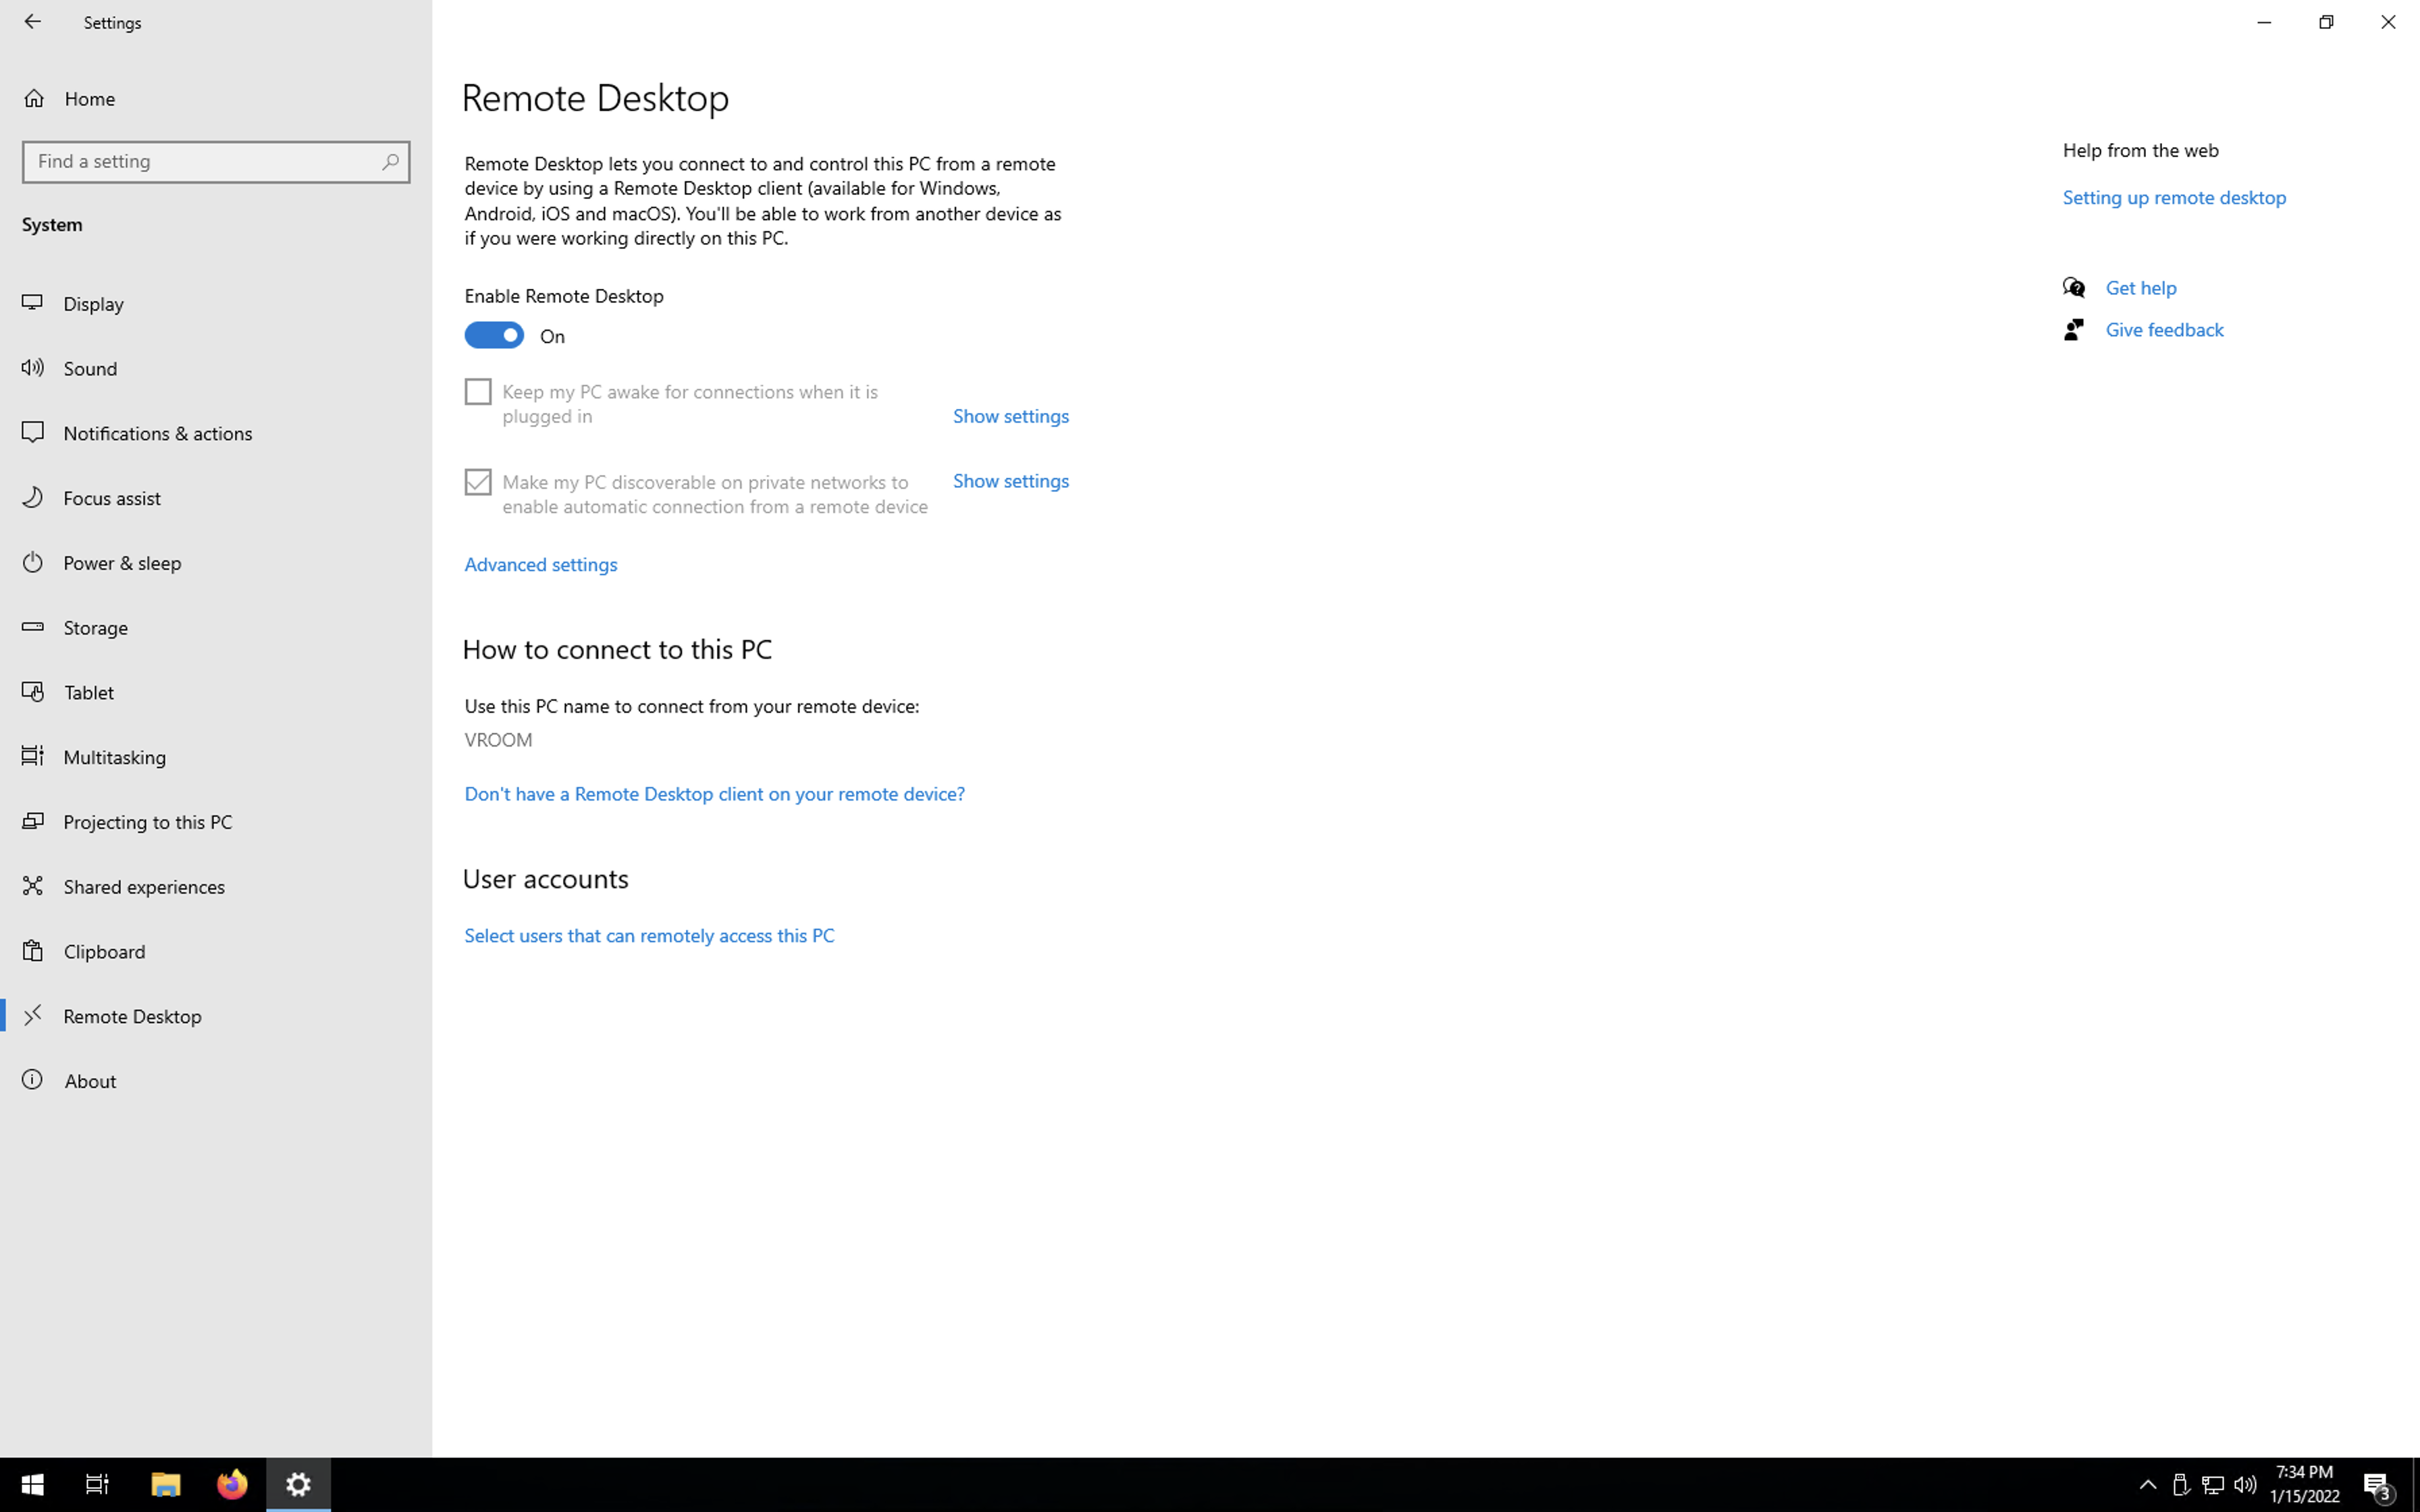
- Set a Static IP and enable Remote Desktop Connections
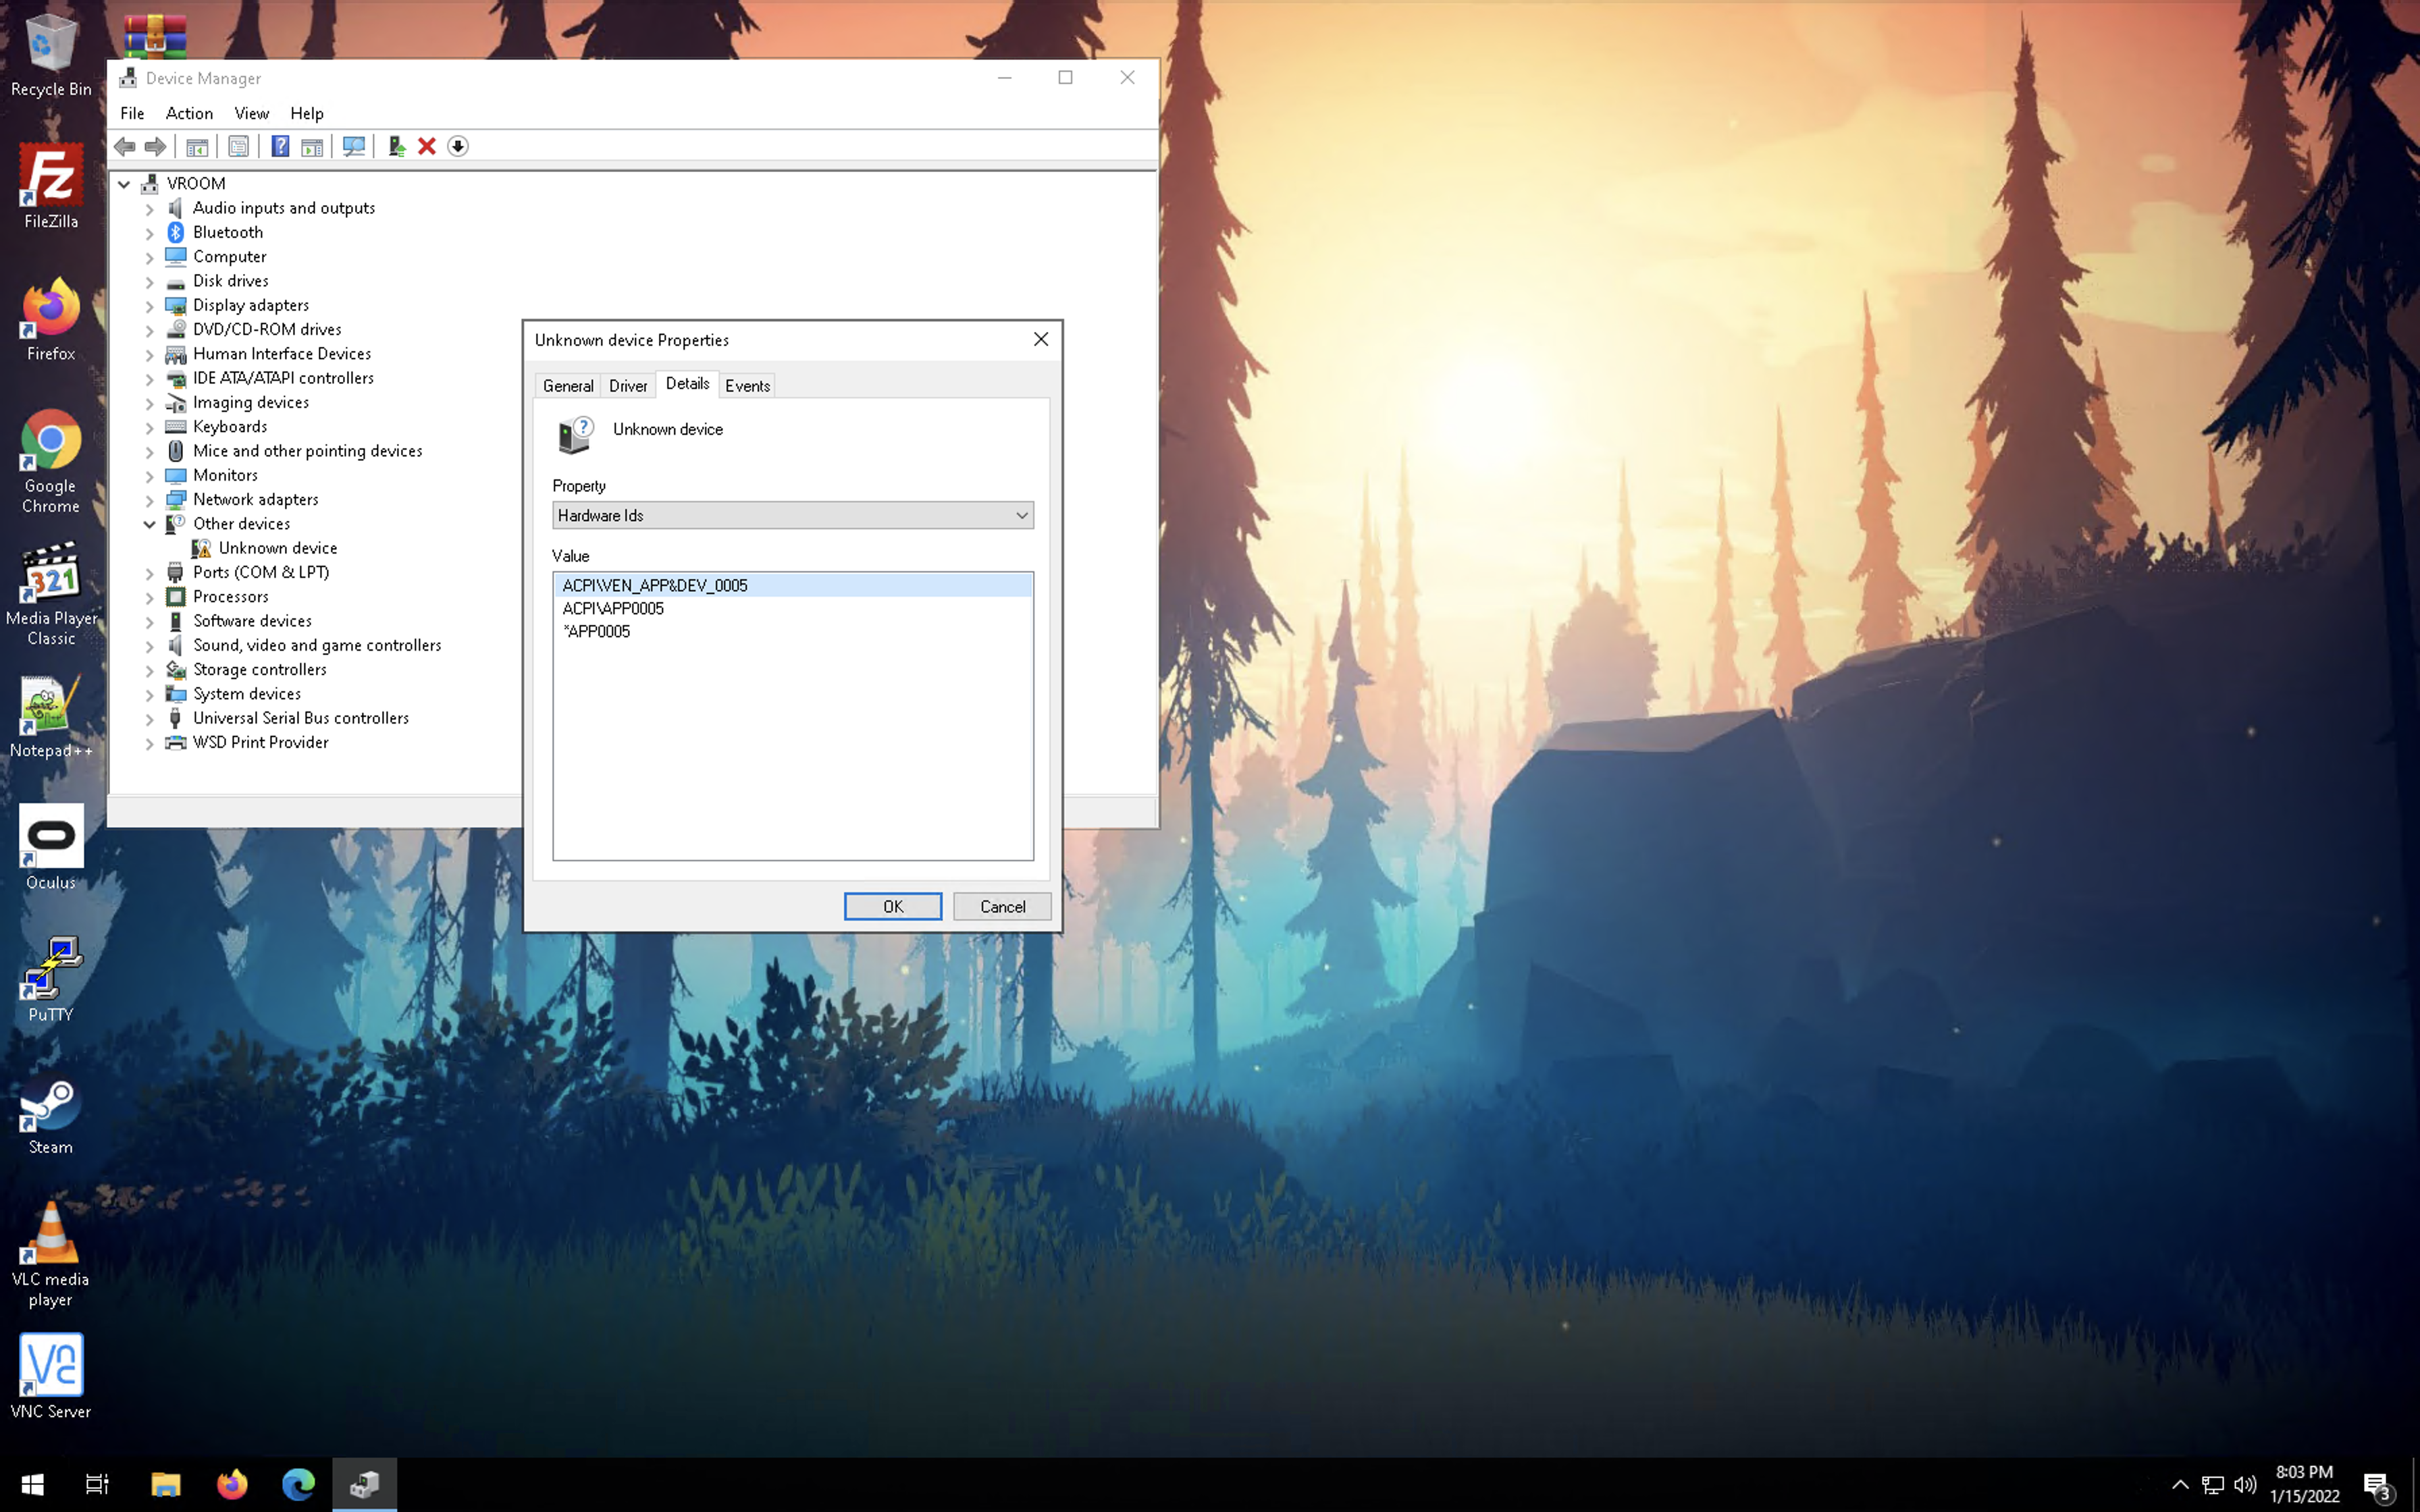
- Install drivers via Device Manager - some you’ll need to specify to look for driver files in the mounted VirtIO CD-ROM - there will be an Unknown Device which is normal, it’s some weird QEMU device bug
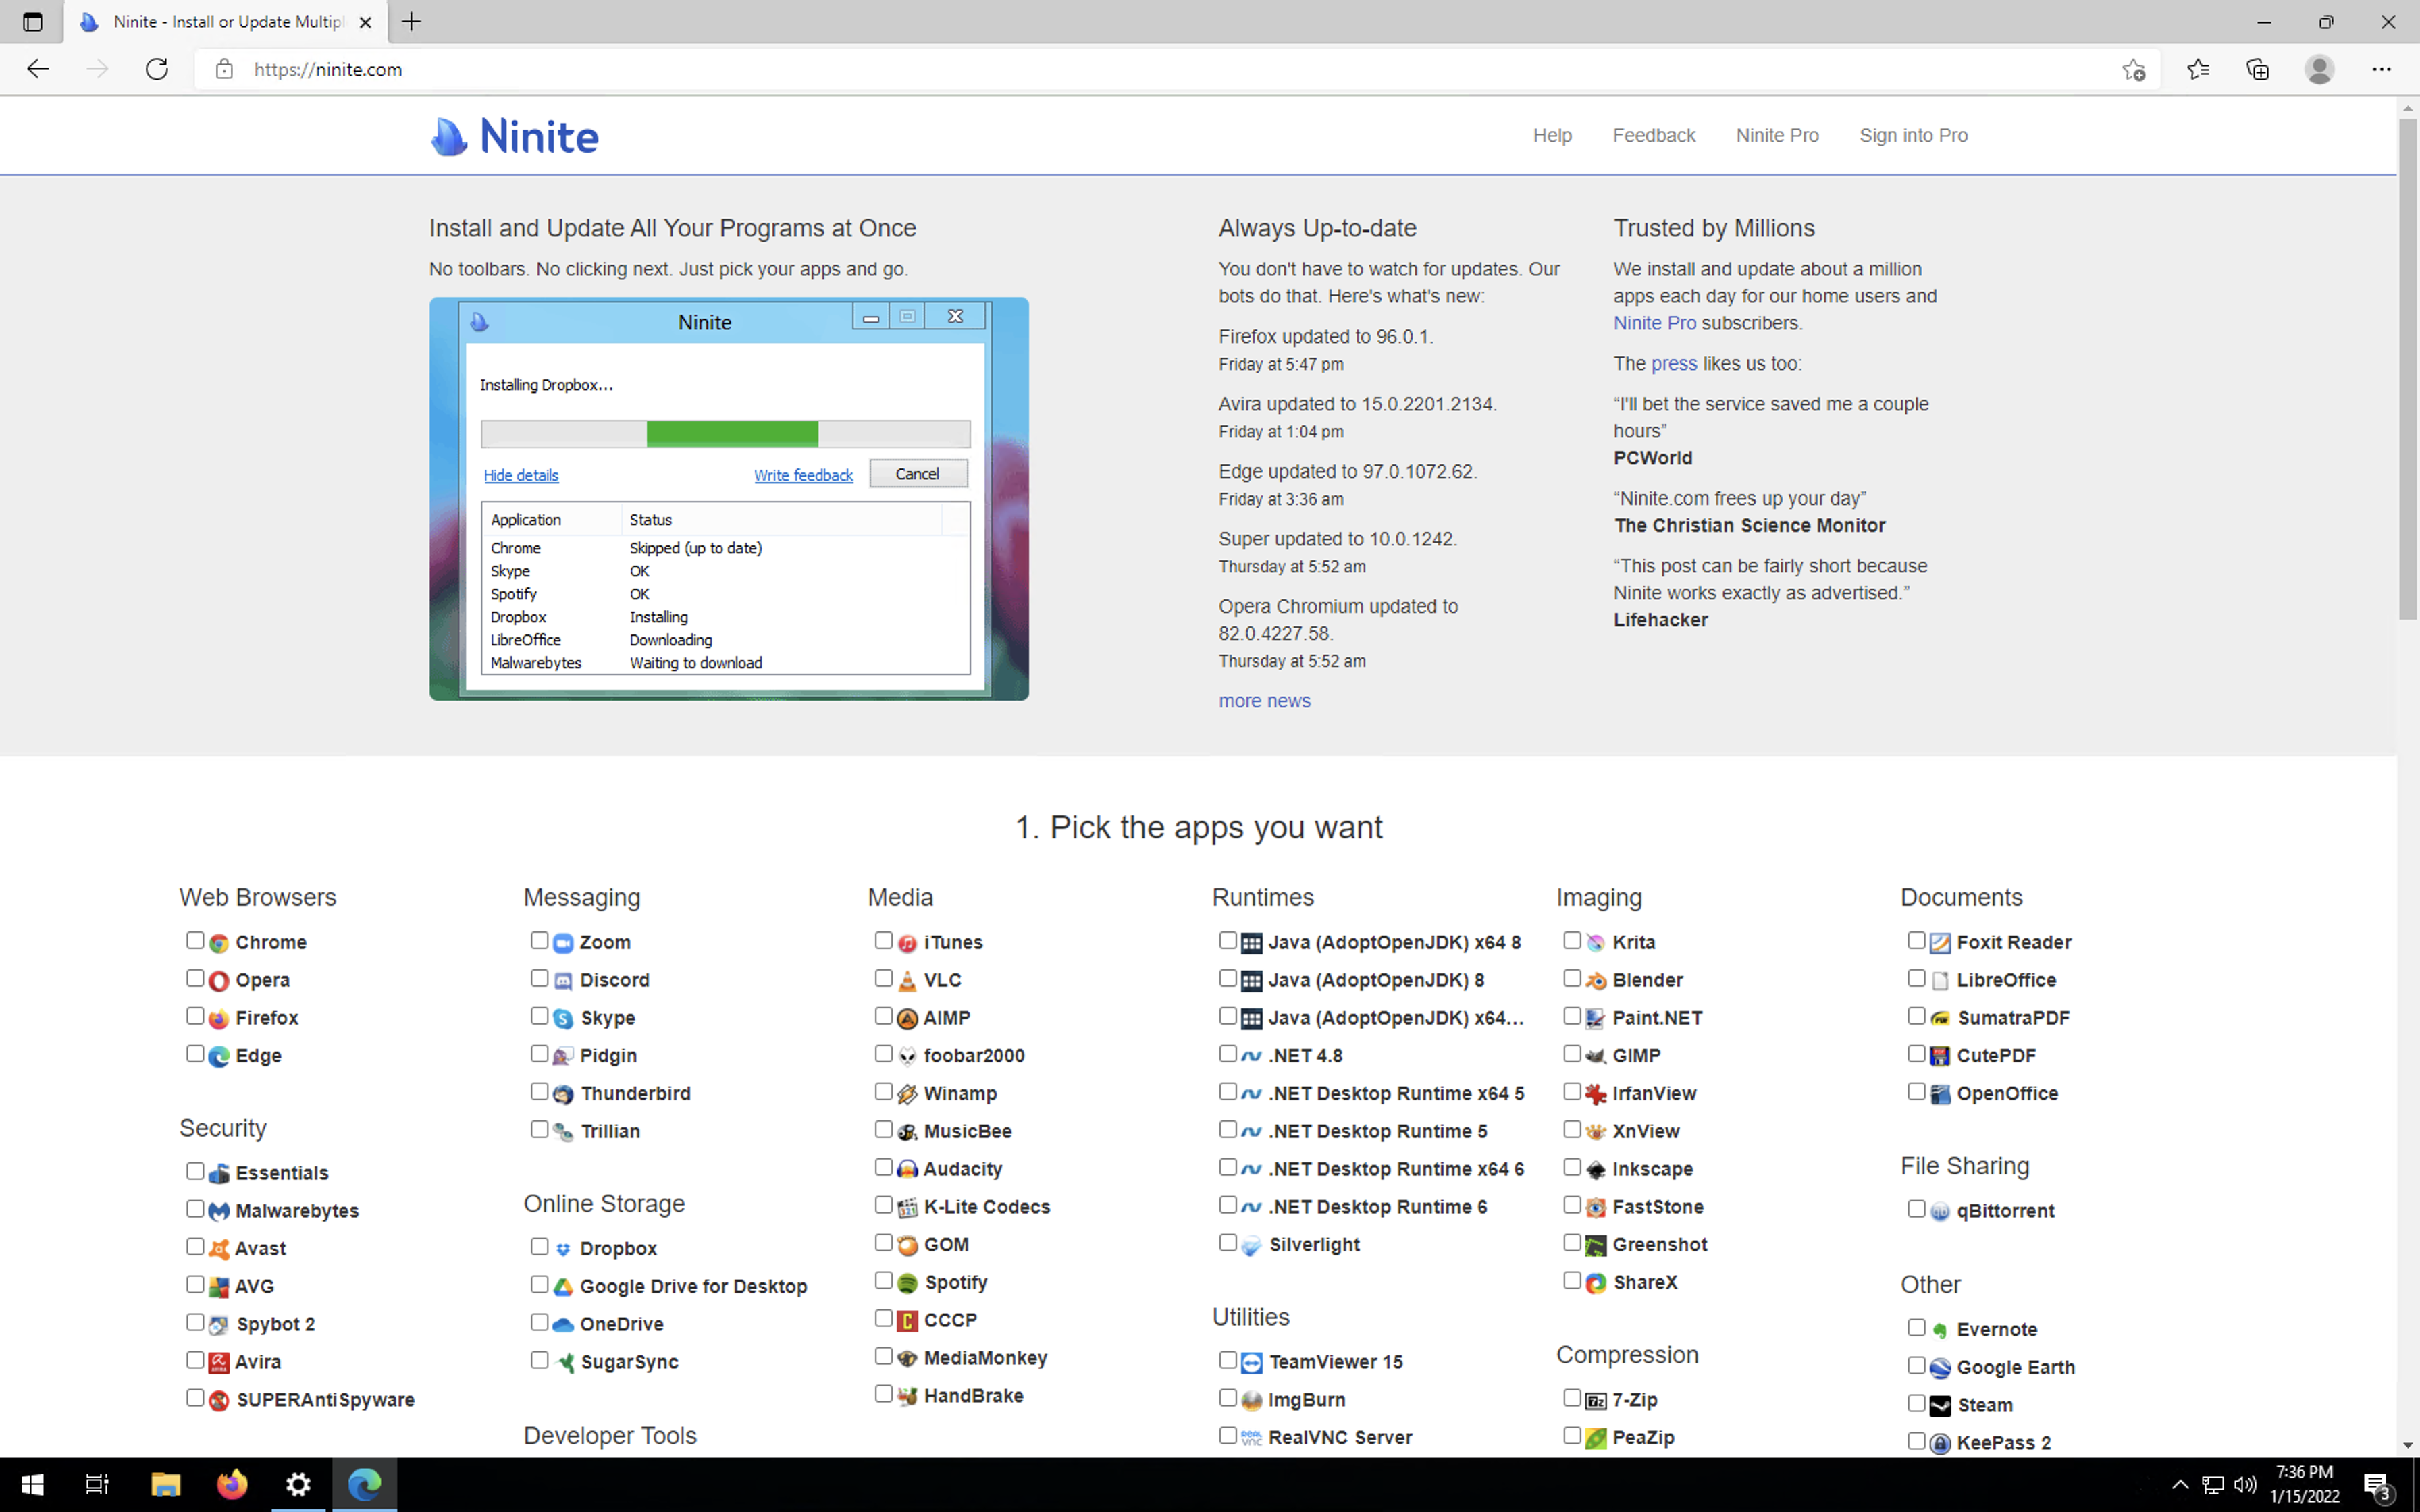
- Use Ninite to quickly install Firefox, Steam, different runtimes like Java, etc
- Perform a Windows Update, then check for more Windows Updates until there are no more left to download - make sure to also install Feature Updates
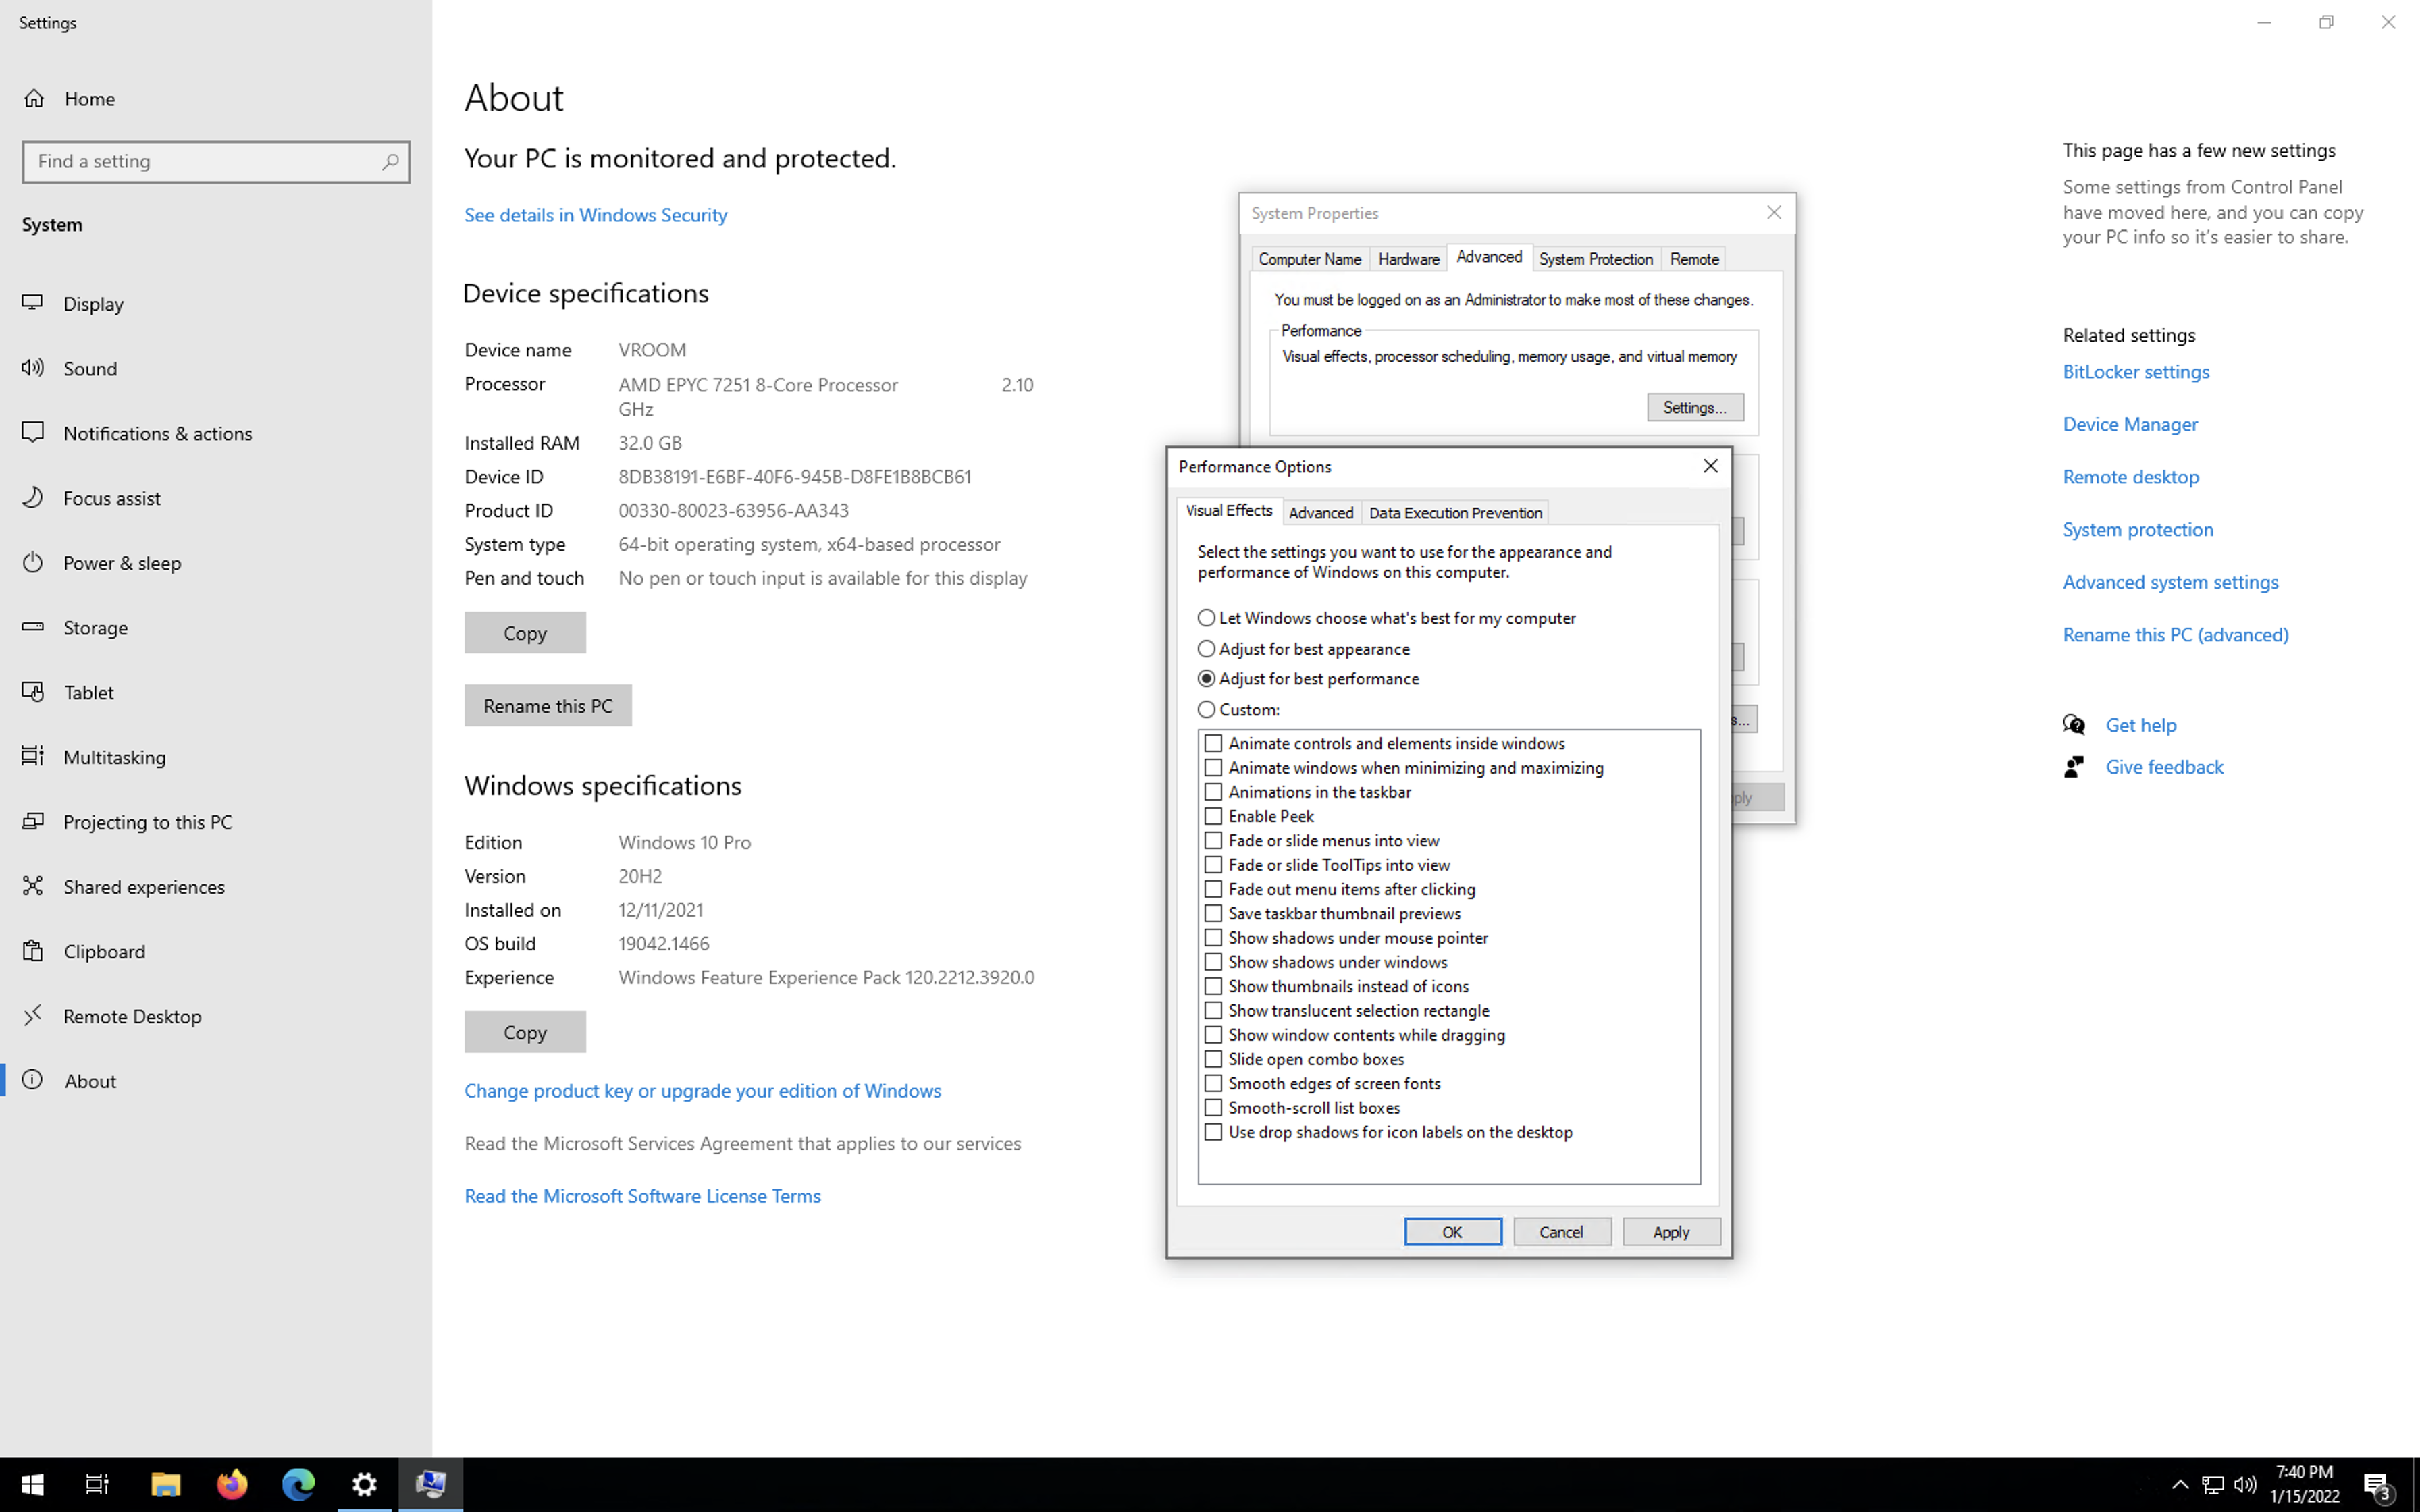
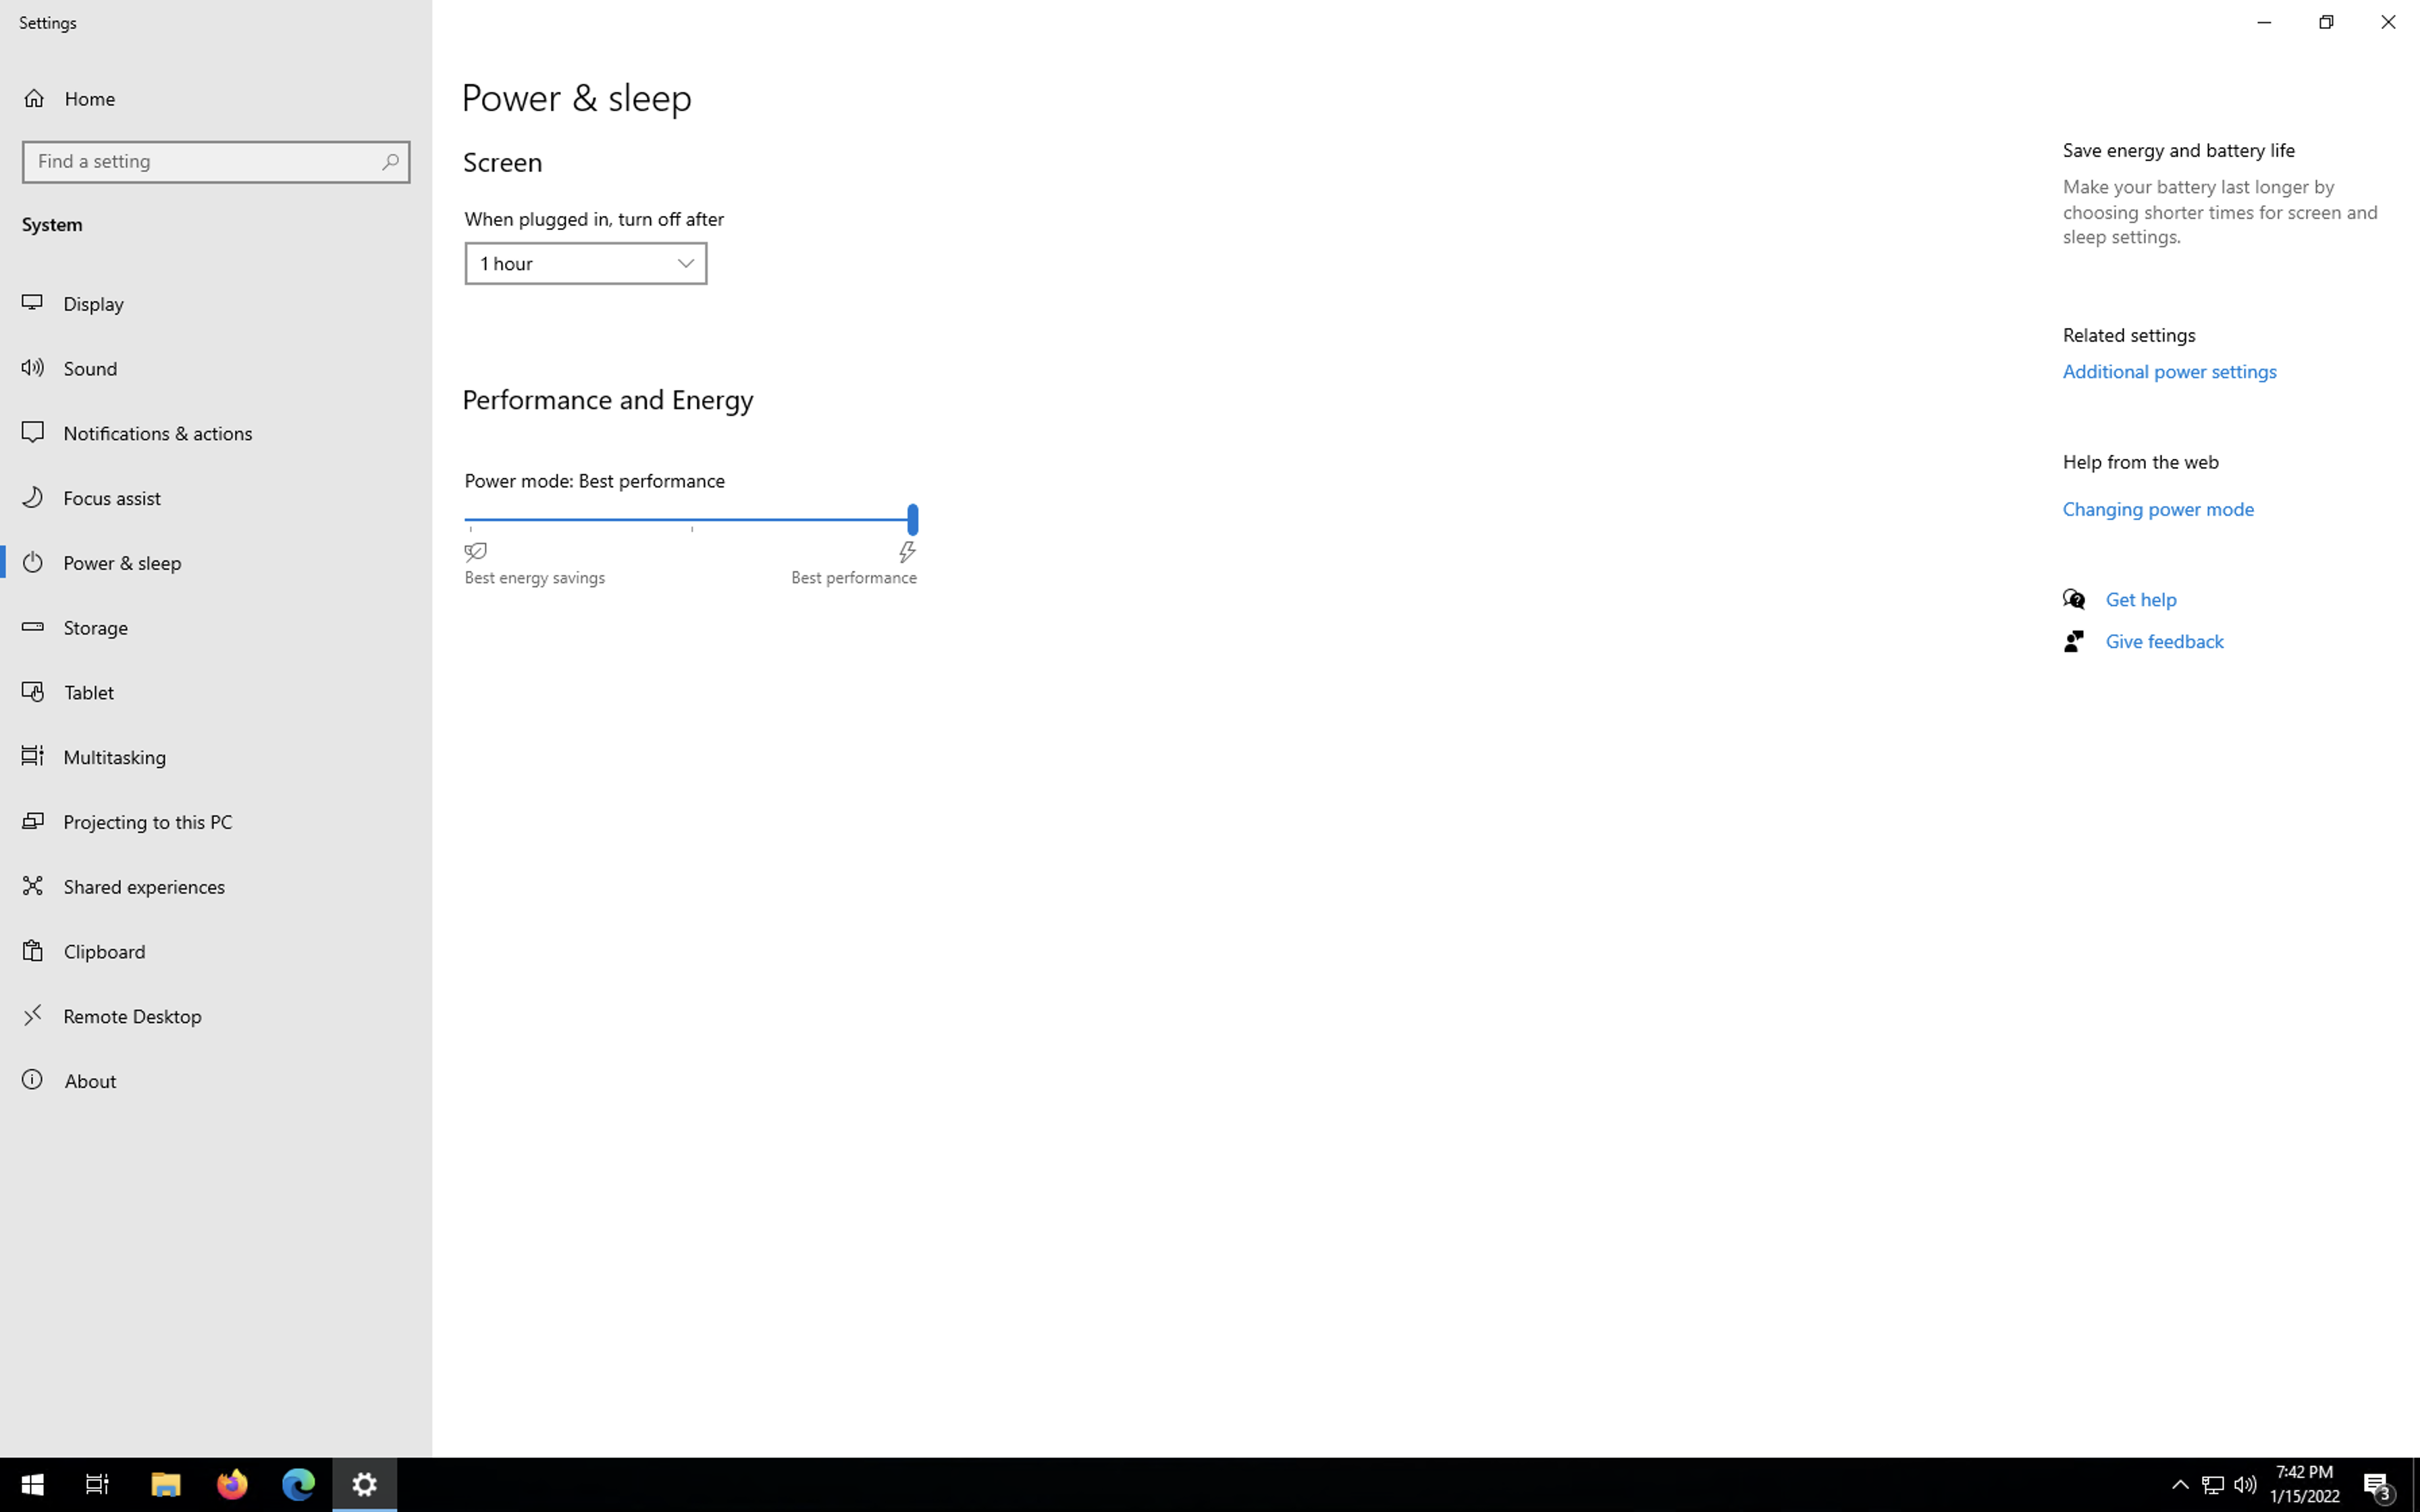
- Set Windows to High Performance in:
- Settings > About > Advanced system settings > Performance, Settings… > Adjust for best performance
- Settings > Power & sleep > Performance and Energy > Best Performance