

Don’t forget to lace up your sneaker(net)s — this is a long trip
Today’s exercise in the ever popular category of “Yeah, sure, why not?" we’ll be exploring a popular topic and my favorite way of deploying OpenShift, BU be damned, the Assisted Installer!
But not just the OpenShift Assisted Installer Service - how to deploy it as a self-hosted service in a disconnected environment!
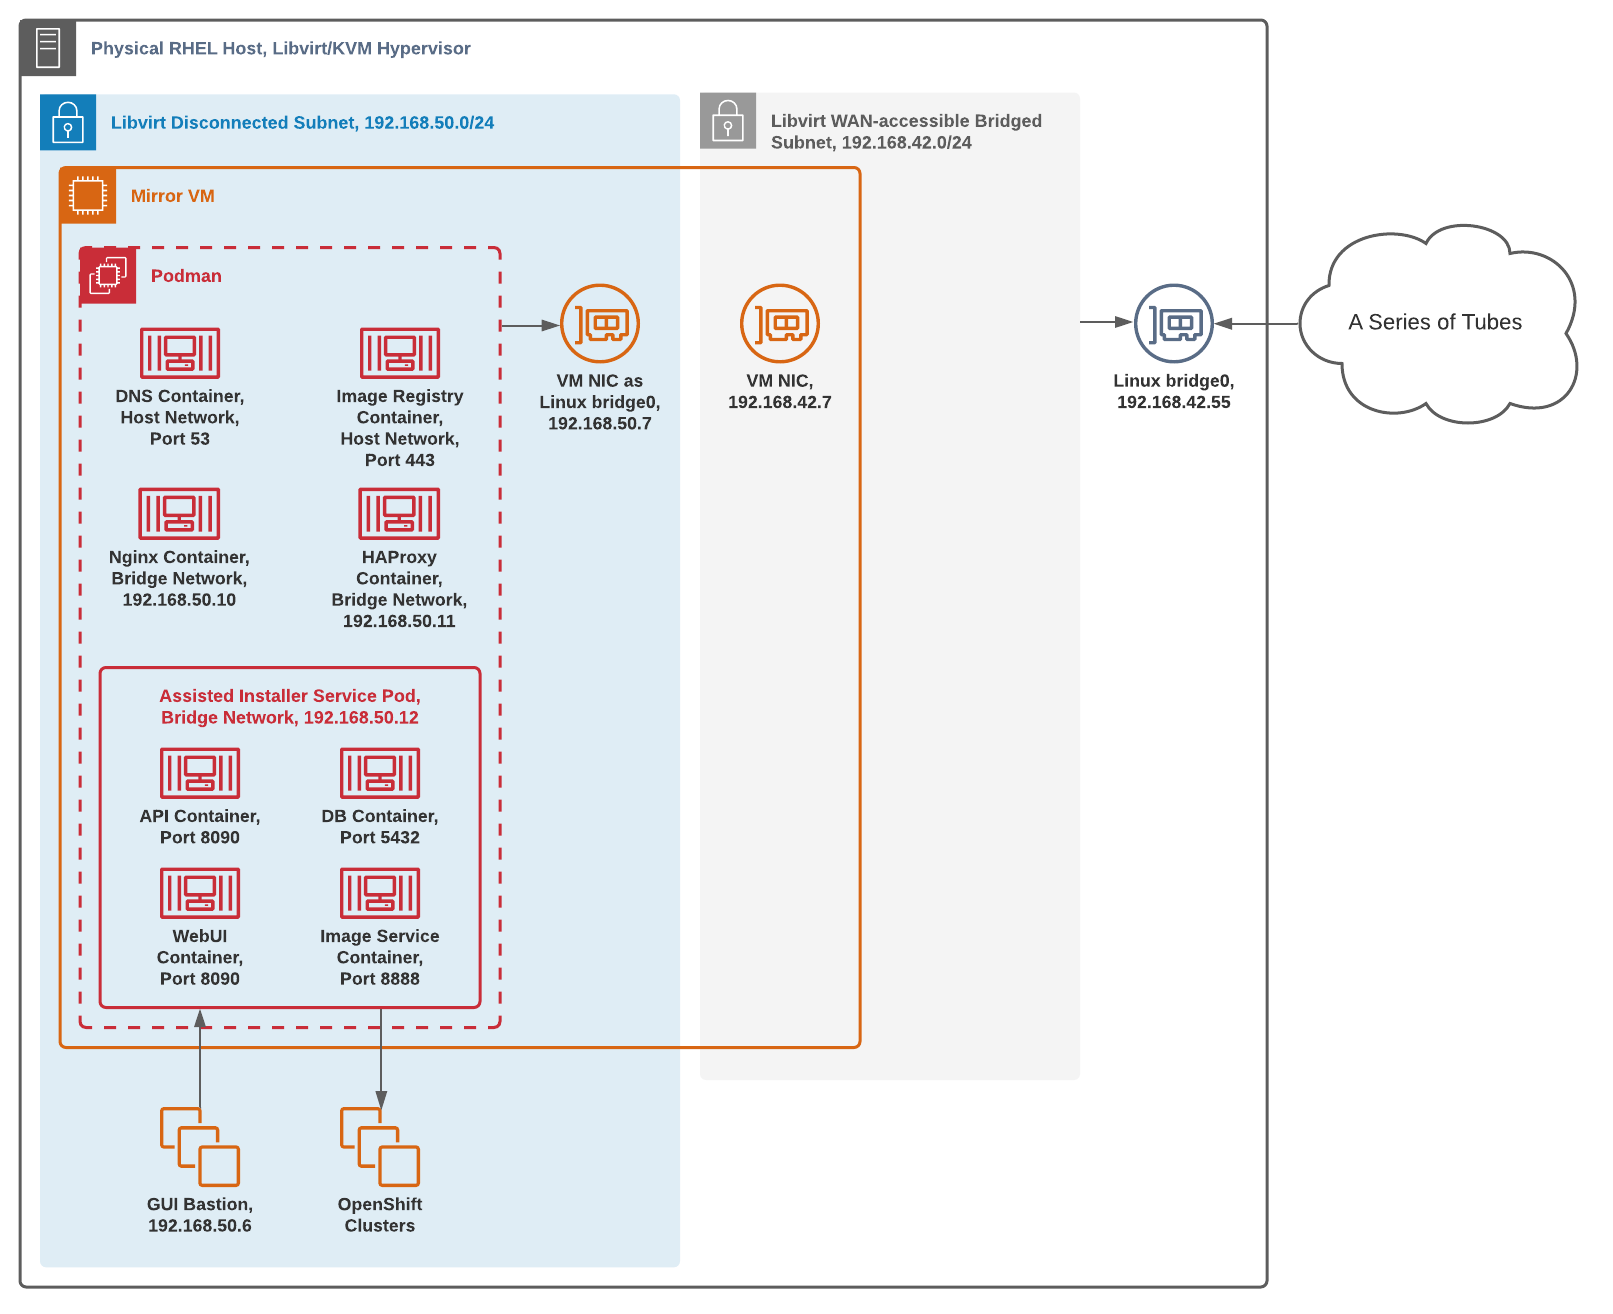
The following demonstration will be done on a single RHEL physical host with Libvirt installed utilizing two different networks, a bridged public and an isolated private subnet with the Mirror VM in both. This can be done in an actual air-gapped environment and on any hypervisor or infrastructure with little modification.
The tl;dr repo is here if you're more inclined to run Bash scripts from strangers on the Internet:
https://github.com/kenmoini/oas-disconnected
Assisted Installer Architecture
In case you’re not familiar with it, the Red Hat OpenShift Assisted Installer Service (OAS) is an automated and API-driven approach to infrastructure agnostic OpenShift deployments - all you need is to cut some IPs, set up some DNS, and boot an ISO ‐ a few clicks later and you’ll have a fancy OpenShift cluster in no time.
The primary Tech Preview version of the service is hosted online, however we can host this ourselves in our own networks with little effort - I’ve hosted it in my lab for sometime and it simply just pulls resources from Quay and the Red Hat registries where needed.
To do so in a disconnected fashion is pretty much the same process as any OpenShift disconnected deployment - you gotta mirror some content and serve it via a container registry and HTTP server. The only additional components and steps required really are what Assisted Installer imposes:
- Agent & Controller container set
- Back-end API service
- Front-end Web UI
- Image service
- PostgreSQL database
Disconnected Mirroring & Deployment Overview
Before jumping right into things, let’s take a quick overview of the steps that will be taken to mirror OpenShift, the Operator Catalog, and the Assisted Installer…
Low-side, internet connected steps:
- Create a Mirror VM, install packages & configure system basics
- Query the Red Hat-hosted OpenShift Assisted Installer Service API for the currently supported versions it serves so we can easily and quickly replicate the same version maps
- Configure DNS Services
- Set up a Certificate Authority and basic PKI
- Create an HTPassword file to authenticate to the mirrored Container Registry
- Deploy said Container Registry
- Create a set of Pull Secrets to pull from the RH Registry and push to the mirrored Container Registry
- Loop through the versions targeted from our previous API query and:
- Download the OpenShift binaries and matching Red Hat CoreOS
- Mirror the OpenShift release images
- Extract the openshift-install binary from the mirrored images
- Map additional version details for use in the Assisted Service
- Mirror the Operator Catalog container images
- Mirror the Assisted Installer Service container images
- Mirror additional container images for HAProxy and Nginx
- Create configuration and SystemD services for running the Podman containers
From there you could bundle everything up in a TAR archive file and move it to a disconnected environment…
High-side, disconnected network steps:
- Create a Mirror VM, install packages & configure system basics
- Extract archive bundle
- Start the Container Registry
- Start the HAProxy and Nginx services
- Start the Assisted Installer Service
- Use the Assisted Installer Service WebUI or API to create an OpenShift cluster or few
For our intents since these actions are all being performed on a single Mirror VM sitting between the two networks, we’ll just consolidate the creation of Mirror VMs and skip the archive/extraction process, doing all the steps on that single VM.
Note: With the OpenShift release and Operator Catalog mirrored you could also use the mirrored assets to deploy OpenShift via IPI/UPI if you so choose to do so instead of the Assisted Service.
Libvirt Lab Architecture
If you’re following this as an exercise step-by-step, you’ll need a physical RHEL 8 host, or a RHEL 8 VM that is enabled with Nested Virtualization - either way, you’ll need Libvirt installed on RHEL.
With Libvirt we can create a disconnected network environment virtually, as well as a bridged network to a subnet with Internet access. That will allow us to use a single Mirror VM with two NICs, one to access the public internet and another to act as a repository in the disconnected network.
Note: This can be done on any hypervisor platform just as easily so if you don’t have Libvirt and instead use Nutanix’s AHV or vSphere then just make a RHEL VM and skip down to the Mirror VM Setup section.
RHEL Host Requirements
If you don’t have a physical system to perform these steps, or are performing this disconnected deployment on another hypervisor or set of systems then you can skip this section - but make sure you have similarly spec’d resources as listed right below.
This [Libvirt] hypervisor host needs:
- One physical NIC for a bridged network to the Internet
- 400-500GB of disk space for the Mirror VM per mirrored OpenShift release - double that when archiving
- 2 vCPUs for the Mirror VM
- 8GB of RAM for the Mirror VM
- [Optional] 2 vCPUs for the GUI Bastion VM
- [Optional] 4GB of RAM for the GUI Bastion VM
- Additional resources to deploy OpenShift
RHEL Hypervisor Preflight & Bootstrap
First let’s install Libvirt/KVM and some other tools:
## Check if you have virtualization enabled
VIRT_TEST=$(cat /proc/cpuinfo | egrep "vmx|svm" | wc -l)
if [[ $VIRT_TEST -eq 0 ]]; then
    echo "Virtualization is not enabled on this host.  Please enable it and try again."
    exit 1
fi

## Update base system
dnf update -y

## Install libvirt
dnf install @virt -y

## Install Python
dnf install python3 -y

## Install supporting tools [optional]
dnf install libvirt-devel virt-top libguestfs-tools cockpit-machines -y
## Enable Cockpit [optional]
systemctl enable --now cockpit.socket

## Enable Libvirt
systemctl enable --now libvirtd
Bridge Network Interface Creation
Prior to creating the Libvirt Networks and VMs there needs to be a bridged network interface created from the physical interface on the hypervisor host - you can do so with the following:
## Create the bridge, assuming a name of bridge0
nmcli con add type bridge con-name bridge0 ifname bridge0

## Configure the bridge
## Substitute $DNS1, $GATEWAY, $IPADDR, $PREFIX, and $NETWORK_DOMAIN to match your internet-connected LAN
nmcli con mod bridge0 \
 ipv4.dns $DNS1 \
 ipv4.gateway $GATEWAY \
 ipv4.addresses "${IPADDR}/${PREFIX}" \
 ipv4.dns-search "$NETWORK_DOMAIN" \
 ipv4.method manual \
 connection.autoconnect yes \
 connection.autoconnect-slaves yes

## Add the physical device, assuming it's enp0s1
nmcli con add type bridge-slave ifname enp0s1 master bridge0

## Bring the connection up
nmcli con up bridge0

## Delete the old physical connection
nmcli con delete enp0s1
Libvirt Network Setup
With Libvirt installed and started we can now create some Libvirt networks, a bridged network and an isolated network - create the following files:
/var/lib/libvirt/bridged-network.xml
<network>
  <name>bridge0</name>
  <forward mode="bridge"/>
  <bridge name="bridge0"/>
</network>
/var/lib/libvirt/disconnected-network.xml
<network>
  <name>isolatedNet</name>
  <bridge name="virbr50"/>
  <ip address="192.168.50.1" netmask="255.255.255.0">
    <dhcp>
      <range start="192.168.50.100" end="192.168.50.254"/>
    </dhcp>
  </ip>
</network>
Make sure that the 192.168.50.0/24 used in the disconnected network doesn’t overlap with your bridged network - there’s a range for DHCP and space before it for static IPs. The virbr50 device will be created automatically.
Next we’ll define the networks and start them:
virsh net-define /var/lib/libvirt/bridged-network.xml
virsh net-start bridge0
virsh net-autostart bridge0

virsh net-define /var/lib/libvirt/disconnected-network.xml
virsh net-start isolatedNet
virsh net-autostart isolatedNet
Assuming that all worked out well then your physical host should have Libvirt/KVM installed with two networks, one bridged to the host’s physical adapter that has access to the Internet so a connected VM can pull down the resources it needs to service the second disconnected virtual network as a mirror to install OpenShift and the Assisted Installer Service.
Note: There is also a default Libvirt network - you can disregard this network since we’ll be defining VMs with our two custom networks.
Creating a Mirror VM
Now that we have our physical Libvirt hypervisor host set up we can create our Mirror VM.
This VM will serve as a bridge between the disconnected network and serve all the mirrored content needed to host the Assisted Installer service as well as the mirrored containers, operators, and so on.
In high-security disconnected environments this mirror VM is not usually a bastion host sitting in between the two networks. There is often a system in the DMZ/low-side that is able to download the needed files, then it is copied onto a physical device that is then physically moved to the secure/high-side disconnected network’s ingress point. This ingress point is usually a system with a sophisticated data diode and scanner, which once cleared can be copied to a system in the disconnected network to serve as the internal registry. This mirror VM that is sitting between the two networks reduces that need to physically move and copy data to another system, thus reducing the steps and storage requirements in this exercise.
Assuming you have the latest RHEL 8.5 ISO located at /var/lib/libvirt/images/rhel8.5.iso, then create the Mirror VM as such:
## Set networking configuration
MIRROR_VM_HOSTNAME="mirror-vm"

# MIRROR_VM_BRIDGE_IFACE_IP is the IP for the internet-connect Mirror VM NIC.
# Change the following to a static IP in your LAN's network space
MIRROR_VM_BRIDGE_IFACE_IP="192.168.42.7"
MIRROR_VM_BRIDGE_IFACE_NETMASK="255.255.255.0"
MIRROR_VM_BRIDGE_IFACE_GATEWAY="192.168.42.1"
MIRROR_VM_BRIDGE_IFACE_DNS="192.168.42.9"

# MIRROR_VM_ISOLATED_NETWORK_IFACE_IP is the IP for the Mirror VM's NIC in the virtual air-gapped/disconnected/isolated network.
# The following don't need to be changed unless you changed the disconnected Libvirt network
MIRROR_VM_ISOLATED_NETWORK_IFACE_IP="192.168.50.7"
ISOLATED_NETWORK_NETMASK="255.255.255.0"
ISOLATED_NETWORK_GATEWAY="192.168.50.1"

## Generate a root password hash - ideally replace 'aSecurePassword'
ROOT_PW_HASH=$(python -c "import crypt; print crypt.crypt('aSecurePassword')")

## Create a Kickstart File
cat > /var/lib/libvirt/kickstart.mirror-vm.cfg << EOF
rootpw $ROOT_PW_HASH --iscrypted

network --device=enp1s0 --bootproto=static --ip=$MIRROR_VM_BRIDGE_IFACE_IP --netmask=$MIRROR_VM_BRIDGE_IFACE_NETMASK --gateway=$MIRROR_VM_BRIDGE_IFACE_GATEWAY --nameserver=$MIRROR_VM_BRIDGE_IFACE_DNS

network --device=enp2s0 --bootproto=static --ip=$MIRROR_VM_ISOLATED_NETWORK_IFACE_IP --netmask=$ISOLATED_NETWORK_NETMASK --gateway=$ISOLATED_NETWORK_GATEWAY --nameserver=$MIRROR_VM_ISOLATED_NETWORK_IFACE_IP

network --hostname=$MIRROR_VM_HOSTNAME

#platform x86_64
lang en_US
keyboard us
timezone America/New_York --isUtc
reboot --eject
eula --agreed
text --non-interactive
cdrom
bootloader --append="rhgb quiet crashkernel=auto"
zerombr
clearpart --all --initlabel
autopart --type=lvm --nohome
auth --passalgo=sha512 --useshadow
selinux --permissive
firewall --disabled
skipx
firstboot --disable

%packages
@^minimal-environment
kexec-tools
curl
jq
cockpit
cockpit-podman
podman
skopeo
nano
nfs-utils
bash-completion
bind-utils
httpd-tools
tar
tmux
%end

services --enabled="sshd"
services --enabled="cockpit.socket"
EOF

## Create the Mirror VM
virt-install --name=$MIRROR_VM_HOSTNAME \
 --vcpus "sockets=1,cores=2,threads=1" --memory="8192" \
 --disk "size=500,path=/var/lib/libvirt/images/$MIRROR_VM_HOSTNAME.qcow2,cache=none,format=qcow2" \
 --location /var/lib/libvirt/images/rhel8.5.iso \
 --network network=bridge0,model=virtio \
 --network network=isolatedNet,model=virtio \
 --console pty,target_type=serial \
 --os-type linux --os-variant=rhel8.5 \
 --controller type=scsi,model=virtio-scsi \
 --hvm --virt-type kvm --features kvm_hidden=on \
 --graphics vnc,listen=0.0.0.0,tlsport=,defaultMode='insecure' \
 --memballoon none --cpu host-passthrough --autostart --noautoconsole --events on_reboot=restart \
 --initrd-inject /var/lib/libvirt/kickstart.$MIRROR_VM_HOSTNAME.cfg \
 --extra-args "inst.ks=file://kickstart.$MIRROR_VM_HOSTNAME.cfg console=tty0 console=ttyS0,115200n8"
At this point if you also have Cockpit installed and enabled with the cockpit-machines package then you can visually follow the install of the Mirror VM:
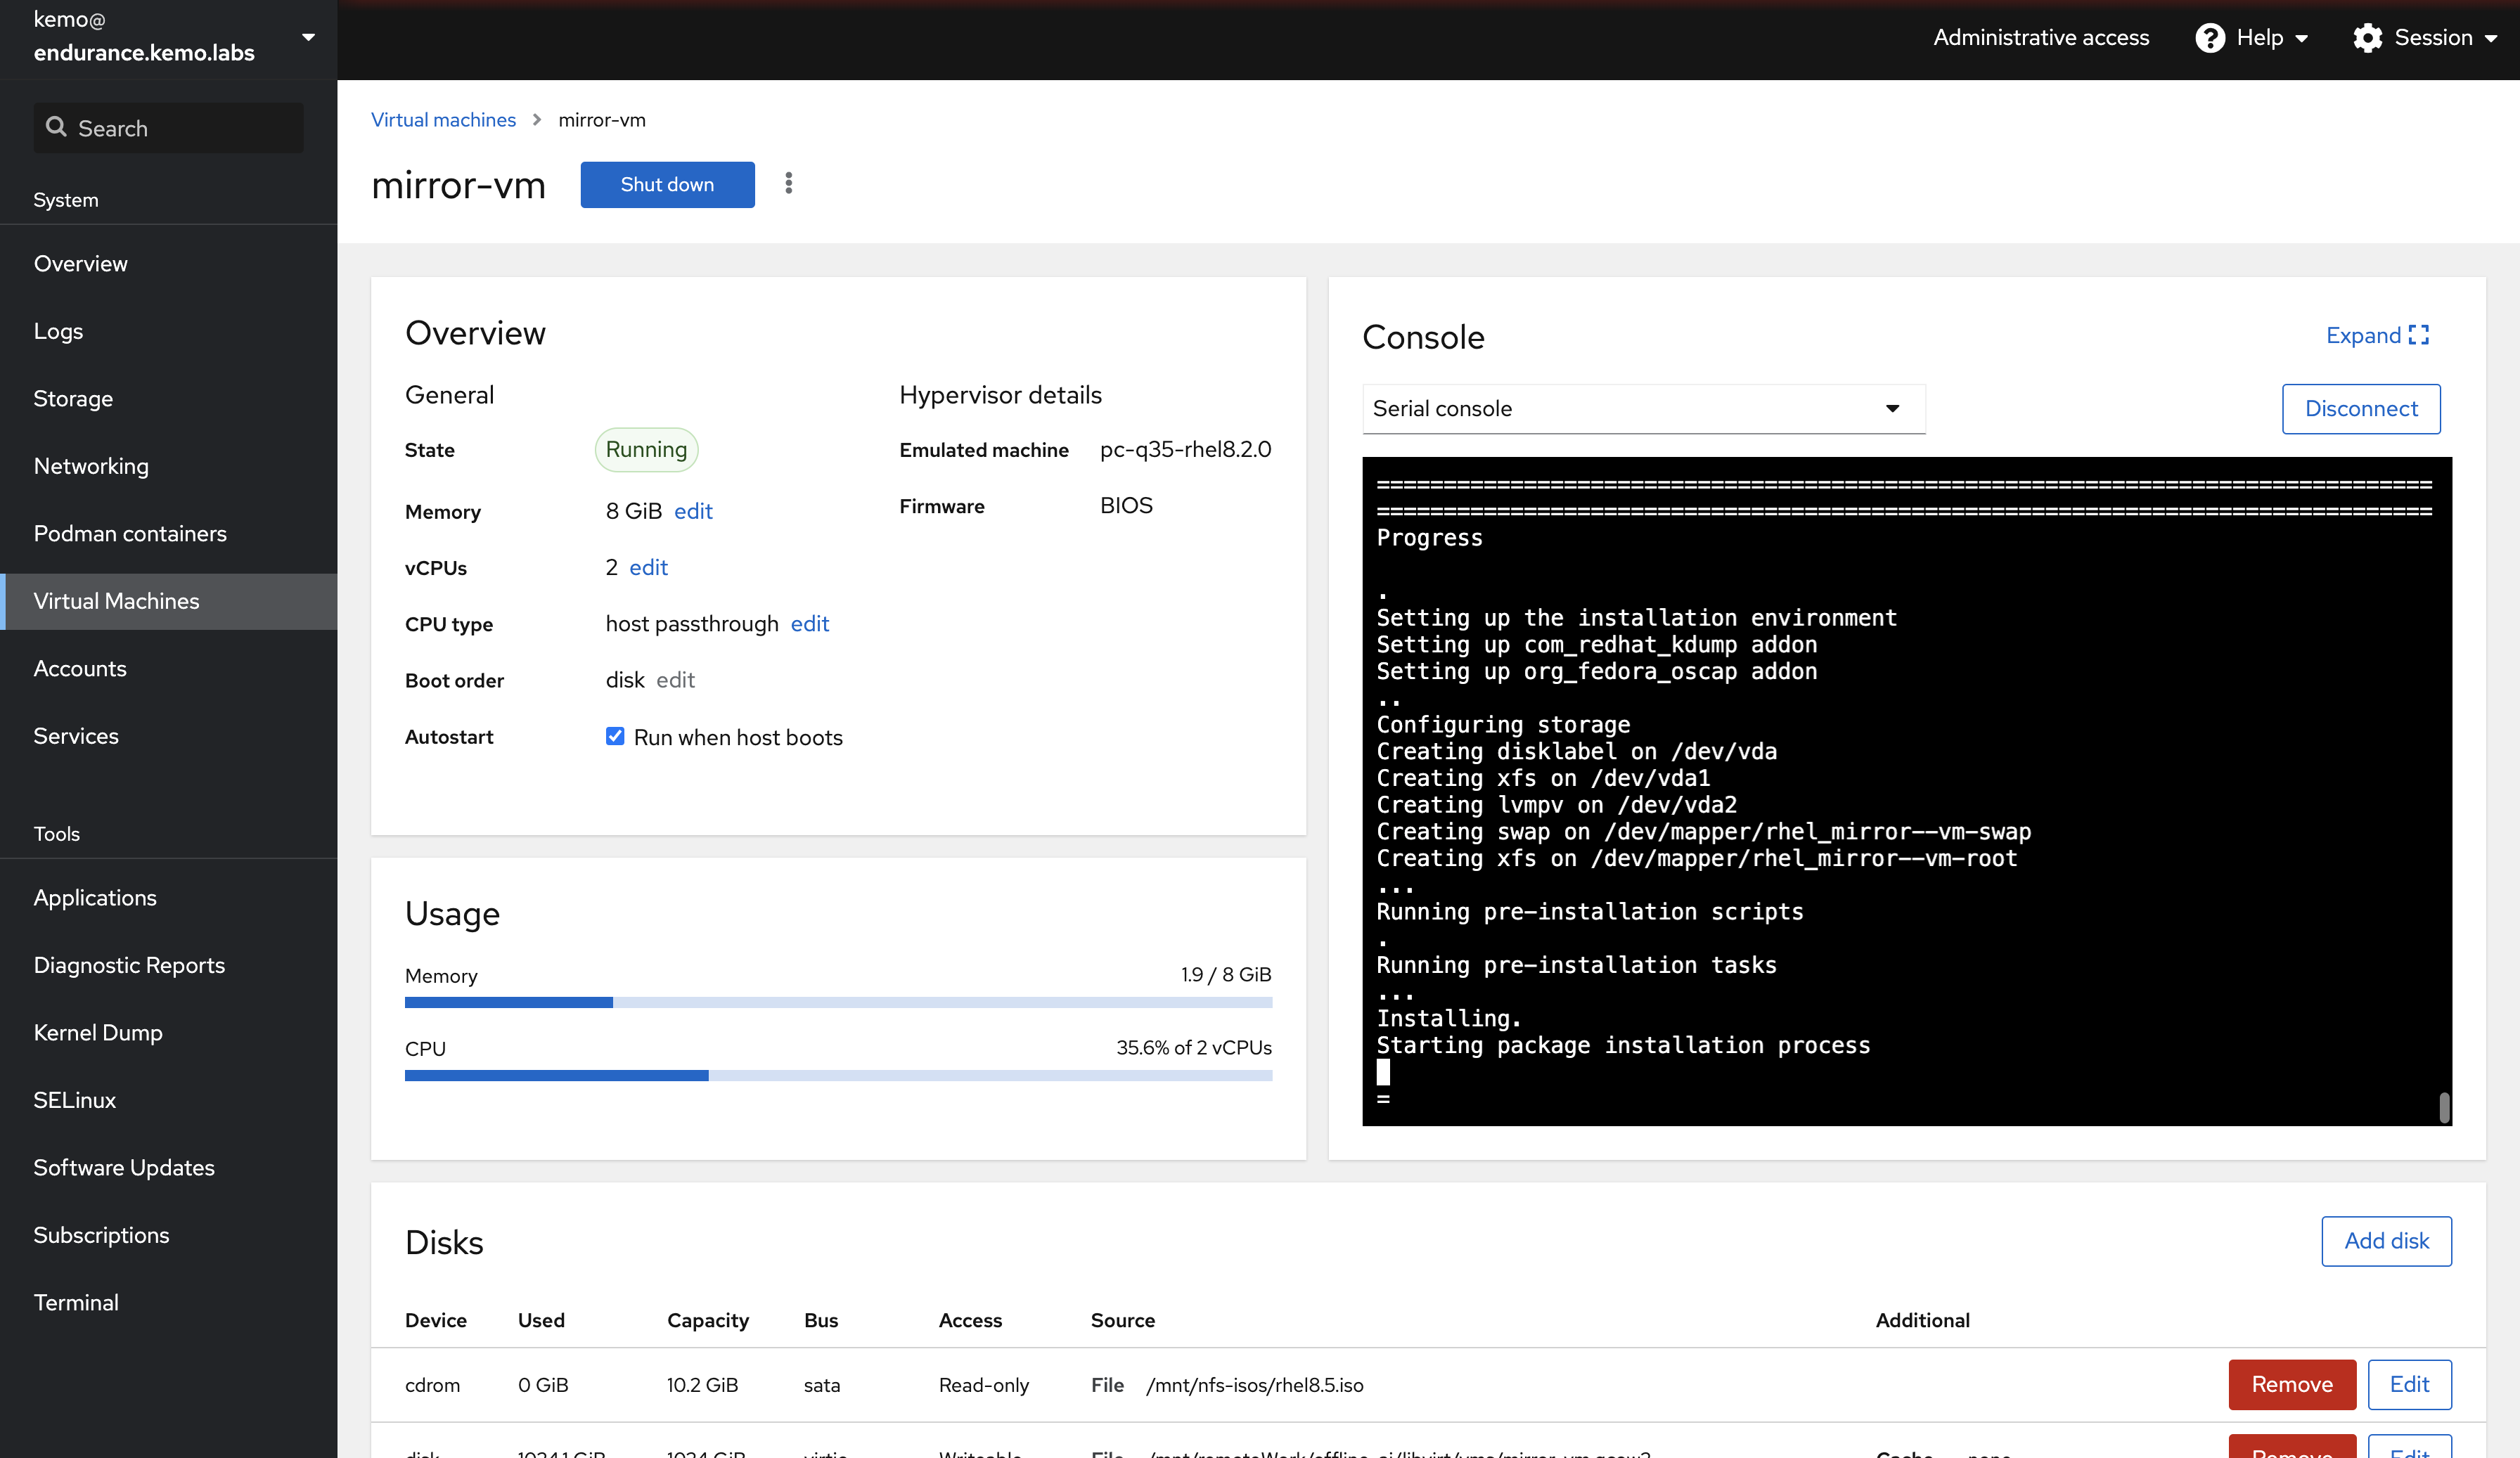
The VM will complete the install then shutdown - start it back up via Cockpit or via the CLI: virsh start $MIRROR_VM_HOSTNAME
Creating a GUI Bastion VM - Optional
To really make sure things are being routed and served properly it’s helpful to have another machine on the same Libvirt isolated network that can load the Assisted Installer Web UI and HTTP Mirror. You can rinse and repeat the the previous steps for making the Mirror VM to create another VM that will act as a GUI-enabled bastion.
## Generate a root password hash - ideally replace 'aSecurePassword'
GUI_BASTION_ROOT_PW_HASH=$(python -c "import crypt; print crypt.crypt('aSecurePassword')")

## Set networking configuration
GUI_BASTION_VM_HOSTNAME="bastion"

# GUI_BASTION_VM_ISOLATED_NETWORK_IFACE_IP is the IP for the GUI Bastion VM's NIC in the virtual air-gapped/disconnected/isolated network.
# The following don't need to be changed unless you changed the disconnected Libvirt network
GUI_BASTION_VM_ISOLATED_NETWORK_IFACE_IP="192.168.50.6"
ISOLATED_NETWORK_NETMASK="255.255.255.0"
ISOLATED_NETWORK_GATEWAY="192.168.50.1"

## MIRROR_VM_ISOLATED_NETWORK_IFACE_IP is used to target the DNS server running on the Mirror VM
MIRROR_VM_ISOLATED_NETWORK_IFACE_IP="192.168.50.7"

## Create a Kickstart File
cat > /var/lib/libvirt/kickstart.$GUI_BASTION_VM_HOSTNAME.cfg << EOF
rootpw $GUI_BASTION_ROOT_PW_HASH --iscrypted

network --device=enp1s0 --bootproto=static --ip=$GUI_BASTION_VM_ISOLATED_NETWORK_IFACE_IP --netmask=$ISOLATED_NETWORK_NETMASK --gateway=$ISOLATED_NETWORK_GATEWAY --nameserver=$MIRROR_VM_ISOLATED_NETWORK_IFACE_IP

network --hostname=$GUI_BASTION_VM_HOSTNAME

#platform x86_64
lang en_US
keyboard us
timezone America/New_York --isUtc
reboot --eject
eula --agreed
text --non-interactive
cdrom
bootloader --append="rhgb quiet crashkernel=auto"
zerombr
clearpart --all --initlabel
autopart --type=lvm --nohome
auth --passalgo=sha512 --useshadow
selinux --permissive
firewall --disabled
firstboot --disable

%packages
@^graphical-server-environment
kexec-tools
curl
jq
cockpit
nano
bash-completion
bind-utils
tar
tmux
firefox
%end

services --enabled="sshd"
services --enabled="cockpit.socket"
EOF

## Create the GUI Bastion VM
virt-install --name=$GUI_BASTION_VM_HOSTNAME \
 --vcpus "sockets=1,cores=2,threads=1" --memory="4096" \
 --disk "size=30,path=/var/lib/libvirt/images/$GUI_BASTION_VM_HOSTNAME.qcow2,cache=none,format=qcow2" \
 --location /var/lib/libvirt/images/rhel8.5.iso \
 --network network=isolatedNet,model=virtio \
 --console pty,target_type=serial \
 --os-type linux --os-variant=rhel8.5 \
 --controller type=scsi,model=virtio-scsi \
 --hvm --virt-type kvm --features kvm_hidden=on \
 --graphics vnc,listen=0.0.0.0,tlsport=,defaultMode='insecure' \
 --memballoon none --cpu host-passthrough --autostart --noautoconsole --events on_reboot=restart \
 --initrd-inject /var/lib/libvirt/kickstart.$GUI_BASTION_VM_HOSTNAME.cfg \
 --extra-args "inst.ks=file://kickstart.$GUI_BASTION_VM_HOSTNAME.cfg console=tty0 console=ttyS0,115200n8"
The following steps are performed on the Mirror VM
Mirror VM Setup
In other environments this Mirror VM could be a bare metal host or a VM on another hypervisor such as Nutanix’s AHV or vSphere - shoot there could even be two of them in two separate networks. The Preflight steps are done on any Mirror VM in scope.
Preflight
The Mirror VM is now created but there’s still a tiny bit of work to do to make it usable - one of the first things being subscribing RHEL. Once the Mirror VM has installed and booted, SSH into it and run the following commands:
## The Mirror VM's Hostname
MIRROR_VM_HOSTNAME="mirror-vm"
## ISOLATED_NETWORK_DOMAIN is the domain base for the Isolated Network
ISOLATED_NETWORK_DOMAIN="isolated.local"

## Set the Hostname
hostnamectl set-hostname $MIRROR_VM_HOSTNAME

## Extend the root partition
lvextend -l +100%FREE /dev/rhel/root
xfs_growfs /dev/mapper/rhel-root

## Register to RHSM
subscription-manager register
subscription-manager auto-attach

## Enable Repos
subscription-manager repos --enable codeready-builder-for-rhel-8-x86_64-rpms

## Do a base update
dnf update -y

## Install a few basic packages
dnf install curl wget tar jq podman skopeo httpd-tools openssl nano nfs-utils bash-completion bind-utils -y

## Set lower unprivileged ports for Podman
echo 0 > /proc/sys/net/ipv4/ip_unprivileged_port_start
Network Bridge
Now that we have some basics installed and set up we’ll create a Bridge Network Interface - this bridge is to the disconnected/isolated Network.
## Create a bridge attached to the NIC in the isolated network to allow Containers/Pods to pull IPs from the Isolated network space
## No need to modify the isolated bridge configuration unless you modified the Libvirt Isolated Network space
nmcli con add type bridge con-name bridge0 ifname bridge0
# Configure the bridge
nmcli con mod bridge0 ipv4.dns 192.168.50.7 ipv4.gateway 192.168.50.1 ipv4.addresses "192.168.50.7/24" ipv4.dns-search "$ISOLATED_NETWORK_DOMAIN" ipv4.method manual connection.autoconnect yes connection.autoconnect-slaves yes
# Add the physical device
nmcli con add type bridge-slave ifname enp2s0 master bridge0
# Bring the connection up
nmcli con up bridge0
# Delete the old connection
nmcli con delete enp2s0
Podman CNI Bridge
With the bridge network interface created, we can create a Bridged CNI for Podman which will allow containers to access the same disconnected/isolated IP address space:
## Ensure our needed directories exist
mkdir -p /etc/cni/net.d/

## Set some variables
MIRROR_VM_ISOLATED_BRIDGE_IFACE="bridge0"
ISOLATED_NETWORK_CIDR="192.168.50.0/24"
ISOLATED_NETWORK_GATEWAY="192.168.50.1"
ISOLATED_NETWORK_START_RANGE="192.168.50.2"
ISOLATED_NETWORK_END_RANGE="192.168.50.254"

## Create the Bridged CNI definition
cat > /etc/cni/net.d/$MIRROR_VM_ISOLATED_BRIDGE_IFACE.conflist <<EOF
{
  "cniVersion": "0.4.0",
  "name": "$MIRROR_VM_ISOLATED_BRIDGE_IFACE",
  "plugins": [
      {
        "type": "bridge",
        "bridge": "$MIRROR_VM_ISOLATED_BRIDGE_IFACE",
        "ipam": {
            "type": "host-local",
            "ranges": [
                [
                    {
                        "subnet": "$ISOLATED_NETWORK_CIDR",
                        "rangeStart": "$ISOLATED_NETWORK_START_RANGE",
                        "rangeEnd": "$ISOLATED_NETWORK_END_RANGE",
                        "gateway": "$ISOLATED_NETWORK_GATEWAY"
                    }
                ]
            ],
            "routes": [
                {"dst": "0.0.0.0/0"}
            ]
        }
      },
      {
        "type": "portmap",
        "capabilities": {
            "portMappings": true
        }
      },
      {
        "type": "firewall",
        "backend": ""
      },
      {
        "type": "tuning",
        "capabilities": {
            "mac": true
        }
      }
  ]
}
EOF

## Restart Podman for good measure
systemctl restart podman
Multi-DNS Resolution
Since this is a Mirror VM that sits between two networks and needs to resolve multiple domain bases we’ll need to set up multi-DNS resolution - if there are separate Mirror VMs in two different networks then this is likely not something that needs to be done. You can read more about it in the Red Hat Enterprise Linux documentation.
## Set up mutli-DNS resolution
NM_MAIN_CONF_LINE_NO=$(grep -n "\[main\]" /etc/NetworkManager/NetworkManager.conf | grep -Eo '^[^:]+')
NM_MAIN_AFTER_CONF_LINE_NO=$(( $NM_MAIN_CONF_LINE_NO + 1))

NM_CONFIG_HEAD=$(head -n $NM_MAIN_CONF_LINE_NO /etc/NetworkManager/NetworkManager.conf)
NM_CONFIG_TAIL=$(tail -n +$NM_MAIN_AFTER_CONF_LINE_NO /etc/NetworkManager/NetworkManager.conf)

cp /etc/NetworkManager/NetworkManager.conf /etc/NetworkManager/NetworkManager.conf.bak-$(date '+%s')

echo "$NM_CONFIG_HEAD" > /etc/NetworkManager/NetworkManager.conf
echo 'dns=systemd-resolved' >> /etc/NetworkManager/NetworkManager.conf
echo "$NM_CONFIG_TAIL" >> /etc/NetworkManager/NetworkManager.conf

## Start and enable the systemd-resolved service
systemctl --now enable systemd-resolved

## Reload NetworkManager
systemctl reload NetworkManager
Reboot the Mirror VM since it probably loaded a new kernel earlier during the package update: systemctl reboot
Once the Mirror VM has rebooted, connect back to it via SSH - the next set of steps will be done on it to download and serve all of the required content.
Determining OpenShift Release Versions to Mirror
If this were a normal OpenShift deployment that was bound to a specific version, usually the version of the OpenShift binaries being used, then you could simply do an oc adm release info and find out the release images needed.
The Assisted Installer Service however can provide multiple OpenShift versions, so we’ll need to first query the Red Hat hosted Assisted Service API to find the versions that are currently supported that we could/should/will mirror.
Note: You could totally do other versions that aren’t specifically served by the RH-hosted AI API, but for simplicity this is how you don’t have to muck with mapping versions much.
In order to interact with the RH APIs you need an Offline Token - get one from here: https://access.redhat.com/management/api
Save the Offline Token to a file in the Mirror VM at $HOME/rh-api-offline-token
## Set needed variables
MIRROR_BASE_PATH="/opt/disconnected-mirror"

# RH_OFFLINE_TOKEN is the token generated from this page: https://access.redhat.com/management/api
RH_OFFLINE_TOKEN=$(cat $HOME/rh-api-offline-token)

ASSISTED_SERVICE_V2_API="https://api.openshift.com/api/assisted-install/v2"

## Make working directories
mkdir -p $MIRROR_BASE_PATH/{mirror-ingress/{haproxy,nginx/templates/,scripts}/,ai-svc/{local-store,volumes/{db,opt,imgsvc}}/,auth,dns,pki,downloads/{images,olm,rhcos,tools}}

## Authenticate to the RH API and get the Access Token
export ACCESS_TOKEN=$(curl -s --fail https://sso.redhat.com/auth/realms/redhat-external/protocol/openid-connect/token -d grant_type=refresh_token -d client_id=rhsm-api -d refresh_token=$RH_OFFLINE_TOKEN | jq .access_token  | tr -d '"')

## Check to make sure an Access token was obtains
if [ -z "$ACCESS_TOKEN" ]; then
  echo "Failed to authenticate with the RH API!"
  exit 1
fi

## Query the Assisted Installer Service for available versions
QUERY_CLUSTER_VERSIONS_REQUEST=$(curl -s --fail \
--header "Authorization: Bearer $ACCESS_TOKEN" \
--header "Content-Type: application/json" \
--header "Accept: application/json" \
--request GET \
"${ASSISTED_SERVICE_V1_API}/openshift-versions")

## Check to make sure we retrieved data
if [ -z "$QUERY_CLUSTER_VERSIONS_REQUEST" ]; then
  echo "Failed to find supported cluster release version!"
  exit 1
fi

## Save the versions to a JSON file for use later
echo $QUERY_CLUSTER_VERSIONS_REQUEST > ${MIRROR_BASE_PATH}/ai-svc/cluster-versions.json
The returned data that is stored in that $MIRROR_BASE_PATH/ai-svc/cluster-versions.json file should look something like this, minified:
{
  "4.6": {
    "cpu_architectures": [
      "x86_64"
    ],
    "display_name": "4.6.16",
    "support_level": "production"
  },
  "4.7": {
    "cpu_architectures": [
      "x86_64"
    ],
    "display_name": "4.7.37",
    "support_level": "maintenance"
  },
  "4.8": {
    "cpu_architectures": [
      "x86_64"
    ],
    "display_name": "4.8.22",
    "support_level": "production"
  },
  "4.9": {
    "cpu_architectures": [
      "x86_64"
    ],
    "default": true,
    "display_name": "4.9.9",
    "support_level": "production"
  }
}
We’ll use this information in some later steps to create a few configuration files and map version data for other services.
Deploying DNS
Before we get much farther we need some domain/host name resolution, so naturally we need a DNS server.
/etc/hosts file
If this is simply a low-side system you could just get away with using the /etc/hosts file and do something like this:
echo '127.0.0.1    mirror-vm mirror-vm.isolated.local' >> /etc/hosts
echo '127.0.0.1    mirror mirror.isolated.local' >> /etc/hosts
This would allow for local resolution of your hostname is all really, which would allow mirroring of the external assets to a localhost registry, but no other systems could access it unless they also had /etc/hosts definitions pointing to this Mirror VM - you’d need a proper DNS server in the disconnected environment for the OpenShift clusters anyway so let’s deploy that for our Libvirt environment.
Go Zones
Go Zones is a Golang project I built that will create BIND-compatible DNS Zone files from simple YAML definitions.
All the DNS we’re serving will be for the disconnected network - for operators of other DNS services, you’ll need the A/PTR records in the disconnected environment as follows:
- mirror-vm <> 192.168.50.7 (the Mirror VM’s disconnected IP)
- assisted-installer <> 192.168.50.13 (the HAProxy container that will run in the disconnected environment)
- mirror <> 192.168.50.13
- registry <> 192.168.50.13
Go Zones just needs a simple YAML file and it’ll create all the needed BIND configuration:
## Set vars
MIRROR_BASE_PATH="/opt/disconnected-mirror"
MIRROR_VM_HOSTNAME="mirror-vm"
MIRROR_VM_ISOLATED_BRIDGE_IFACE_IP="192.168.50.7"
ISOLATED_NETWORK_DOMAIN="isolated.local"
ISOLATED_NETWORK_CIDR="192.168.50.0/24"
ISOLATED_AI_SVC_ENDPOINT="assisted-installer"
ISOLATED_AI_SVC_HAPROXY_IP="192.168.50.13"

# Create the YAML File
cat > $MIRROR_BASE_PATH/dns/volumes/go-zones/zones.yml <<EOF
zones:
  - name: $ISOLATED_NETWORK_DOMAIN
    subnet: $ISOLATED_NETWORK_CIDR
    network: internal
    primary_dns_server: $MIRROR_VM_HOSTNAME.$ISOLATED_NETWORK_DOMAIN
    ttl: 3600
    records:
      NS:
        - name: $MIRROR_VM_HOSTNAME
          ttl: 86400
          domain: $ISOLATED_NETWORK_DOMAIN.
          anchor: '@'
      A:
        - name: $MIRROR_VM_HOSTNAME
          ttl: 6400
          value: $MIRROR_VM_ISOLATED_BRIDGE_IFACE_IP

        - name: $ISOLATED_AI_SVC_ENDPOINT
          ttl: 6400
          value: $ISOLATED_AI_SVC_HAPROXY_IP
        - name: mirror
          ttl: 6400
          value: $ISOLATED_AI_SVC_HAPROXY_IP
        - name: registry
          ttl: 6400
          value: $ISOLATED_AI_SVC_HAPROXY_IP
EOF

## Create a forwarder file to redirect all other inqueries to this Mirror VM
cat > $MIRROR_BASE_PATH/dns/volumes/bind/external_forwarders.conf <<EOF
forwarders {
  127.0.0.53;
};
EOF
With that you can start the container with the following:
podman run --name dns-go-zones \
 --net host \
 -m 512m \
 -v $MIRROR_BASE_PATH/dns/volumes/go-zones:/etc/go-zones/ \
 -v $MIRROR_BASE_PATH/dns/volumes/bind:/opt/app-root/vendor/bind/ \
 quay.io/kenmoini/go-zones:file-to-bind
This will start the Go Zones container with Podman, giving it host network access, some memory limits, and mounting a few volumes.
You should now be able to do something like dig mirror.$ISOLATED_NETWORK_DOMAIN and find a response to the HAProxy IP, 192.168.50.13.
Create a Certificate Authority & Certificates
Before starting to mirror the container images we need a Certificate Authority and a set of SSL Certificates. We’ll use OpenSSL for this process.
OpenSSL Configuration Files
First we must make a few files to configure OpenSSL:
MIRROR_VM_HOSTNAME="mirror-vm"
ISOLATED_NETWORK_DOMAIN="isolated.local"

## Certificate Authority DN Variables
PKI_CA_COUNTRY="US"
PKI_CA_STATE="North Carolina"
PKI_CA_CITY="Raleigh"
PKI_CA_ORG="Mirrors R Us"
PKI_CA_ORG_UNIT="Security"
PKI_CA_COMMON_NAME="MirrorsCA"

## Registry & Wildcard Server Certificate DN Variables - more SANs are defined below
PKI_SERVER_CERT_COUNTRY="US"
PKI_SERVER_CERT_STATE="North Carolina"
PKI_SERVER_CERT_CITY="Raleigh"
PKI_SERVER_CERT_ORG="Mirrors R Us"
PKI_SERVER_CERT_ORG_UNIT="Security"
PKI_REGISTRY_CERT_COMMON_NAME="$MIRROR_VM_HOSTNAME"
PKI_WILDCARD_CERT_COMMON_NAME="$ISOLATED_NETWORK_DOMAIN"

## Create the OpenSSL Configuration file for the Certificate Authority
cat > $MIRROR_BASE_PATH/pki/openssl.ca.cnf <<EOF
[ req ]
distinguished_name = req_distinguished_name
policy             = policy_match
x509_extensions    = v3_ca

# For the CA policy
[ policy_match ]
countryName             = optional
stateOrProvinceName     = optional
organizationName        = optional
organizationalUnitName  = optional
commonName              = supplied
emailAddress            = optional

[ req_distinguished_name ]
countryName                     = Country Name (2 letter code)
countryName_default             = $PKI_CA_COUNTRY
countryName_min                 = 2
countryName_max                 = 2
stateOrProvinceName             = State or Province Name (full name)
stateOrProvinceName_default     = $PKI_CA_STATE
localityName                    = Locality Name (eg, city)
localityName_default            = $PKI_CA_CITY
0.organizationName              = Organization Name (eg, company)
0.organizationName_default      = $PKI_CA_ORG
organizationalUnitName          = Organizational Unit Name (eg, section)
organizationalUnitName_default  = $PKI_CA_ORG_UNIT
commonName                      = Common Name (eg, your name or your server hostname)
commonName_max                  = 64
emailAddress                    = Email Address
emailAddress_max                = 64

[ v3_ca ]
subjectKeyIdentifier = hash
authorityKeyIdentifier = keyid:always,issuer
basicConstraints = critical,CA:true
EOF

## Create the OpenSSL Configuration file for the Server Certificates
cat > $MIRROR_BASE_PATH/pki/openssl.server.cnf <<EOF
[ req ]
distinguished_name  = req_distinguished_name
policy              = policy_match
x509_extensions     = server_cert
req_extensions      = v3_req

# For the CA policy
[ policy_match ]
countryName             = optional
stateOrProvinceName     = optional
organizationName        = optional
organizationalUnitName  = optional
commonName              = supplied
emailAddress            = optional

[ req_distinguished_name ]
countryName                     = Country Name (2 letter code)
countryName_default             = $PKI_SERVER_CERT_COUNTRY
countryName_min                 = 2
countryName_max                 = 2
stateOrProvinceName             = State or Province Name (full name)
stateOrProvinceName_default     = $PKI_SERVER_CERT_STATE
localityName                    = Locality Name (eg, city)
localityName_default            = $PKI_SERVER_CERT_CITY
0.organizationName              = Organization Name (eg, company)
0.organizationName_default      = $PKI_SERVER_CERT_ORG
organizationalUnitName          = Organizational Unit Name (eg, section)
organizationalUnitName_default  = $PKI_SERVER_CERT_ORG_UNIT
commonName                      = Common Name (eg, your name or your server hostname)
commonName_max                  = 64
emailAddress                    = Email Address
emailAddress_max                = 64

[ v3_req ]
basicConstraints = CA:FALSE
keyUsage = critical, digitalSignature, keyEncipherment
extendedKeyUsage = serverAuth

[ server_cert ]
nsCertType = client, server, email
subjectKeyIdentifier = hash
authorityKeyIdentifier = keyid,issuer:always
subjectAltName = @alt_names

[ alt_names ]
IP.1 = 127.0.0.1
DNS.1 = ${MIRROR_VM_HOSTNAME}
DNS.2 = ${MIRROR_VM_HOSTNAME}.${ISOLATED_NETWORK_DOMAIN}
DNS.3 = mirror.${ISOLATED_NETWORK_DOMAIN}
DNS.4 = registry.${ISOLATED_NETWORK_DOMAIN}

[ iso_wc_cert ]
nsCertType = client, server, email
subjectKeyIdentifier = hash
authorityKeyIdentifier = keyid,issuer:always
subjectAltName = @iso_wc_alt_names

[ iso_wc_alt_names ]
DNS.1 = *.${ISOLATED_NETWORK_DOMAIN}
EOF
Generating a Certificate Authority
With those configuration files created, we can now create the Certificate Authority that will be used to identify and secure services:
## Generate the CA Key
openssl genrsa -out ${MIRROR_BASE_PATH}/pki/ca.key.pem 4096

## Generate the CA Certificate in one shot without a separate CSR process
openssl req -new -x509 -days 3650 -config ${MIRROR_BASE_PATH}/pki/openssl.ca.cnf \
 -key ${MIRROR_BASE_PATH}/pki/ca.key.pem -out ${MIRROR_BASE_PATH}/pki/ca.cert.pem \
 -subj "/CN=$PKI_CA_COMMON_NAME"

## Validate the Certificate with:
openssl x509 -text -in ${MIRROR_BASE_PATH}/pki/ca.cert.pem

## Update the local CA Root Trust
cp ${MIRROR_BASE_PATH}/pki/ca.cert.pem /etc/pki/ca-trust/source/anchors/
update-ca-trust

## Copy the CA to the downloads folder in order to be easily downloaded by other nodes later
cp ${MIRROR_BASE_PATH}/pki/ca.cert.pem $MIRROR_BASE_PATH/downloads/
Creating & Signing Certificates
Now that the Certificate Authority is created, now we can create some SSL Certificates for our Container Registry and HAProxy services. Since those are two separate services, we’ll follow best practices and create separate certificate+key pairs - keep in mind a mature PKI is more robust than this in many other ways so it’s not like we started entirely with best practices in mind…there’d be an Intermediate CA, Signing CA, etc…anywho, let’s make some certificates.
## Generate Container Registry Server Key
openssl genrsa -out $MIRROR_BASE_PATH/pki/server.key.pem 4096

## Generate the Container Registry Server Certificate
openssl req -config $MIRROR_BASE_PATH/pki/openssl.server.cnf -new \
 -key $MIRROR_BASE_PATH/pki/server.key.pem \
 -out $MIRROR_BASE_PATH/pki/server.csr.pem \
 -subj "/CN=$PKI_REGISTRY_CERT_COMMON_NAME"

## Verify the CSR
openssl req -text -in $MIRROR_BASE_PATH/pki/server.csr.pem

## Generate a Certificate
openssl x509 -req -days 365 -in $MIRROR_BASE_PATH/pki/server.csr.pem \
 -CA $MIRROR_BASE_PATH/pki/ca.cert.pem -CAkey $MIRROR_BASE_PATH/pki/ca.key.pem \
 -CAcreateserial -out $MIRROR_BASE_PATH/pki/server.cert.pem \
 -extensions server_cert -extfile $MIRROR_BASE_PATH/pki/openssl.server.cnf

## Verify the Certificate
openssl x509 -text -in $MIRROR_BASE_PATH/pki/server.cert.pem
This Certificate will be used for the Container Image Registry - next let’s create a Wildcard Certificate for use with HAProxy:
## Generate the Wildcard Key
openssl genrsa -out $MIRROR_BASE_PATH/pki/isolated-wildcard.key.pem 4096

## Generate the Wildcard CSR
openssl req -config $MIRROR_BASE_PATH/pki/openssl.server.cnf -new \
 -key $MIRROR_BASE_PATH/pki/isolated-wildcard.key.pem \
 -out $MIRROR_BASE_PATH/pki/isolated-wildcard.csr.pem \
 -subj "/CN=$PKI_WILDCARD_CERT_COMMON_NAME"

## Verify the CSR
openssl req -text -in $MIRROR_BASE_PATH/pki/isolated-wildcard.csr.pem

## Generate the Wildcard Certificate
openssl x509 -req -days 365 -in $MIRROR_BASE_PATH/pki/isolated-wildcard.csr.pem \
 -CA $MIRROR_BASE_PATH/pki/ca.cert.pem -CAkey $MIRROR_BASE_PATH/pki/ca.key.pem -CAcreateserial \
 -out $MIRROR_BASE_PATH/pki/isolated-wildcard.cert.pem \
 -extensions iso_wc_cert -extfile $MIRROR_BASE_PATH/pki/openssl.server.cnf

## Verify the Certificate with:
openssl x509 -text -in $MIRROR_BASE_PATH/pki/isolated-wildcard.cert.pem

## Create the HAProxy Certificate Bundle (Key > Cert > CA Chain)
cat $MIRROR_BASE_PATH/pki/isolated-wildcard.key.pem > $MIRROR_BASE_PATH/pki/isolated-wildcard.haproxy-bundle.pem
cat $MIRROR_BASE_PATH/pki/isolated-wildcard.cert.pem >> $MIRROR_BASE_PATH/pki/isolated-wildcard.haproxy-bundle.pem
cat $MIRROR_BASE_PATH/pki/ca.cert.pem >> $MIRROR_BASE_PATH/pki/isolated-wildcard.haproxy-bundle.pem
With those steps all of our needed x509 PKI is now created!
HTPasswd Authentication
To log into the Container Registry there needs to be some sort of authentication store - we’ll create an HTPasswd file to be used as an authentication store for the Container Image Registry:
## Change these ideally...
MIRROR_CONTAINER_REGISTRY_USER="openshift-release-dev+admin"
MIRROR_CONTAINER_REGISTRY_PASS="Passw0rd123"

## Create an HTPasswd file to log into the registry
htpasswd -bBc ${MIRROR_BASE_PATH}/auth/htpasswd $MIRROR_CONTAINER_REGISTRY_USER $MIRROR_CONTAINER_REGISTRY_PASS
Deploy the Container Registry
Speaking of that darned Container Image Registry, let’s go ahead and deploy it:
podman run --name mirror-registry --net host \
  -v ${MIRROR_BASE_PATH}/auth:/auth:z \
  -v ${MIRROR_BASE_PATH}/pki:/certs:z \
  -v ${MIRROR_BASE_PATH}/downloads/images:/var/lib/registry:z \
  -e "REGISTRY_HTTP_ADDR=0.0.0.0:443" \
  -e "REGISTRY_AUTH=htpasswd" \
  -e "REGISTRY_AUTH_HTPASSWD_REALM=registry-realm" \
  -e "REGISTRY_AUTH_HTPASSWD_PATH=/auth/htpasswd" \
  -e "REGISTRY_HTTP_TLS_CERTIFICATE=/certs/server.cert.pem" \
  -e "REGISTRY_HTTP_TLS_KEY=/certs/server.key.pem" \
  -e "REGISTRY_COMPATIBILITY_SCHEMA1_ENABLED=true" \
  quay.io/redhat-emea-ssa-team/registry:2
This registry runs on port 443 of the Mirror VM since it’s using the container host network - otherwise it’s mounting certificates, the HTPasswd file, and a directory for persistent storage, setting a few environmental variables to configure the registry.
You can test the running registry with the following command:
## Set a variable for the local registry
LOCAL_REGISTRY="${MIRROR_VM_HOSTNAME}.${ISOLATED_NETWORK_DOMAIN}"
## Registry Credentials
MIRROR_CONTAINER_REGISTRY_USER="openshift-release-dev+admin"
MIRROR_CONTAINER_REGISTRY_PASS="Passw0rd123"

## Check the registry is able to be connected to
curl -sSL -u ${MIRROR_CONTAINER_REGISTRY_USER}:${MIRROR_CONTAINER_REGISTRY_PASS} https://$LOCAL_REGISTRY/v2/_catalog
You should see something like this returned from the cURL request: {"repositories":[]}
Creating a Pull Secret
In order to pull or push container images to the registry we need to pass along some credentials - we just used the username and password pair when testing the registry with the cURL command but there’s a better way that is more suited to use with different applications without piping credentials in a command that can be grep’d with a simple history.
## Set a variable for the local registry
LOCAL_REGISTRY="${MIRROR_VM_HOSTNAME}.${ISOLATED_NETWORK_DOMAIN}"
## Registry Credentials
MIRROR_CONTAINER_REGISTRY_USER="openshift-release-dev+admin"
MIRROR_CONTAINER_REGISTRY_PASS="Passw0rd123"

## Create a container registry authentication file by authenticating to
podman login --authfile "${MIRROR_BASE_PATH}/auth/mirror-pull-secret.json" -u $MIRROR_CONTAINER_REGISTRY_USER -p $MIRROR_CONTAINER_REGISTRY_PASS $LOCAL_REGISTRY
With that we have a JSON-formatted Pull Secret for use with the local registry - but there’s still another Pull Secret needed, a Red Hat Registry Pull Secret that will allow the pulling of container images from Red Hat.
Obtain a Red Hat Pull Secret
In order to pull the OpenShift containers you also need a Red Hat Pull Secret - you can get one from here: https://console.redhat.com/openshift/downloads
Log in and scroll down to the bottom and you should see a Copy and Download button - do whatever it is you need to do to store the pull secret somewhere on the Mirror VM’s file system so that it can be used by the binaries we’ll use to mirror.
Combining Pull Secrets
The binary applications, oc in this case, need to be able to use both Pull Secrets to pull and then subsequently push. To do so we need to combine the Mirror Registry and the Red Hat Registry Pull Secrets and you can do so pretty easily with jq:
## Define some variables with where the pull secrets currently reside
MIRROR_PULL_SECRET_PATH="${MIRROR_BASE_PATH}/auth/mirror-pull-secret.json"
## This is the path where you saved the Red Hat Pull Secret from the last step
RED_HAT_PULL_SECRET_PATH="${MIRROR_BASE_PATH}/auth/red-hat-pull-secret.json"

## Combine into a single minified Pull Secret file
jq -cM -s '{"auths": ( .[0].auths + .[1].auths ) }' ${MIRROR_PULL_SECRET_PATH} ${RED_HAT_PULL_SECRET_PATH} > ${MIRROR_BASE_PATH}/auth/compiled-pull-secret.json
Mirroring OpenShift Releases
With DNS, SSL, and a Container Registry set up we can start to mirror assets!
There are different binaries, container images, and RHCOS versions for each release…the binaries are generally backwards compatible but it’s best to grab the properly paired assets anyway.
Since we are matching the versions that the Red Hat-hosted Assisted Installer provides, and since there are multiple versions available, we’ll need to loop through the different versions and pull assets for each - or in our case, just the default version in order to save some disk space and time.
The following is a pretty large loop as it iterates over the queried OpenShift versions and will download the binaries, container images, Operator Catalog, and create some needed configuration.
## Set ONLY_MIRROR_DEFAULT_VERSION to true in order to only mirror the default version
ONLY_MIRROR_DEFAULT_VERSION="true"

## Mirroring the Operator Catalog isn't required but it sure is handy - this is the bulk of the disk space and time consumed
MIRROR_OPERATOR_CATALOG="true"

## We need to know what the latest version is
LATEST_VERSION=$(cat ${MIRROR_BASE_PATH}/ai-svc/cluster-versions.json | jq -r '. | keys_unsorted | max_by( split(".") | map(tonumber) )')
LATEST_VERSION_FULL=$(cat ${MIRROR_BASE_PATH}/ai-svc/cluster-versions.json | jq -r '.["'${LATEST_VERSION}'"].display_name')

## The Assisted Installer Service needs some configuration files which map assets and release versions
## DEFAULT_VERSION is simply initialized - no need to set it
DEFAULT_VERSION=""
COMPILED_OPENSHIFT_VERSIONS="{"
echo '[]' > ${MIRROR_BASE_PATH}/downloads/rhcos/os_images.json
echo '[]' > ${MIRROR_BASE_PATH}/downloads/rhcos/release_images.json

## Set the path for our combined Pull Secret from the last step
PULL_SECRET_PATH="${MIRROR_BASE_PATH}/auth/compiled-pull-secret.json"
## LOCAL_REGISTRY is the FQDN or other resolvable endpoint for the mirrored container registry
LOCAL_REGISTRY="${MIRROR_VM_HOSTNAME}.${ISOLATED_NETWORK_DOMAIN}"
## LOCAL_REPOSITORY is the local registry org/repo that will house the mirrored OCP release
LOCAL_REPOSITORY="ocp4/openshift4"

## Super handy to log some things in addition to printing to screen since there can be so much output displayed
LOG_FILE="/var/log/ocp-release-mirror.$(date '+%s').log"

## Loop through the cluster_versions.json file from the earlier RH API query
## We are doing so by base64 encoding each object with jq and iterating over them
for version in $(cat $MIRROR_BASE_PATH/ai-svc/cluster-versions.json | jq -r '.[] | @base64'); do
  ## This _jq function will decode the JSON object and return a query
  _jq() {
    echo ${version} | base64 --decode | jq -r ${1}
  }

  ## Set up some version variables that we'll need inside the loop for each release
  VERSION=$(_jq '.display_name')
  VERSION_ARR=(${VERSION//./ })
  VERSION_SHORT="${VERSION_ARR[0]}.${VERSION_ARR[1]}"
  VERSION_FULL="${VERSION_ARR[0]}.${VERSION_ARR[1]}.${VERSION_ARR[2]}"

  ## Check if this is the default version and if so then set it
  IS_DEFAULT=$(_jq '.default')
  if [ "$IS_DEFAULT" == "true" ]; then
    DEFAULT_VERSION=$VERSION_FULL
  fi

  ## Determine if we are only mirroring the default version and if this is it
  echo "Found version: ${VERSION_FULL}..."
  if [ "$ONLY_MIRROR_DEFAULT_VERSION" == "true" ]; then
    if [ "$IS_DEFAULT" != "true" ]; then
      echo "Only mirroring default version - skipping..."
      continue
    else
      echo "${VERSION_FULL} is the default version!  Starting to mirror..."
    fi
  else
    echo "Starting to mirror ${VERSION_FULL}..."
  fi

  ## Create the directories for the version
  mkdir -p ${MIRROR_BASE_PATH}/downloads/tools/${VERSION_FULL}
  mkdir -p ${MIRROR_BASE_PATH}/downloads/rhcos/${VERSION_FULL}

  ## Download the oc binary
  if [ ! -f ${MIRROR_BASE_PATH}/downloads/tools/${VERSION_FULL}/openshift-client-linux.tar.gz ]; then
    echo "  - Downloading oc..."
    curl -sSL https://mirror.openshift.com/pub/openshift-v4/x86_64/clients/ocp/${VERSION_FULL}/openshift-client-linux.tar.gz -o ${MIRROR_BASE_PATH}/downloads/tools/${VERSION_FULL}/openshift-client-linux.tar.gz
    cd ${MIRROR_BASE_PATH}/downloads/tools/${VERSION_FULL}/
    tar --no-same-owner -xzf openshift-client-linux.tar.gz
    chmod a+x oc
    chmod a+x kubectl
    rm README.md
    cd -
  fi

  ## Download the opm binary
  if [ ! -f ${MIRROR_BASE_PATH}/downloads/tools/${VERSION_FULL}/opm-linux.tar.gz ]; then
    echo "  - Downloading opm..."
    curl -sSL https://mirror.openshift.com/pub/openshift-v4/x86_64/clients/ocp/${VERSION_FULL}/opm-linux.tar.gz -o ${MIRROR_BASE_PATH}/downloads/tools/${VERSION_FULL}/opm-linux.tar.gz
    cd ${MIRROR_BASE_PATH}/downloads/tools/${VERSION_FULL}/
    tar --no-same-owner -xzf opm-linux.tar.gz
    chmod a+x opm
    cd -
  fi

  ## Download RH CoreOS
  if [ ! -f ${MIRROR_BASE_PATH}/downloads/rhcos/${VERSION_FULL}/rhcos-live.x86_64.iso ]; then
    echo "  - Downloading RH CoreOS ISO..."
    curl -sSL https://mirror.openshift.com/pub/openshift-v4/dependencies/rhcos/${VERSION_SHORT}/latest/rhcos-live.x86_64.iso -o ${MIRROR_BASE_PATH}/downloads/rhcos/${VERSION_FULL}/rhcos-live.x86_64.iso
  fi

  ## Download the RHCOS Kernel
  if [ ! -f ${MIRROR_BASE_PATH}/downloads/rhcos/${VERSION_FULL}/rhcos-live-kernel-x86_64 ]; then
    echo "  - Downloading RH CoreOS Kernel..."
    curl -sSL https://mirror.openshift.com/pub/openshift-v4/dependencies/rhcos/${VERSION_SHORT}/latest/rhcos-live-kernel-x86_64 -o ${MIRROR_BASE_PATH}/downloads/rhcos/${VERSION_FULL}/rhcos-live-kernel-x86_64
  fi

  ## Download the RHCOS initramfs
  if [ ! -f ${MIRROR_BASE_PATH}/downloads/rhcos/${VERSION_FULL}/rhcos-live-initramfs.x86_64.img ]; then
    echo "  - Downloading RH CoreOS initramfs..."
    curl -sSL https://mirror.openshift.com/pub/openshift-v4/dependencies/rhcos/${VERSION_SHORT}/latest/rhcos-live-initramfs.x86_64.img -o ${MIRROR_BASE_PATH}/downloads/rhcos/${VERSION_FULL}/rhcos-live-initramfs.x86_64.img
  fi

  ## Download the RHCOS rootfs
  if [ ! -f ${MIRROR_BASE_PATH}/downloads/rhcos/${VERSION_FULL}/rhcos-live-rootfs.x86_64.img ]; then
    echo "  - Downloading RH CoreOS RootFS..."
    curl -sSL https://mirror.openshift.com/pub/openshift-v4/dependencies/rhcos/${VERSION_SHORT}/latest/rhcos-live-rootfs.x86_64.img -o ${MIRROR_BASE_PATH}/downloads/rhcos/${VERSION_FULL}/rhcos-live-rootfs.x86_64.img
  fi

  ## The Assisted Installer configuration needs to know detailed release version information and we'll save this data to a file
  echo "  - Mapping OpenShift and RHCOS Images..."
  ## Get the RHCOS full version
  ${MIRROR_BASE_PATH}/downloads/tools/${VERSION_FULL}/oc adm release info ${VERSION_FULL} -o 'jsonpath={.displayVersions.machine-os.Version}' > ${MIRROR_BASE_PATH}/downloads/rhcos/${VERSION_FULL}/version
  ## Get the RHCOS Architecture
  ${MIRROR_BASE_PATH}/downloads/tools/${VERSION_FULL}/oc adm release info ${VERSION_FULL} -o 'jsonpath={.config.architecture}' > ${MIRROR_BASE_PATH}/downloads/rhcos/${VERSION_FULL}/architecture

  ## Redefine the architecture reference
  if [ "$(cat ${MIRROR_BASE_PATH}/downloads/rhcos/${VERSION_FULL}/architecture)" == "amd64" ]; then
    ARCHITECTURE="x86_64"
  fi

  ## Generate JSON for OS_IMAGES env var needed by the OpenShift Assisted Installer Service
  cat > ${MIRROR_BASE_PATH}/downloads/rhcos/${VERSION_FULL}/rhcos-image-info.json <<EOF
{"openshift_version":"$VERSION_SHORT","cpu_architecture":"${ARCHITECTURE}","url":"https://mirror.${ISOLATED_NETWORK_DOMAIN}/pub/downloads/rhcos/${VERSION_FULL}/rhcos-live.$ARCHITECTURE.iso","rootfs_url":"https://mirror.${ISOLATED_NETWORK_DOMAIN}/pub/downloads/rhcos/${VERSION_FULL}/rhcos-live-rootfs.$ARCHITECTURE.img","version":"$(cat ${MIRROR_BASE_PATH}/downloads/rhcos/${VERSION_FULL}/version)"}
EOF
  cat > ${MIRROR_BASE_PATH}/downloads/rhcos/${VERSION_FULL}/release-image-info.json <<EOF
{"openshift_version":"$VERSION_SHORT","cpu_architecture":"${ARCHITECTURE}","url":"${LOCAL_REGISTRY}/${LOCAL_REPOSITORY}:${VERSION_FULL}-${ARCHITECTURE}","version":"$VERSION_FULL"}
EOF
oc_version() {
  cat <<EOF
"$VERSION_SHORT":{"display_name":"${VERSION_FULL}","release_version":"${VERSION_FULL}","release_image":"${LOCAL_REGISTRY}/${LOCAL_REPOSITORY}:${VERSION_FULL}-${ARCHITECTURE}","rhcos_image":"https://mirror.${ISOLATED_NETWORK_DOMAIN}/pub/downloads/rhcos/${VERSION_FULL}/rhcos-live.$ARCHITECTURE.iso","rhcos_rootfs":"https://mirror.${ISOLATED_NETWORK_DOMAIN}/pub/downloads/rhcos/${VERSION_FULL}/rhcos-live-rootfs.$ARCHITECTURE.img","rhcos_version":"$(cat ${MIRROR_BASE_PATH}/downloads/rhcos/${VERSION_FULL}/version)","support_level":"production"},
EOF
}
  COMPILED_OPENSHIFT_VERSIONS+=$(oc_version)

  ## Add this release version information to a combined JSON file
  jq -rMc --argjson value "$(cat ${MIRROR_BASE_PATH}/downloads/rhcos/${VERSION_FULL}/rhcos-image-info.json)" '. |= . + [$value]' ${MIRROR_BASE_PATH}/downloads/rhcos/os_images.json > ${MIRROR_BASE_PATH}/downloads/rhcos/os_images.json.tmp
  jq -rcM --argjson value "$(cat ${MIRROR_BASE_PATH}/downloads/rhcos/${VERSION_FULL}/release-image-info.json)" '. |= . + [$value]' ${MIRROR_BASE_PATH}/downloads/rhcos/release_images.json > ${MIRROR_BASE_PATH}/downloads/rhcos/release_images.json.tmp
  mv ${MIRROR_BASE_PATH}/downloads/rhcos/os_images.json.tmp ${MIRROR_BASE_PATH}/downloads/rhcos/os_images.json
  mv ${MIRROR_BASE_PATH}/downloads/rhcos/release_images.json.tmp ${MIRROR_BASE_PATH}/downloads/rhcos/release_images.json

  ## Mirror needed OCP images
  ## https://docs.openshift.com/container-platform/4.9/installing/installing-mirroring-installation-images.html#installation-mirror-repository_installing-mirroring-installation-images
  echo "  - Downloading OpenShift Release Images..."

  ## Use the oc command to mirror this specific release
  ${MIRROR_BASE_PATH}/downloads/tools/${VERSION_FULL}/oc adm -a ${PULL_SECRET_PATH} release mirror \
    --from=quay.io/openshift-release-dev/ocp-release:${VERSION_FULL}-${ARCHITECTURE} \
    --to=${LOCAL_REGISTRY}/${LOCAL_REPOSITORY} \
    --to-release-image=${LOCAL_REGISTRY}/${LOCAL_REPOSITORY}:${VERSION_FULL}-${ARCHITECTURE} 2>&1 | tee -a $LOG_FILE

  ## The openshift-install binary needs to be extracted so that it can be configured with the local container image registry
  echo -e "  - Extracting the openshift-install binary..."
  cd ${MIRROR_BASE_PATH}/downloads/tools/${VERSION_FULL}/
  ${MIRROR_BASE_PATH}/downloads/tools/${VERSION_FULL}/oc adm release extract -a ${PULL_SECRET_PATH} --command=openshift-install "${LOCAL_REGISTRY}/${LOCAL_REPOSITORY}:${VERSION_FULL}-${ARCHITECTURE}" 2>&1 | tee -a $LOG_FILE
  ## Check the version of the openshift-install binary that was just extracted
  ${MIRROR_BASE_PATH}/downloads/tools/${VERSION_FULL}/openshift-install version 2>&1 | tee -a $LOG_FILE
  cd -

  # Optionally mirror the Operator Catalog for this release - note, this takes 400-500GB space per release
  if [ "$MIRROR_OPERATOR_CATALOG" == "true" ]; then
    if [ ! -f "$MIRROR_BASE_PATH/downloads/rhcos/${VERSION_FULL}/.operator-catalog-finished" ]; then
      echo "  - Mirroring Operator catalog..."
      ${MIRROR_BASE_PATH}/downloads/tools/${VERSION_FULL}/oc adm catalog mirror -a ${PULL_SECRET_PATH} \
      registry.redhat.io/redhat/redhat-operator-index:v${VERSION_SHORT} \
      ${LOCAL_REGISTRY}/olm-mirror \
      --to-manifests="${MIRROR_BASE_PATH}/downloads/olm" 2>&1 | tee -a $LOG_FILE
      touch $MIRROR_BASE_PATH/downloads/rhcos/${VERSION_FULL}/.operator-catalog-finished
    fi
  fi

  echo "All assets for ${VERSION_FULL} downloaded!"

done

## Do some ugly bash'ing of JSON
COMPILED_OPENSHIFT_VERSIONS_COMMA_FIX="${COMPILED_OPENSHIFT_VERSIONS::-1}}"
echo $COMPILED_OPENSHIFT_VERSIONS_COMMA_FIX > ${MIRROR_BASE_PATH}/ai-svc/openshift_versions.json

## Save the snippet of the generated imageContentSources spec for install-config.yaml files
grep -A6 'imageContentSources:' $LOG_FILE | head -n7 > ${MIRROR_BASE_PATH}/image_content_sources.yaml
whew that was a doozy…to recap this is what that loop does in case you’re not fond of reading the comments:
- Set some variables that alter the operation of the loop, such as an option to limit mirrored releases to the single default version and whether or not to also mirror the Operator Catalog
- Initialize a few files and variables that will be used to build the configuration files for the Assisted Installer Service
- Configure a few more variables around the mirrored container registry and create a log file since there can be a lot output to the screen and there are some important bits we need to know
- Start the loop by going through each object in the
cluster-versions.jsonfile, base64 encode it withjq, then setting a function to base64 decode the iterated object for querying - Inside the loop we:
- Set a few variables for version information
- Determine if this is the default version and if it should be mirrored or skipped
- Make versioned sub-directories for binaries and RHCOS
- Download the
ocandopmbinaries - Download RHCOS
- Map version data into configuration files and variables
- Mirror the OpenShift release container images, log output
- Extract the reconfigured
openshift-installbinary from the mirrored container image - Mirror the Operator Catalog for the version and log output, optional
- After the loop,
grepthe log for the generatedimageContentSourcesspec that needs to be used when installing OpenShift
With that your hard drive should now be at least 10lbs heavier!
At this point you could utilize the mirrored content to deploy OpenShift via IPI or UPI but we’re doing the Assisted Installer and still need to mirror those assets.
Mirroring the OpenShift Assisted Installer Service
The Assisted Installer Service is just an amalgamation of containers and configuration. We can use some of the similar processes and functions to mirror the containers needed - thankfully there isn’t a version for each OpenShift release so this is much more straight forward.
## Set the path for our combined Pull Secret from the last step
PULL_SECRET_PATH="${MIRROR_BASE_PATH}/auth/compiled-pull-secret.json"
## LOCAL_REGISTRY is the FQDN or other resolvable endpoint for the mirrored container registry
LOCAL_REGISTRY="${MIRROR_VM_HOSTNAME}.${ISOLATED_NETWORK_DOMAIN}"

## Determine the latest version from our previous saved query - if this version was not downloaded
LATEST_VERSION=$(cat ${MIRROR_BASE_PATH}/ai-svc/cluster-versions.json | jq -r '. | keys_unsorted | max_by( split(".") | map(tonumber) )')
LATEST_VERSION_FULL=$(cat ${MIRROR_BASE_PATH}/ai-svc/cluster-versions.json | jq -r '.["'${LATEST_VERSION}'"].display_name')

## Mirror Library components
for IMAGE in haproxy nginx
do
  ${MIRROR_BASE_PATH}/downloads/tools/${LATEST_VERSION_FULL}/oc -a ${PULL_SECRET_PATH} image mirror docker.io/library/$IMAGE:latest ${LOCAL_REGISTRY}/library/$IMAGE:latest
done

## Mirror the coreos-installer container
IMAGE="coreos-installer"
${MIRROR_BASE_PATH}/downloads/tools/${LATEST_VERSION_FULL}/oc -a ${PULL_SECRET_PATH} image mirror quay.io/coreos/coreos-installer:v0.9.1 ${LOCAL_REGISTRY}/coreos/coreos-installer:v0.9.1
${MIRROR_BASE_PATH}/downloads/tools/${LATEST_VERSION_FULL}/oc -a ${PULL_SECRET_PATH} image mirror quay.io/coreos/coreos-installer:v0.10.0 ${LOCAL_REGISTRY}/coreos/coreos-installer:v0.10.0
${MIRROR_BASE_PATH}/downloads/tools/${LATEST_VERSION_FULL}/oc -a ${PULL_SECRET_PATH} image mirror quay.io/coreos/coreos-installer:release ${LOCAL_REGISTRY}/coreos/coreos-installer:release

## Mirror AI Svc components
### Latest tags
for IMAGE in postgresql-12-centos7 ocp-metal-ui agent assisted-installer-agent assisted-iso-create assisted-installer assisted-installer-controller assisted-service
do
  ${MIRROR_BASE_PATH}/downloads/tools/${LATEST_VERSION_FULL}/oc -a ${PULL_SECRET_PATH} image mirror quay.io/ocpmetal/$IMAGE:latest ${LOCAL_REGISTRY}/ocpmetal/$IMAGE:latest
done

for IMAGE in assisted-installer-agent assisted-installer assisted-installer-controller assisted-service assisted-image-service assisted-installer-ui
do
  ${MIRROR_BASE_PATH}/downloads/tools/${LATEST_VERSION_FULL}/oc -a ${PULL_SECRET_PATH} image mirror quay.io/edge-infrastructure/$IMAGE:latest ${LOCAL_REGISTRY}/edge-infrastructure/$IMAGE:latest
done

### Stable tags
for IMAGE in ocp-metal-ui assisted-iso-create assisted-installer assisted-installer-controller assisted-service
do
  ${MIRROR_BASE_PATH}/downloads/tools/${LATEST_VERSION_FULL}/oc -a ${PULL_SECRET_PATH} image mirror quay.io/ocpmetal/$IMAGE:stable ${LOCAL_REGISTRY}/ocpmetal/$IMAGE:stable
done

for IMAGE in assisted-installer-agent assisted-installer assisted-installer-controller assisted-service assisted-image-service assisted-installer-ui
do
  ${MIRROR_BASE_PATH}/downloads/tools/${LATEST_VERSION_FULL}/oc -a ${PULL_SECRET_PATH} image mirror quay.io/edge-infrastructure/$IMAGE:stable ${LOCAL_REGISTRY}/edge-infrastructure/$IMAGE:stable
done
OpenShift and Assisted Installer Service Configuration Files
Before you can podman run you must podman walk - or rather you need to create some configuration files to run the containers.
Assisted Installer Service Config
OAS has an Nginx configuration and a service configuration file that is required to start the various containers. The Nginx configuration is pretty straightforward, it’s the service configuration file that can be tricky.
## Create the Nginx configuration file
cat > $MIRROR_BASE_PATH/ai-svc/volumes/opt/nginx-ui.conf <<EOF
server {
  listen 0.0.0.0:8080;
  server_name _;
  root /app;
  index index.html;
  location /api {
      proxy_pass http://localhost:8090;
      proxy_http_version 1.1;
      proxy_set_header Upgrade \$http_upgrade;
      proxy_set_header Connection 'upgrade';
      proxy_set_header Host \$host;
      proxy_cache_bypass \$http_upgrade;
  }
  location / {
     try_files \$uri /index.html;
  }
}
EOF

## Create Assisted Installer Configuration
cat > $MIRROR_BASE_PATH/ai-svc/volumes/opt/onprem-environment <<EOF
#This is the IP or name with the API the OCP discovery agent will callback
SERVICE_FQDN="assisted-installer.${ISOLATED_NETWORK_DOMAIN}"

SERVICE_BASE_URL=http://127.0.0.1:8090
ASSISTED_SERVICE_SCHEME=http
ASSISTED_SERVICE_HOST=127.0.0.1:8090
IMAGE_SERVICE_BASE_URL=http://127.0.0.1:8888
LISTEN_PORT=8888

# Required when using self-signed certifications or no certificates
SKIP_CERT_VERIFICATION=true

DEPLOY_TARGET=onprem
DUMMY_IGNITION=false
STORAGE=filesystem
DISK_ENCRYPTION_SUPPORT=true
NTP_DEFAULT_SERVER=
IPV6_SUPPORT=false
AUTH_TYPE=none

POSTGRESQL_DATABASE=installer
POSTGRESQL_PASSWORD=admin
POSTGRESQL_USER=admin
DB_HOST=127.0.0.1
DB_PORT=5432
DB_USER=admin
DB_PASS=admin
DB_NAME=installer

# Uncomment to avoid pull-secret requirement for quay.io on restricted network installs
PUBLIC_CONTAINER_REGISTRIES="quay.io,registry.access.redhat.com,registry.redhat.io,$LOCAL_REGISTRY"

OPENSHIFT_VERSIONS=$(cat ${MIRROR_BASE_PATH}/ai-svc/openshift_versions.json)
OS_IMAGES=$(cat ${MIRROR_BASE_PATH}/downloads/rhcos/os_images.json)
RELEASE_IMAGES=$(cat ${MIRROR_BASE_PATH}/downloads/rhcos/release_images.json)

HW_VALIDATOR_REQUIREMENTS=[{"version":"default","master":{"cpu_cores":4,"ram_mib":16384,"disk_size_gb":120,"installation_disk_speed_threshold_ms":10,"network_latency_threshold_ms":100,"packet_loss_percentage":0},"worker":{"cpu_cores":2,"ram_mib":8192,"disk_size_gb":120,"installation_disk_speed_threshold_ms":10,"network_latency_threshold_ms":1000,"packet_loss_percentage":10},"sno":{"cpu_cores":8,"ram_mib":32768,"disk_size_gb":120,"installation_disk_speed_threshold_ms":10}}]

# Enabled for SNO Deployments
ENABLE_SINGLE_NODE_DNSMASQ=true
EOF
Modified install-config.yaml
Those are the two key configuration files needed to deploy the OpenShift Assisted Installer Service however there are a few other configuration files that also come in handy, such as a modified install-config.yaml file and the HAProxy and Nginx configuration needed to mirror content over HTTPS.
MIRROR_PULL_SECRET_PATH="${MIRROR_BASE_PATH}/auth/mirror-pull-secret.json"

## Create an example install-config.yaml
cat > $MIRROR_BASE_PATH/example-install-config.yaml <<EOF
apiVersion: v1
baseDomain: example.com
controlPlane:
  name: master
  hyperthreading: Disabled
  replicas: 3
compute:
- name: worker
  hyperthreading: Disabled
  replicas: 3
metadata:
  name: test-cluster
networking:
  networkType: OpenShiftSDN
  clusterNetworks:
  - cidr: 10.128.0.0/14
    hostPrefix: 23
  machineNetwork:
  - cidr: 172.18.0.0/16
  serviceNetwork:
  - 172.30.0.0/16
platform:
  none: {}
fips: false
sshKey: 'ssh-rsa kjhf9dfkjf...YOUR_SSH_KEY_HERE...'
pullSecret: '$(jq -rcM $MIRROR_PULL_SECRET_PATH .)'
additionalTrustBundle: |
  $(cat $MIRROR_BASE_PATH/pki/ca.cert.pem | sed 's/^/  /')
$(cat ${MIRROR_BASE_PATH}/image_content_sources.yaml)
EOF
That is just a template install-config.yaml file that should pull in most of the needed components such as the Mirror Container Registry Pull Secret, the CA Certificate as an .additionalTrustBundle addition to the spec so that it will validate the Mirror Registry’s and HTTP Mirror’s SSL certificates, and if everything was logged properly then the .imageContentSources spec that will tell OpenShift where to look for containers, which should look something like this:
imageContentSources:
- mirrors:
  - mirror-vm.isolated.local/ocp4/openshift4
  source: quay.io/openshift-release-dev/ocp-release
- mirrors:
  - mirror-vm.isolated.local/ocp4/openshift4
  source: quay.io/openshift-release-dev/ocp-v4.0-art-dev
Nginx Server
There are a few resources that will be needed to be pulled from an HTTP server by the Assisted Installer or a PXE server - to do this we’ll deploy an Nginx server with some simple configuration:
cat > $MIRROR_BASE_PATH/mirror-ingress/nginx/templates/default.conf.template <<EOF
server {
    listen       8080;
    server_name  _;

    location / {
        root   /usr/share/nginx/html;
        index mirror-index.html;
        autoindex on;
        autoindex_format html;
        autoindex_exact_size off;
        autoindex_localtime on;
    }
}
EOF
HAProxy Reverse Proxy
For conveinience we’ll put the Nginx server and Assisted Installer behind an HAProxy with a wildcard SSL certificate to secure everything.
## Set some variables
MIRROR_VM_ISOLATED_BRIDGE_IFACE_IP="192.168.50.7"
ISOLATED_AI_SVC_NGINX_IP="192.168.50.14"
ISOLATED_AI_SVC_ENDPOINT_IP="192.168.50.11"

ISOLATED_NETWORK_DOMAIN="isolated.local"

ISOLATED_AI_SVC_API_HOSTNAME="ai-api"
ISOLATED_AI_SVC_WEB_UI_HOSTNAME="ai-web"
ISOLATED_AI_SVC_ENDPOINT="assisted-installer"

## Create the CRT List for HAProxy
cat > $MIRROR_BASE_PATH/mirror-ingress/haproxy/crt-list.cfg <<EOF
/usr/local/etc/certs/isolated-wildcard.haproxy-bundle.pem
EOF

## Create the HAProxy Configuration file
cat > $MIRROR_BASE_PATH/mirror-ingress/haproxy/haproxy.cfg <<EOF
global
  log stdout format raw local0
  daemon
  ssl-default-bind-ciphers kEECDH+aRSA+AES:kRSA+AES:+AES256:RC4-SHA:!kEDH:!LOW:!EXP:!MD5:!aNULL:!eNULL

resolvers docker_resolver
  nameserver dns $MIRROR_VM_ISOLATED_BRIDGE_IFACE_IP:53

defaults
  log     global
  mode    http
  option  httplog
  option  dontlognull
  timeout connect 36000s
  timeout client 36000s
  timeout server 36000s

frontend http
  bind *:80
  mode http
  acl is_well_known path_beg -i /.well-known/
  redirect scheme https code 301 if !is_well_known !{ ssl_fc }

frontend https
  mode tcp
  bind *:443 ssl crt-list /usr/local/etc/haproxy/crt-list.cfg

  acl host_ai_svc_api hdr(host) -i $ISOLATED_AI_SVC_API_HOSTNAME.$ISOLATED_NETWORK_DOMAIN
  acl host_ai_svc_web hdr(host) -i $ISOLATED_AI_SVC_WEB_UI_HOSTNAME.$ISOLATED_NETWORK_DOMAIN
  acl host_ai_svc_endpoint hdr(host) -i $ISOLATED_AI_SVC_ENDPOINT.$ISOLATED_NETWORK_DOMAIN
  acl host_registry hdr(host) -i registry.$ISOLATED_NETWORK_DOMAIN
  acl host_mirror hdr(host) -i mirror.$ISOLATED_NETWORK_DOMAIN

  use_backend aiwebui if host_ai_svc_web
  use_backend aiwebui if host_ai_svc_endpoint
  use_backend aiapi if host_ai_svc_api
  use_backend registry if host_registry
  use_backend mirrorhttp if host_mirror

  default_backend mirrorhttp

backend mirrorhttp
  mode http
  server backend1 $ISOLATED_AI_SVC_NGINX_IP:8080
  http-request add-header X-Forwarded-Proto https if { ssl_fc }
  http-response set-header Strict-Transport-Security "max-age=16000000; includeSubDomains; preload;"

backend registry
  mode tcp
  server registry1 $MIRROR_VM_ISOLATED_BRIDGE_IFACE_IP:443

backend aiapi
  mode http
  server aiapi1 $ISOLATED_AI_SVC_ENDPOINT_IP:8090
  http-request add-header X-Forwarded-Proto https if { ssl_fc }
  http-response set-header Strict-Transport-Security "max-age=16000000; includeSubDomains; preload;"

backend aiwebui
  mode http
  server aiwebui1 $ISOLATED_AI_SVC_ENDPOINT_IP:8080
  http-request add-header X-Forwarded-Proto https if { ssl_fc }
  http-response set-header Strict-Transport-Security "max-age=16000000; includeSubDomains; preload;"
EOF
This HAProxy configuration will front an endpoint for the Container Image Registry with passthrough SSL, edge-terminated SSL for the Nginx HTTP server and Assisted Installer services.
Starting the Container Services
Now that all the assets are available locally and the configuration has been created, we can finally start the Assisted Installer Service ensemble and supporting services such as HAProxy and Nginx!
We’ll be starting things with Podman - most containers will be run independantly except for the set of containers for the Assisted Installer Service which will be run together as a Pod:
## Set some variables
## DEFAULT_VERSION was set after the mirroring loop was run
DEFAULT_VERSION="4.9.9"
## Set the path for our combined Pull Secret from the last step
PULL_SECRET_PATH="${MIRROR_BASE_PATH}/auth/compiled-pull-secret.json"
## LOCAL_REGISTRY is the FQDN or other resolvable endpoint for the mirrored container registry
LOCAL_REGISTRY="${MIRROR_VM_HOSTNAME}.${ISOLATED_NETWORK_DOMAIN}"
ISOLATED_NETWORK_DOMAIN="isolated.local"
ISOLATED_AI_SVC_API_HOSTNAME="ai-api"
ISOLATED_AI_SVC_WEB_UI_HOSTNAME="ai-web"
ISOLATED_AI_SVC_DB_HOSTNAME="ai-db"
ISOLATED_AI_SVC_IMAGE_HOSTNAME="ai-image"
ISOLATED_AI_SVC_ENDPOINT="assisted-installer"
ISOLATED_AI_SVC_ENDPOINT_IP="192.168.50.11"
ISOLATED_AI_SVC_HAPROXY_IP="192.168.50.13"
ISOLATED_AI_SVC_NGINX_IP="192.168.50.14"
MIRROR_VM_ISOLATED_BRIDGE_IFACE="bridge0"
MIRROR_VM_ISOLATED_BRIDGE_IFACE_IP="192.168.50.7"
## Start the Nginx HTTP Server
podman run -dt --name mirror-websrv \
--network $MIRROR_VM_ISOLATED_BRIDGE_IFACE --ip "${ISOLATED_AI_SVC_NGINX_IP}" -p 8080/tcp \
-m 1024m \
-e "NGINX_PORT=8080" \
--authfile ${PULL_SECRET_PATH} \
-v ${MIRROR_BASE_PATH}/downloads:/usr/share/nginx/html/pub/downloads \
-v ${MIRROR_BASE_PATH}/mirror-ingress/nginx/templates:/etc/nginx/templates \
$LOCAL_REGISTRY/library/nginx:latest
## Start HAProxy
podman run -dt --sysctl net.ipv4.ip_unprivileged_port_start=0 \
--name mirror-ingress -m 1024m \
--network $MIRROR_VM_ISOLATED_BRIDGE_IFACE --ip "${ISOLATED_AI_SVC_HAPROXY_IP}" -p 80/tcp -p 443/tcp \
--authfile ${PULL_SECRET_PATH} \
-v ${MIRROR_BASE_PATH}/mirror-ingress/haproxy:/usr/local/etc/haproxy:ro \
-v ${MIRROR_BASE_PATH}/pki:/usr/local/etc/certs:ro \
$LOCAL_REGISTRY/library/haproxy:latest
## Preset the needed assets for OAS
### Copy the RHCOS live CD
if [ ! -f "${MIRROR_BASE_PATH}/ai-svc/local-store/rhcos-live.x86_64.iso" ]; then
cp ${MIRROR_BASE_PATH}/downloads/rhcos/${DEFAULT_VERSION}/rhcos-live.x86_64.iso ${MIRROR_BASE_PATH}/ai-svc/local-store/rhcos-live.x86_64.iso
fi
### Copy the RHCOS installer
if [ ! -f "$MIRROR_BASE_PATH/ai-svc/local-store/coreos-installer" ]; then
podman run -it --rm --authfile ${PULL_SECRET_PATH} \
-v ${MIRROR_BASE_PATH}/ai-svc/local-store:/data \
-w /data \
--entrypoint /bin/bash \
$LOCAL_REGISTRY/coreos/coreos-installer:v0.10.0 \
-c 'cp /usr/sbin/coreos-installer /data/coreos-installer'
fi
## Create the Assisted Installer Service Pod
podman pod create --name $ISOLATED_AI_SVC_ENDPOINT \
-p 5432:5432,8080:8080,8090:8090,8888:8888 \
--network "${MIRROR_VM_ISOLATED_BRIDGE_IFACE}" \
--ip "${ISOLATED_AI_SVC_ENDPOINT_IP}" \
--dns "${MIRROR_VM_ISOLATED_BRIDGE_IFACE_IP}" \
--dns-search "${ISOLATED_NETWORK_DOMAIN}"
## Prepare for DB persistence
### NOTE: Make sure to delete this directory if persistence is not desired for a new environment!
mkdir -p ${MIRROR_BASE_PATH}/ai-svc/volumes/db
chown -R 26 ${MIRROR_BASE_PATH}/ai-svc/volumes/db
## Start the OAS Database
podman run -dt --pod $ISOLATED_AI_SVC_ENDPOINT --name $ISOLATED_AI_SVC_DB_HOSTNAME \
-m 512m \
--restart unless-stopped \
--authfile ${PULL_SECRET_PATH} \
--env-file ${MIRROR_BASE_PATH}/ai-svc/volumes/opt/onprem-environment \
-v ${MIRROR_BASE_PATH}/ai-svc/volumes/db:/var/lib/pgsql:z \
$LOCAL_REGISTRY/ocpmetal/postgresql-12-centos7:latest
## Start the OAS Image Service
podman run -dt --pod $ISOLATED_AI_SVC_ENDPOINT --name $ISOLATED_AI_SVC_IMAGE_HOSTNAME \
-m 1024m \
--restart unless-stopped \
--authfile ${PULL_SECRET_PATH} \
--env-file $MIRROR_BASE_PATH/ai-svc/volumes/opt/onprem-environment \
-v $MIRROR_BASE_PATH/ai-svc/volumes/imgsvc:/data:z \
-v $MIRROR_BASE_PATH/downloads/ca.cert.pem:/etc/pki/ca-trust/source/anchors/ca.cert.pem:z \
--entrypoint='["/bin/bash", "-c", "update-ca-trust; /assisted-image-service"]' \
$LOCAL_REGISTRY/edge-infrastructure/assisted-image-service:stable
## Start the OAS API
podman run -dt --pod $ISOLATED_AI_SVC_ENDPOINT --name $ISOLATED_AI_SVC_API_HOSTNAME \
-m 1024m \
--restart unless-stopped \
--authfile ${PULL_SECRET_PATH} \
--env-file $MIRROR_BASE_PATH/ai-svc/volumes/opt/onprem-environment \
-e DUMMY_IGNITION=False \
-v $MIRROR_BASE_PATH/ai-svc/local-store/rhcos-live.x86_64.iso:/data/livecd.iso:z \
-v $MIRROR_BASE_PATH/ai-svc/local-store/coreos-installer:/data/coreos-installer:z \
-v $MIRROR_BASE_PATH/downloads/ca.cert.pem:/etc/pki/ca-trust/source/anchors/ca.cert.pem:z \
--entrypoint='["/bin/bash", "-c", "update-ca-trust; /assisted-service"]' \
$LOCAL_REGISTRY/ocpmetal/assisted-service:latest
## Start the OAS WebUI
podman run -dt --pod $ISOLATED_AI_SVC_ENDPOINT --name $ISOLATED_AI_SVC_WEB_UI_HOSTNAME \
-m 512m \
--restart unless-stopped \
--authfile ${PULL_SECRET_PATH} \
--env-file $MIRROR_BASE_PATH/ai-svc/volumes/opt/onprem-environment \
-v $MIRROR_BASE_PATH/ai-svc/volumes/opt/nginx-ui.conf:/opt/bitnami/nginx/conf/server_blocks/nginx.conf:z \
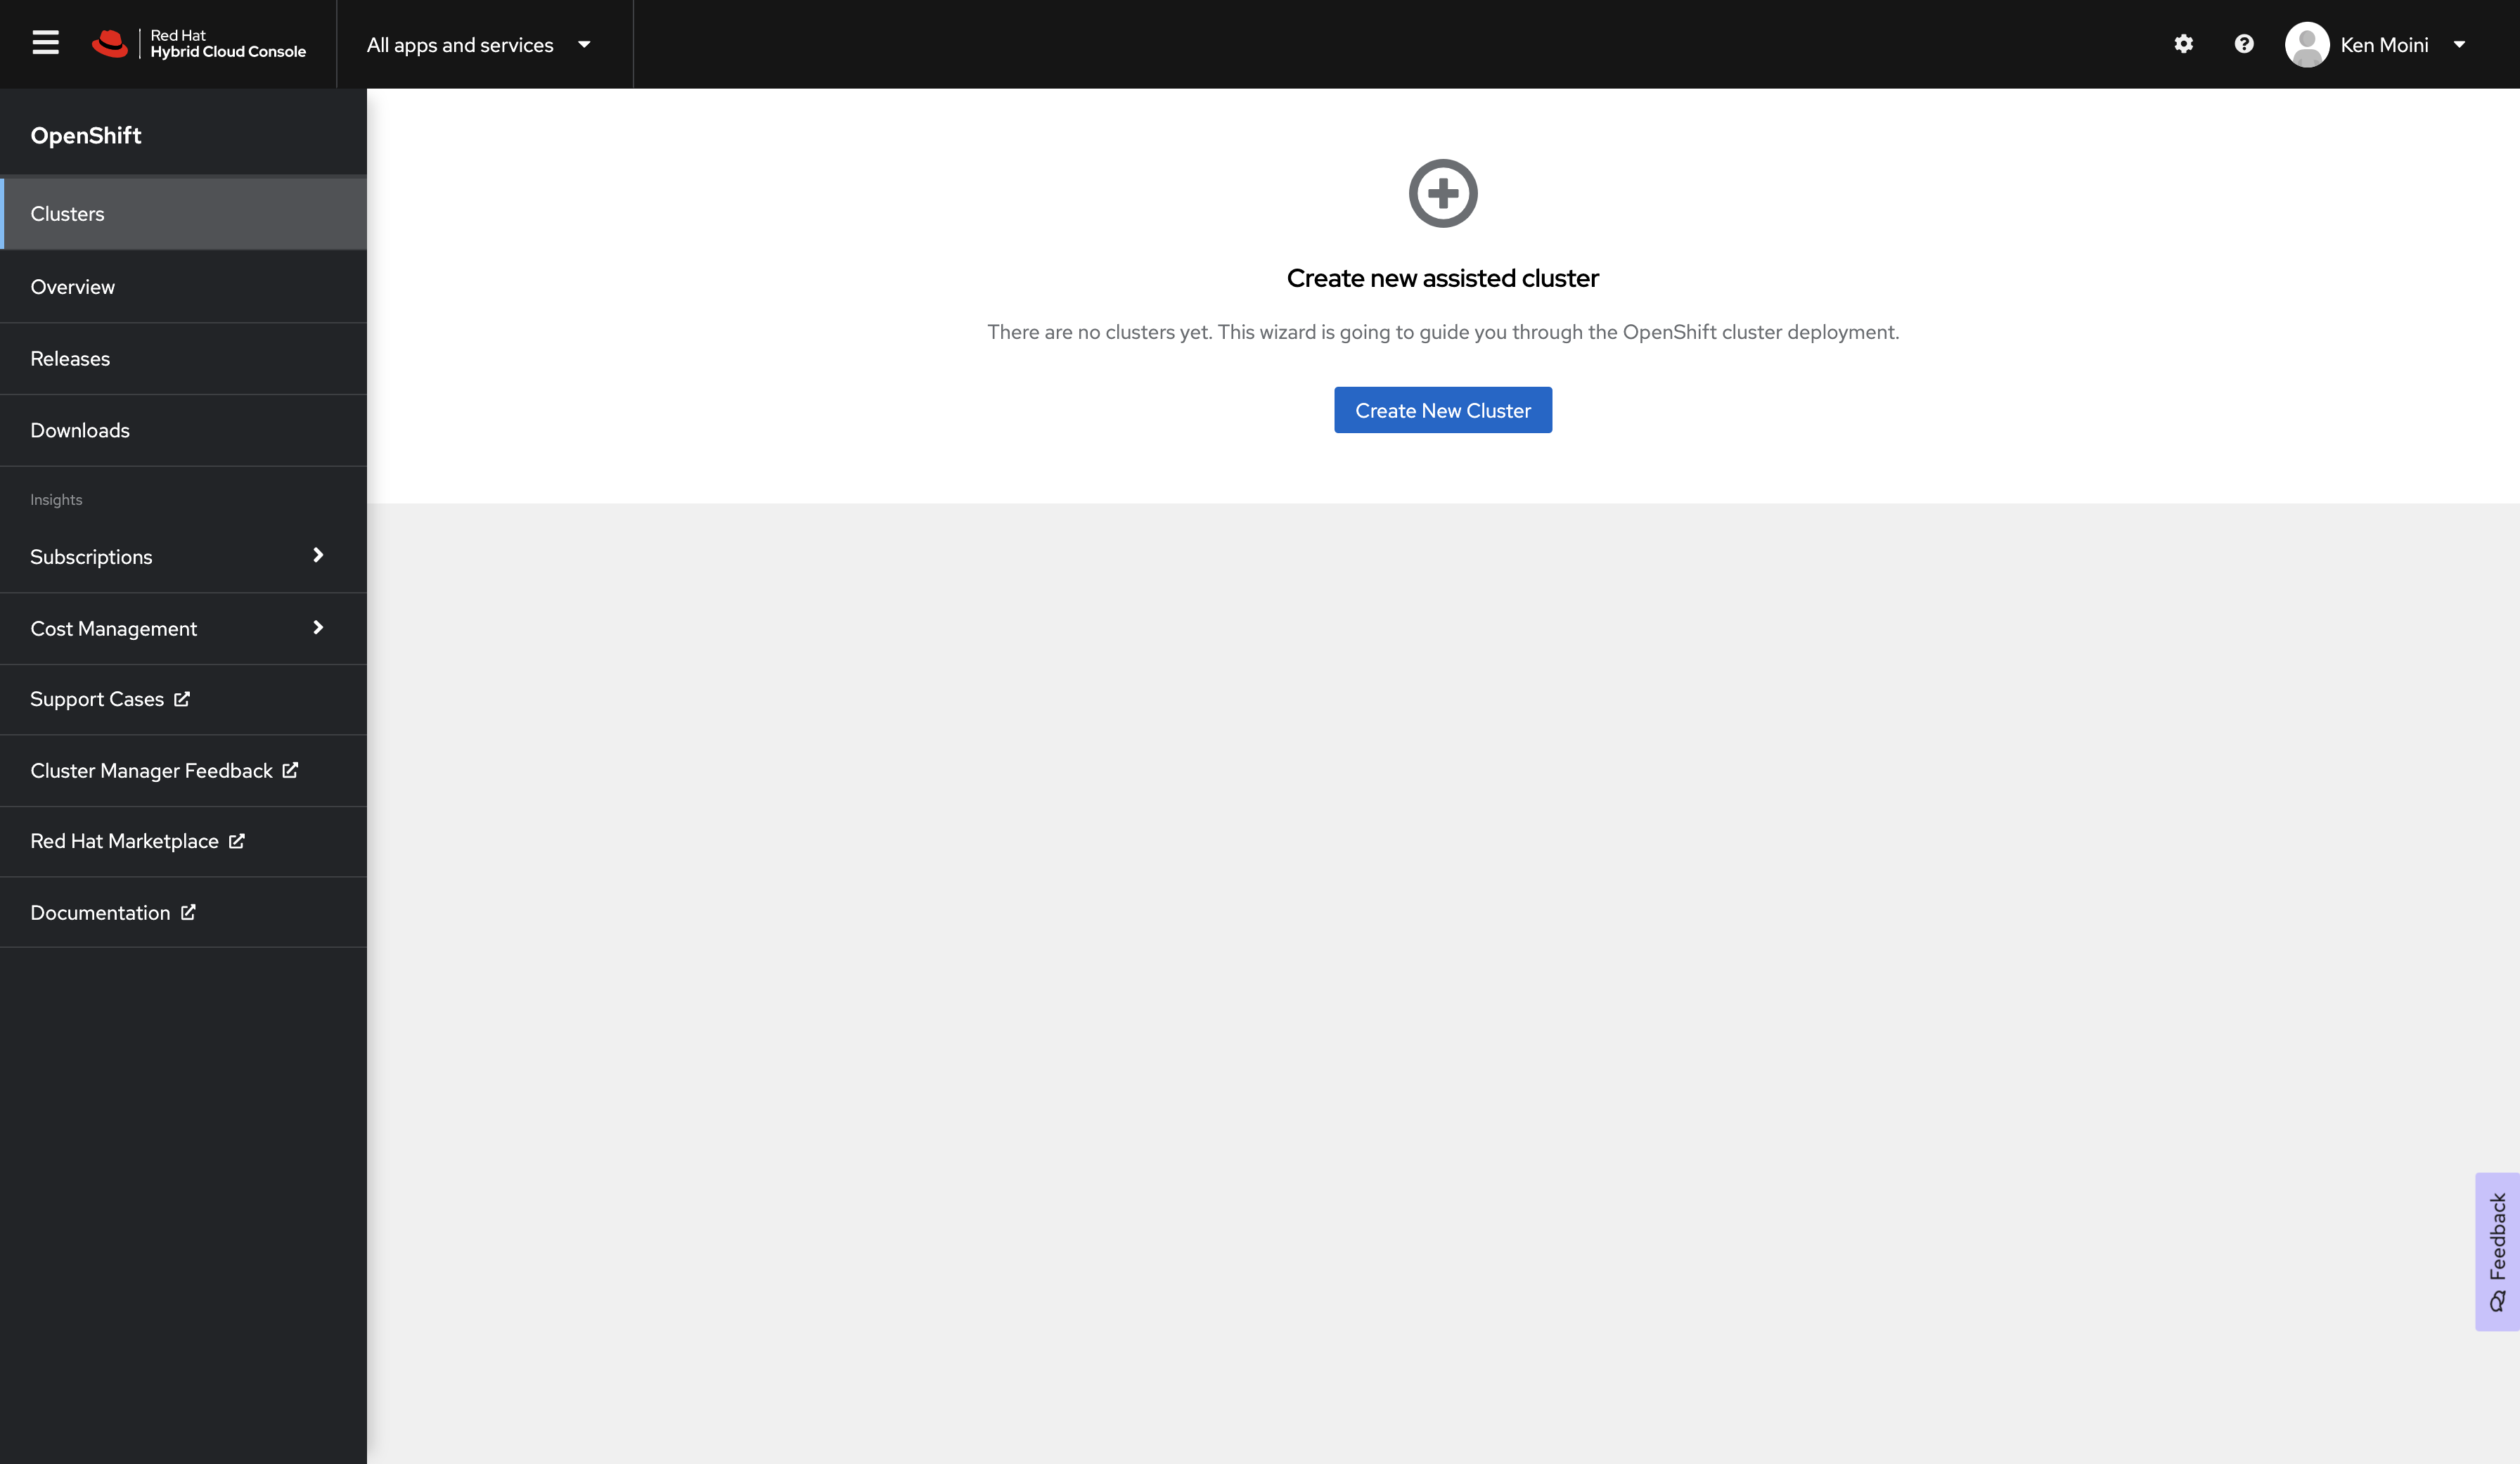
$LOCAL_REGISTRY/ocpmetal/ocp-metal-ui:stableAt this point, if you created the GUI Bastion VM in the isolated network, you can use a web browser to navigate to the Assisted Installer Service Endpoint (https://assisted-installer.isolated.local/) to access the OAS Web UI and create clusters!

You can also use the Assisted Installer Service API to create clusters - there’s even some Ansible Automation content created to deploy either to KVM/Libvirt or to Nutanix’s AHV via Prism!
Bonus: Packaging Assets for Transport
This is not part of the local Libvirt lab exercises, this is for moving assets and services from a connected system to a disconnected system
We have everything mirrored and running on this weird Mirror VM that lives in-between networks - but what about if you’re going to manually move it to a disconnected network?
The bulk of the processes are still the same, you just need to package up a few things and unpack them properly…let’s start with the process to package things up nice and right:
## Set some variables
PACKAGE_AND_COMPRESS_DESTINATION_PATH="/opt"
ISOLATED_AI_SVC_API_HOSTNAME="ai-api"
ISOLATED_AI_SVC_WEB_UI_HOSTNAME="ai-web"
ISOLATED_AI_SVC_IMAGE_HOSTNAME="ai-image"
ISOLATED_AI_SVC_DB_HOSTNAME="ai-db"
ISOLATED_AI_SVC_ENDPOINT="assisted-installer"

## Stop the container services if they are running
podman kill dns-go-zones
podman kill mirror-registry
podman kill mirror-ingress
podman kill mirror-websrv
podman kill $ISOLATED_AI_SVC_WEB_UI_HOSTNAME
podman kill $ISOLATED_AI_SVC_API_HOSTNAME
podman kill $ISOLATED_AI_SVC_IMAGE_HOSTNAME
podman kill $ISOLATED_AI_SVC_DB_HOSTNAME
podman pod kill $ISOLATED_AI_SVC_ENDPOINT

podman rm -f -i dns-go-zones
podman rm -f -i mirror-registry
podman rm -f -i mirror-ingress
podman rm -f -i mirror-websrv
podman rm -f -i $ISOLATED_AI_SVC_WEB_UI_HOSTNAME
podman rm -f -i $ISOLATED_AI_SVC_API_HOSTNAME
podman rm -f -i $ISOLATED_AI_SVC_IMAGE_HOSTNAME
podman rm -f -i $ISOLATED_AI_SVC_DB_HOSTNAME
podman pod rm -f -i $ISOLATED_AI_SVC_ENDPOINT

## Save the Image Registry Container Image to a file
podman save -o ${MIRROR_BASE_PATH}/downloads/registry-container.tar quay.io/redhat-emea-ssa-team/registry:2

## Optionally, save the Go Zones DNS Container Image to a file
podman save -o ${MIRROR_BASE_PATH}/downloads/dns-container.tar quay.io/kenmoini/go-zones:file-to-bind

## Package the whole mirrored directory with 7Zip, split into 1GB files
7za a -t7z -v1g -m0=lzma -mx=9 -mfb=64 -md=32m -ms=on ${PACKAGE_AND_COMPRESS_DESTINATION_PATH}/offline-openshift-bundle.7z ${MIRROR_BASE_PATH}

##### OR

## Package the whole mirrored directory with TAR
tar -cvzf ${PACKAGE_AND_COMPRESS_DESTINATION_PATH}/offline-openshift-bundle.tar.gz ${MIRROR_BASE_PATH}

## Split the Tar package into 1GB files & remove the original TAR
split -b 1G ${PACKAGE_AND_COMPRESS_DESTINATION_PATH}/offline-openshift-bundle.tar.gz "${PACKAGE_AND_COMPRESS_DESTINATION_PATH}/offline-openshift-bundle.tar.gz.part" && rm ${PACKAGE_AND_COMPRESS_DESTINATION_PATH}/offline-openshift-bundle.tar.gz

## Create an MD5 hash table for integrity verification
md5sum ${PACKAGE_AND_COMPRESS_DESTINATION_PATH}/* > ${MIRROR_BASE_PATH}/offline-openshift-bundle.md5
mv ${MIRROR_BASE_PATH}/offline-openshift-bundle.md5 ${PACKAGE_AND_COMPRESS_DESTINATION_PATH}/offline-openshift-bundle.md5
Now just move those files to the disconnected network and do the following to unpackage:
## Set some variables
ARCHIVE_SOURCE_DIR="/mnt/extData"
TARGET_EXTRACTION_DIR="/opt/offline-ai"

## Unpackage the whole TAR bundle
cat ${ARCHIVE_SOURCE_DIR}/offline-openshift-bundle.tar.gz.part* > ${TARGET_EXTRACTION_DIR}/offline-openshift-bundle.tar.gz && rm ${ARCHIVE_SOURCE_DIR}/offline-openshift-bundle.tar.gz.part*
cd $TARGET_EXTRACTION_DIR
tar zxvf offline-openshift-bundle.tar.gz

##### OR

## Unpackage the 7Zip bundle
cp ${ARCHIVE_SOURCE_DIR}/offline-openshift-bundle.7z* ${TARGET_EXTRACTION_DIR}/
cd $TARGET_EXTRACTION_DIR
7za x offline-openshift-bundle.7z*

## Unpackage the Image Registry Container file
podman import $TARGET_EXTRACTION_DIR/downloads/registry-container.tar

## Optionally, unpackage the DNS Image Container file
podman import $TARGET_EXTRACTION_DIR/downloads/dns-container.tar

## Start the container services in the needed order
## - DNS
## - Container Registry
## - Nginx
## - HAProxy
## - OAS DB
## - OAS Image Service
## - OAS API
## - OAS WebUI

## ?????

## PROFIT!!!!1
Credits
- Alexis de Talhouët for debugging errors I made in this post and trying it with other components, such as the oc mirror-registry!

