

The ultimate trifecta to local development environments on Windows
There was an interesting shift that happened recently, Docker Inc decided to change their license for Docker Desktop and require developers who do work for their company to pay for a license - of course, this normally falls back to the company paying for the product and going through all the normal fiery hoops of procurement.
On Linux, the developer experience is pretty much first-class - almost anything works out of the box, be that Docker, Podman, runtimes, virtual machines, so on.
On Mac OS X, the developer experience is solid, many things are available with little effort and many Linux tools are available with something like a brew install command.
On Windows however, that’s a different story. To bridge the gap there’s something called Windows Subsystem for Linux (WSL) - a Linux-based environment that runs on top of Windows. It’s pretty great really, I used it for a while and it’s a great way to do Linux-based development locally on Windows.
If you goto the Microsoft Store you’ll find very few WSL distributions - it’s pretty much just Ubuntu and some weird Fedora Remix, the latter of which is an unofficial community project since Microsoft’s WSL licensing is evidently too toxic for an official Fedora or Red Hat distribution. However, there’s nothing stopping you from making your own WSL distribution…
With that in mind, let’s look at how to get started with WSL on Windows, create a WSL distribution based on Red Hat’s Universal Base Image, get it up and running with some runtimes, and finally rootless Podman to build and run containers!
Installing WSL on Windows
Specifically, we’re installing WSL 2 - the Podman bits don’t work in WSL 1.
If you already have WSL installed, you can skip this section, or just do it anyway to be sure that it’s WSL v2 that you’re using.
On the Windows system, via a Powershell terminal with Administrative permissions, run the following:
# Enable WSL2
dism.exe /online /enable-feature /featurename:Microsoft-Windows-Subsystem-Linux /all /norestart

# Enable VM Platform for WSL2
dism.exe /online /enable-feature /featurename:VirtualMachinePlatform /all /norestart

## Make some directories
mkdir C:\WSLDistros\
mkdir C:\WSLDistros\UBI8\
Now, restart your computer and you should be able to run WSL2!
Create a Container Package to Import into WSL
WSL takes in a base Linux filesystem, such as one that would be present in a container image - that’s right you can make a WSL distribution out of almost any Linux container image. The only requirement is that the image has a /bin/bash shell.
Run the following on a Linux system, you will need to be able to sudo or run as root:
## Fedora/RHEL Install buildah
sudo dnf install -y buildah

## Debian/Ubuntu Install buildah
sudo apt-get install -y buildah

## Switch to the root user
sudo -i

## Instantiate the Image
CONTNR=$(buildah from registry.access.redhat.com/ubi8/ubi-init:8.5-12.1648464555)

## Mount the image
MNTPNT=$(buildah mount $CONTNR)

## Enter the mount point
cd $MNTPNT

## Create a tar file of the container filesystem, outside of the mounted filesystem
tar cvf /opt/ubi8-init-buildah-base.tar .
With that, you should now have a tar file of the container filesystem that you can use to create a WSL distribution.
Transfer it to your Windows system in some manner, maybe something like WinSCP.
Create the WSL Distribution
Now you can create a WSL distribution out of the tar file you just created.
On the Windows system, via a Powershell terminal with Administrative permissions, run the following - assuming the ubi8-init-buildah-base.tar file was transferred to the C:\WSLDistros\ directory:
## Set the default version to WSL2
wsl --set-default-version 2

## Import the Image
wsl --import UBI8 C:\WSLDistros\UBI8 C:\WSLDistros\ubi8-init-buildah-base.tar

## Test the distribution - will launch the WSL2 distro
wsl -d UBI8

## Optionally set it as a default
wsl --set-default UBI8
The UBI 8 WSL distribution should now be available for use - however, there’s not much on it, so let’s get it configured and install some things that a developer might want to use.
Configuring the WSL Distribution
Out of the box there’s not much, it’s the base RH UBI image. Let’s update the system packages, add a few other packages, add a user, set it up nice and right for rootless Podman, and then install some runtimes.
You can connect to the WSL distribution via a Powershell terminal and by running wsl -d UBI8 - you’ll be given a root prompt in the WSL distribution. You can also connect to the WSL distribution via VS Code for instance, in case you’d like a more GUI-driven editor.
Once inside the WSL distribution by one manner or another, run the following:
## Download the configuration script
curl -O https://raw.githubusercontent.com/kenmoini/wsl-helper/main/configure_ubi_wsl.sh

## Make it executable
chmod +x configure_ubi_wsl.sh

## Edit it to your liking
vi configure_ubi_wsl.sh

## Run the configuration script
./configure_ubi_wsl.sh
When editing the configure_ubi_wsl.sh script, make sure to edit the following lines at the top:
CREATE_USER="true"
NEW_USERNAME="wsluser"
NEW_USER_PASSWORD="somePassw0rd"
NEW_USER_TO_WHEEL="true"

INSTALL_ZSH="true"
INSTALL_GOLANG="true"
INSTALL_PYTHON="true"
INSTALL_PHP="true"
INSTALL_NODEJS="true"
INSTALL_ANSIBLE="true"
INSTALL_OCP_BINARIES="true"
INSTALL_PODMAN="true"- You may want a different username, and hopefully a different password for your user in the WSL distribution.
- You may or may not want to install ZSH, Golang, Python, PHP, NodeJS, Ansible, OCP binaries, and Podman - just set the related variables to true/false.
The rest of the script installs the packages, some of them from source such as ZSH since it’s not included in the RH UBI repos. The language runtimes will install from the RH UBI repos which is will keep your development environment in sync with the distributed RH UBI base images for those runtimes. The OCP binaries option will install oc, kubectl, and odo from the OCP mirror websites.
Once the script is done, you should exit from the WSL session and wait about 30 seconds for it to fully shutdown. Once you start it back up, you’ll be launched into the WSL distribution with the new user by default.
If you chose to install ZSH you’ll be prompted to install Oh My ZSH in case it hasn’t been done already. Once you do so you’ll want to relaunch the WSL distribution to fully cycle things properly.
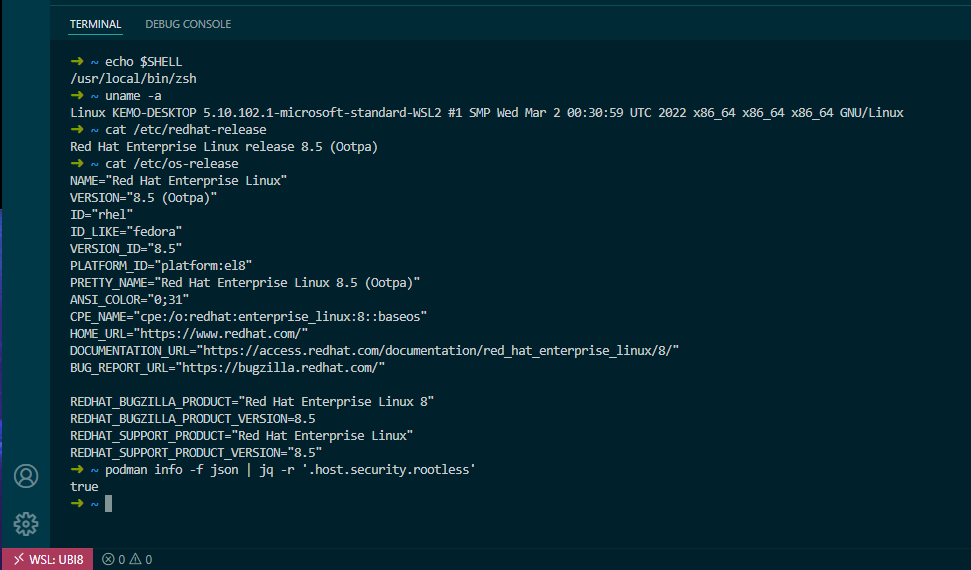
Test the Rootless Podman configuration with a podman info which will show you the configuration info for Podman, and podman run --rm -it registry.access.redhat.com/rhscl/httpd-24-rhel7:2.4-189 whoami which should show you default after it pulls the image.
Here’s what it looks like with a few other echo tests:
Bonus: Export the WSL Distribution
In case you are one of those organizations that is looking to leverage something like this, you can export the built WSL distribution to a tar file that can then be imported on other Windows systems.
wsl --export UBI8 C:\WSLDistros\built-UBI8.tarAnd that C:\WSLDistros\built-UBI8.tar file can be imported into a new WSL distribution on other systems to be used at scale! One could even go so far as to automate all of these steps with Ansible…

