

Zero Trust has a lot of trust, actually
So I’m getting into practical Zero Trust with AI…just kidding. It’s 2026 so if “AI” isn’t in the top fold you don’t get hits.
Really though I needed to demonstrate a workload using the Google Cloud SDK, running in a container - using Workload Identity Federation on Google Kubernetes Engine cluster - AND it running on OpenShift in a different datacenter…without modifications to the application code. I’ll get to that part later…
So I had Claude Fable 5.1 whip me up a quick little Python application that provides an API and Web UI…see, I do actually do some AI. You can find it here:
You can deploy it in a few different ways:
- GKE with Workload Identity
- Kubernetes/OpenShift with a Static GCP Service Account JSON, good for testing
- OpenShift with Zero Trust Workload Identity Management Operator (lol) to Google Cloud IAM Workload Identity Federation
There are examples for all those deployment targets in the repo - this article is more so to go over the OpenShift, ZTWIM, and Google Cloud side of things.
Zero What?
Zero Trust Workload Identity allows your workloads, be them containers or VMs, your nodes, and your 3rd party services to do two key things:
- Provide short-lived identities
- Attest (fancy word for validate with extra steps) the identities are who they say they are
The identities are usually workload and location scoped - in Kubernetes that means a Pod’s ServiceAccount in a Namespace. In AWS this is an IAM account, in Google Cloud this is a Service Account, in Azure this is an EntraID Service Account.
The idea is that you trust specific identities and their identity provider, and then they can exchange those short lived identity tokens/certificates for access to resources they need on either side.
The workflow is something like this for Google Cloud and GKE:
- Create a Google Cloud Service Account
- Give it permissions to some roles for access to some APIs in a Project so your workload can access them, including the workloadIdentityUser role.
- Give the Google Cloud Service Account access to bind with the GKE Workload Principal, which abbreviated looks like
ns/my-namespace/sa/my-service-account. This step is repeated per Workload Principal. - Deploy your application on GKE with an annotation on the ServiceAccount and GKE will exchange that GKE ServiceAccount token for a Google Cloud STS Token, keeping it rotated.
For a 3rd party integration with Google Cloud, such as with SPIFFE/SPIRE via ZTWIM Operator on OpenShift, there are a couple other steps:
- Deploy OpenShift and the ZTWIM Operator
- Create a Google Cloud Service Account
- Give the Google Cloud Service Account access to bind with the ZTWIM Workload Principal, which abbreviated looks like
ns/my-namespace/sa/my-service-account. This step is repeated per Workload Principal. - Create a Google Cloud OIDC Endpoint, enroll the Service Account to it
- Configure the Google Cloud OIDC Endpoint to trust the ZTWIM OIDC Endpoint
- Deploy your application on OpenShift…with a shim/helper to exchange the token and set the needed credentials, while rotating it before expiration.
For that last part you can use the spiffe-helper container to do that via an initContainer/sidecar, or you can roll one yourself.
Before getting too far, I think it’s useful to explain what SPIFFE/SPIRE are, and the components that make them up to enable Zero Trust Architectures.
SPIFFE
Secure Production Identity Framework For Everyone, or SPIFFE for short, is the framework that defines what Zero Trust Workload Identities are.
It dictates how workload identities/principals should be named as SPIFFE IDs, and the cryptographic structure and formatting for JWT/SVIDs and x509 Certificates.
More or less it’s what helps set a common language for consuming and distributing Zero Trust Identities.
You use SPIFFE with your workloads, eg you’ll load the spiffe library/module for your language, which talks to the SPIRE socket with an Identity/Principal, that exchanges that Principal Token along side an Audience that we’re interested in getting a short-lived token from.
SPIRE
SPIFFE Runtime Environment, or SPIRE cause we love acronymns in our acronymns, makes SPIFFE deployable and usable.
SPIRE provides a SPIRE Server which runs an OIDC Provider and acts as the central Authority that handles the signing of SPIFFE formatted identities.
You also have the node-level SPIRE Agents exposing endpoints/sockets that can be used by your SPIFFE-enabled workloads. This allows for node-level attestation and interfaces for attesting the Workload Identities, providing domain scoped SVIDs.
There are some really nice diagrams and much more information in the SPIFFE documentation.
SPIFFE Helper
Not really a key part of the SPIFFE/SPIRE architecture, but certainly something that’s needed to make things work - SPIFFE Helper.
When you perform an SVID <> JWT/x509 exchange, if you inspect it you’ll see a pretty short validity period - by default on ZTWIM JWTs last 5 minutes and Certificates are valid for an hour. So you need something performing that exchange regularly before they expire.
That’s where SPIFFE Helper comes in - it can manage the SVID exchange for your workload, either once or regularly (called daemon mode). We’ll run this as an initContainer sidecar so the exchange happens before a workload starts and so that it’s easily injected into existing workloads.
Prerequisites
Anyway, enough with the jib jab, on to…a lot more jib jab.
Before starting there are a few ingredients you’ll need:
- A Google Cloud account with a Project - if you don’t have resources created, an example Storage Bucket is provided.
- Access to an OpenShift cluster with cluster-admin to deploy the ZTWIM Operator namely, and also to deploy the application but that doesn’t require cluster-admin.
- That OpenShift cluster is accessible from the public Internet - if not, there are some manual steps and additional considerations to be had.
There are some other things such as PKI setup that should be considered in production, and you’d probably want to use a shared upstream source, but this example goes over using self-signed certificates bootstraped automatically by the Operator.
OpenShift Setup
Operator Installation
Before really starting, you’ll need to install the ZTWIM Operator - you can do this via click-ops in the OpenShift GUI, via an Advanced Cluster Management Policy, or with the YAML below:
---
apiVersion: v1
kind: Namespace
metadata:
  name: zero-trust-workload-identity-manager
---
apiVersion: operators.coreos.com/v1
kind: OperatorGroup
metadata:
  name: openshift-zero-trust-workload-identity-manager
  namespace: zero-trust-workload-identity-manager
spec:
  upgradeStrategy: Default
---
apiVersion: operators.coreos.com/v1alpha1
kind: Subscription
metadata:
  name: openshift-zero-trust-workload-identity-manager
  namespace: zero-trust-workload-identity-manager
spec:
  channel: stable-v1
  installPlanApproval: Automatic
  name: openshift-zero-trust-workload-identity-manager
  source: redhat-operators
  sourceNamespace: openshift-marketplace
And in case you want to enable metrics scraping from the Operator:
---
apiVersion: v1
kind: Secret
type: kubernetes.io/service-account-token
metadata:
  name: zero-trust-workload-identity-manager-metrics-auth
  namespace: zero-trust-workload-identity-manager
  annotations:
    kubernetes.io/service-account.name: zero-trust-workload-identity-manager-controller-manager
  labels:
    name: zero-trust-workload-identity-manager
---
apiVersion: rbac.authorization.k8s.io/v1
kind: ClusterRoleBinding
metadata:
  labels:
    name: zero-trust-workload-identity-manager
  name: zero-trust-workload-identity-manager-allow-metrics-access
roleRef:
  apiGroup: rbac.authorization.k8s.io
  kind: ClusterRole
  name: zero-trust-workload-identity-manager-metrics-reader
subjects:
- kind: ServiceAccount
  name: zero-trust-workload-identity-manager-controller-manager
  namespace: zero-trust-workload-identity-manager
---
apiVersion: monitoring.coreos.com/v1
kind: ServiceMonitor
metadata:
  labels:
    name: zero-trust-workload-identity-manager
  name: zero-trust-workload-identity-manager-metrics-monitor
  namespace: zero-trust-workload-identity-manager
spec:
  endpoints:
    - authorization:
        credentials:
          name: zero-trust-workload-identity-manager-metrics-auth
          key: token
        type: Bearer
      interval: 60s
      path: /metrics
      port: metrics-https
      scheme: https
      scrapeTimeout: 30s
      tlsConfig:
        ca:
          configMap:
            name: openshift-service-ca.crt
            key: service-ca.crt
        serverName: zero-trust-workload-identity-manager-metrics-service.zero-trust-workload-identity-manager.svc.cluster.local
  namespaceSelector:
    matchNames:
      - zero-trust-workload-identity-manager
  selector:
    matchLabels:
      name: zero-trust-workload-identity-manager
Operator Deployment
With the ZTWIM Operator installed, we can move on to deploying…a wholllllle bunch of CRs…
ZeroTrustWorkloadIdentityManager
The ZeroTrustWorkloadIdentityManager is sort of the quarterback of the whole deal if I were to use a sportsball reference. It doesn’t really do much but over see things and talk about what all the other players are doing.
Yep, nailed that sportsball talk.
---
apiVersion: operator.openshift.io/v1alpha1
kind: ZeroTrustWorkloadIdentityManager
metadata:
  name: cluster
  labels:
    app.kubernetes.io/name: zero-trust-workload-identity-manager
    app.kubernetes.io/managed-by: zero-trust-workload-identity-manager
spec:
  # Base domain for this ZTWIM deployment, substituting your CLUSTER_NAME and domain.tld
  trustDomain: 'apps.CLUSTER_NAME.domain.tld'
  # A name...yep
  clusterName: 'CLUSTER_NAME'
  # ConfigMap generated by the SpireServer that should be watched
  bundleConfigMap: "spire-bundle"
Creating this CR doesn’t do much outside of wait for other CRs to be made so let’s do that…
SpireServer
The SpireServer CR bootstraps the SPIRE server and the PKI needed for it. It deploys the API endpoints that are used for identity/trust validation.
- Make sure to substitute the
CLUSTER_NAME.domain.tldandSTORAGE_CLASS_NAME
---
apiVersion: operator.openshift.io/v1alpha1
kind: SpireServer
metadata:
  name: cluster
spec:
  logLevel: "info"
  logFormat: "text"
  jwtIssuer: 'https://oidc-discovery.apps.CLUSTER_NAME.domain.tld'
  caValidity: "24h"
  defaultX509Validity: "1h"
  defaultJWTValidity: "5m"
  jwtKeyType: "rsa-2048"
  persistence:
    size: "5Gi"
    accessMode: "ReadWriteOnce"
    storageClass: "STORAGE_CLASS_NAME"
  datastore:
    databaseType: "sqlite3"
    connectionString: "/run/spire/data/datastore.sqlite3"
    tlsSecretName: ""
    maxOpenConns: 100
    maxIdleConns: 10
    connMaxLifetime: 0
    disableMigration: "false"
  caSubject:
    country: "US"
    organization: "Example Corporation"
    commonName: 'CLUSTER_NAME SPIRE Server CA'
  # If not using a self-signed root generated by this SpireServer
  # upstreamAuthority:
  #   vault: ...
  #   certManager: ...
A few things to note:
- The PKI is bootstrapped by the SPIRE server, ideally this would be a delegated sub-CA from a trusted root provided by Cert-Manager/Vault.
- It uses a simple SQLite DB, this should probably be a more durable PGSQL store.
- If
spec.jwtIssueris not a public endpoint that’s secured by a TLS certificate that’s trusted by the standard public trust bundle then you’ll need to upload the JWKS to the OIDC Endpoint in Google Cloud…regularly. - The
spec.caValidityimpacts how long the generated CA is valid for that signs the JWTs and x509 certificates. SPIRE prepares a new JWT signing key every 12 hours and activates it 8 hours later. Any JWKS snapshot goes stale within roughly 8 to 20 hours. This is the timeframe you’d have to fit automation into in order to add a trust to the OIDC Endpoint in Google Cloud.
Once the SpireServer CR is created you should see the .status field conditions change in the ZeroTrustWorkloadIdentityManager CR.
SpireOIDCDiscoveryProvider
Next up is the SpireOIDCDiscoveryProvider which deploys the OIDC server and Route needed for validating the SPIRE Issuer.
---
apiVersion: operator.openshift.io/v1alpha1
kind: SpireOIDCDiscoveryProvider
metadata:
  name: cluster
spec:
  logLevel: "info"
  logFormat: "text"
  # This CSI Driver name will be used shortly, names must match
  csiDriverName: "csi.spiffe.io"
  # Must match the jwtIssuer defined in the SpireServer
  jwtIssuer: 'https://oidc-discovery.apps.CLUSTER_NAME.domain.tld'
  replicaCount: 1
  # If you want the Operator to create the Route
  managedRoute: "true"
  # When using an Secret for Route TLS
  # externalSecretRef: "oidc-discovery-tls"
- If
spec.jwtIssueris not a public endpoint that’s secured by a TLS certificate that’s trusted by the standard public trust bundle then you’ll need to upload the JWKS to the OIDC Endpoint in Google Cloud…regularly. - If you want to request a Certificate from Cert-Manager with something like Let’s Encrypt, this is an example:
---
apiVersion: cert-manager.io/v1
kind: Certificate
metadata:
  name: oidc-discovery
  namespace: zero-trust-workload-identity-manager
spec:
  # Both commonName and dnsNames must be set to the jwtIssuer set in the SpireServer and SpireOIDCDiscoveryProvider CRs
  commonName: oidc-discovery.apps.CLUSTER_NAME.domain.tld
  dnsNames:
    - oidc-discovery.apps.CLUSTER_NAME.domain.tld
  # Change to your Issuer
  issuerRef:
    kind: ClusterIssuer
    name: letsencrypt-digitalocean
  # This is the name of the TLS-type Secret created
  secretName: oidc-discovery-tls
Make sure to uncomment/change the SpireOIDCDiscoveryProvider’s .spec.externalSecretRef to match the name defined in the Certificate .spec.secretName.
Once again, once you deploy the SpireOIDCDiscoveryProvider, you should see the status conditions of the ZeroTrustWorkloadIdentityManager CR change as it identifies another component being deployed/ready.
SpiffeCSIDriver
The SpiffeCSIDriver provides a CSIDriver that allows mounting of a socket to Pods. This allows your workload to exchange it’s ServiceAccount token with an Audience for an SVID that can be used to authenticate to trust domain services.
---
apiVersion: operator.openshift.io/v1alpha1
kind: SpiffeCSIDriver
metadata:
  name: cluster
spec:
  # pluginName must match the csiDriverName in the SpireOIDCDiscoveryProvider CR
  pluginName: "csi.spiffe.io"
  # agentSocketPath must match the SpireAgent's socketPath below
  agentSocketPath: "/run/spire/agent-sockets"
SpireAgent
One last thing before we move on to the Google Cloud side of things, the SpireAgent CR. The SPIRE Agent runs as a DaemonSet on every node and provides the socket interface that the CSIDriver makes available for mounting. The SPIRE Agent also handles generating attesting local SVIDs and keeping a cache of them.
---
apiVersion: operator.openshift.io/v1alpha1
kind: SpireAgent
metadata:
  name: cluster
spec:
  # Must match the agentSocketPath in the SpiffeCSIDriver CR
  socketPath: "/run/spire/agent-sockets"
  logLevel: "info"
  logFormat: "text"
  # Allow node-level attestation via SecureBoot extensions
  nodeAttestor:
    k8sPSATEnabled: "true"
  # Allow workload attestation of Kubernetes ServiceAccounts
  workloadAttestors:
    k8sEnabled: "true"
    workloadAttestorsVerification:
      type: "auto"
      hostCertBasePath: "/etc/kubernetes"
      hostCertFileName: "kubelet-ca.crt"
    disableContainerSelectors: "false"
    useNewContainerLocator: "true"
With everything deployed the ZeroTrustWorkloadIdentityManager CR should now show health and available for all the different components.
Bonus: Metrics
In case you have User Workload Monitoring enabled and want to scrape the metrics provided by the SPIRE Agent and Server controllers, you can also create the following ServiceMonitors:
---
apiVersion: monitoring.coreos.com/v1
kind: ServiceMonitor
metadata:
  labels:
    app.kubernetes.io/name: spire-agent
    name: spire-agent-metrics
  name: spire-agent-metrics
  namespace: zero-trust-workload-identity-manager
spec:
  endpoints:
    - port: metrics
      interval: 30s
      path: /metrics
  selector:
    matchLabels:
      app.kubernetes.io/name: spire-agent
  namespaceSelector:
    matchNames:
      - zero-trust-workload-identity-manager
---
apiVersion: monitoring.coreos.com/v1
kind: ServiceMonitor
metadata:
  labels:
    app.kubernetes.io/name: spire-server
    name: spire-server-metrics
  name: spire-server-metrics
  namespace: zero-trust-workload-identity-manager
spec:
  endpoints:
    - port: metrics
      interval: 30s
      path: /metrics
  selector:
    matchLabels:
      app.kubernetes.io/name: spire-server
  namespaceSelector:
    matchNames:
      - zero-trust-workload-identity-manager
Google Cloud Setup
Whew - that was a bit of a doozy. Now for some Google Cloud setup tasks.
The following steps would be performed by a system that has the gcloud CLI that’s authenticated - or you can do what I do, and just dump this stuff into the Cloud Shell since that makes it easy.
The GCP Dashboard app just uses the Google Cloud SDK to enumerate some basic resources in the Project, but to do so it needs some permissions, and some resources to display. The example below creates a Storage Bucket since that’s hella cheap.
########################################
### Edit these variables, maybe
# Configured Region
REGION="us-central1"

# Auto-query the project unless you want to set something else
PROJECT=$(gcloud config get-value project)

# Google Service Account Name
GOOGLE_SA_NAME="gcp-dash"
GOOGLE_SA_ID="${GOOGLE_SA_NAME}@${PROJECT}.iam.gserviceaccount.com"

########################################
### Don't edit these variables, maybe

########################################
### IAM Creation
# Create a Google Service Account
gcloud iam service-accounts create ${GOOGLE_SA_NAME} --project=${PROJECT}

########################################
### RBAC
# Give the Google Service Account access to APIs used by the dashboard

# Workload Identity User
gcloud projects add-iam-policy-binding projects/${PROJECT} \
    --role="roles/iam.workloadIdentityUser" \
    --member="serviceAccount:${GOOGLE_SA_ID}" \
    --condition=None

# Storage Viewer
gcloud projects add-iam-policy-binding projects/${PROJECT} \
    --role="roles/storage.objectViewer" \
    --member="serviceAccount:${GOOGLE_SA_ID}" \
    --condition=None
gcloud projects add-iam-policy-binding projects/${PROJECT} \
    --role="roles/storage.bucketViewer" \
    --member="serviceAccount:${GOOGLE_SA_ID}" \
    --condition=None

# GKE Viewer
gcloud projects add-iam-policy-binding projects/${PROJECT} \
    --role="roles/container.clusterViewer" \
    --member="serviceAccount:${GOOGLE_SA_ID}" \
    --condition=None

# Network Viewer
gcloud projects add-iam-policy-binding projects/${PROJECT} \
    --role="roles/compute.networkViewer" \
    --member="serviceAccount:${GOOGLE_SA_ID}" \
    --condition=None

# VM Viewer
gcloud projects add-iam-policy-binding projects/${PROJECT} \
    --role="roles/compute.viewer" \
    --member="serviceAccount:${GOOGLE_SA_ID}" \
    --condition=None

########################################
### [Optional]
# If you don't have any resources in the Project, create a sample Storage Bucket so the dashboard can show some data
BUCKET_NAME="gcp-dash-${PROJECT}" # This has to be unique from all the buckets ever
gcloud storage buckets create gs://${BUCKET_NAME}
With that the basic Google Service Account and RBAC is created, and these are the same steps you’d do to setup the workload to use the Google Cloud SDK, just sprinkle on a key and you got a Static Service Account JSON file.
Next we need to create an OIDC Pool and Endpoint and give the target OpenShift ZTWIM workload principal access to use it and the Google Service Account:
########################################
### Target Workload Configuration
# Kubernetes Namespace
K8S_NS="gcp-dash-ztwim"
# Kubernetes ServiceAccount
K8S_SA="gcp-dash"
# Set the target workload principal, substitute the CLUSTER_NAME and domain.tld
SPIFFE_ID_WORKLOAD_APP="spiffe://apps.CLUSTER_NAME.domain.tld/ns/${K8S_NS}/sa/${K8S_SA}"
# Or, get it dynamically with the help of a logged in oc client
# SPIFFE_ID_WORKLOAD_APP="spiffe://$(oc get cm -n zero-trust-workload-identity-manager spire-server -o jsonpath='{ .data.server\.conf }' | jq -r '.server.trust_domain')/ns/${K8S_NS}/sa/${K8S_SA}"

# Set Project Variables dynamically or override manually, same as before
PROJECT=$(gcloud config get-value project)
PROJECT_NUMBER=$(gcloud projects describe $PROJECT --format="value(projectNumber)")

# Google Service Account Name, same as before
GOOGLE_SA_NAME="gcp-dash"
GOOGLE_SA_ID="${GOOGLE_SA_NAME}@${PROJECT}.iam.gserviceaccount.com"

# Google Workload Identity Pool Configuration - substitute CLUSTER_NAME
WORKLOAD_IDENTITY_POOL="ztwim-gcp"
WORKLOAD_IDENTITY_POOL_DESC="CLUSTER_NAME ZTWIM"
WORKLOAD_IDENTITY_POOL_LOCATION="global"

# A Unique Provider Name for the ZTWIM Trusted OIDC Endpoint, DNS compliant name
ZTWIM_PROVIDER_NAME="ztwim-gcp-dash"
# Substitute your CLUSTER_NAME and domain.tld - this should not h
ZTWIM_OIDC_ISSUER="https://oidc-discovery.apps.CLUSTER_NAME.domain.tld"
# Or get it from a logged in OpenShift cluster with ZTWIM deployed
# ZTWIM_OIDC_ISSUER="https://$(oc get route -n zero-trust-workload-identity-manager spire-oidc-discovery-provider -o jsonpath='{ .spec.host }')"

########################################
### Create the Workload Identity Pool
gcloud iam workload-identity-pools create ${WORKLOAD_IDENTITY_POOL} \
  --location="global" --display-name="${WORKLOAD_IDENTITY_POOL_DESC}"

########################################
### Create the Identity Provider
# This creates the trust between the Workload Identity Pool and the ZTWIM OIDC Issuer
gcloud iam workload-identity-pools providers create-oidc ${ZTWIM_PROVIDER_NAME} \
    --location="${WORKLOAD_IDENTITY_POOL_LOCATION}" \
    --workload-identity-pool="${WORKLOAD_IDENTITY_POOL}" \
    --issuer-uri="${ZTWIM_OIDC_ISSUER}" \
    --attribute-mapping="google.subject=assertion.sub"

########################################
# Give the workload principal access to impersonate the Google Service Account
gcloud iam service-accounts add-iam-policy-binding ${GOOGLE_SA_ID} \
    --role roles/iam.workloadIdentityUser \
    --member "principal://iam.googleapis.com/projects/${PROJECT_NUMBER}/locations/${WORKLOAD_IDENTITY_POOL_LOCATION}/workloadIdentityPools/${WORKLOAD_IDENTITY_POOL}/subject/${SPIFFE_ID_WORKLOAD_APP}"
gcloud iam service-accounts add-iam-policy-binding ${GOOGLE_SA_ID} \
    --role roles/iam.serviceAccountTokenCreator \
    --member "principal://iam.googleapis.com/projects/${PROJECT_NUMBER}/locations/${WORKLOAD_IDENTITY_POOL_LOCATION}/workloadIdentityPools/${WORKLOAD_IDENTITY_POOL}/subject/${SPIFFE_ID_WORKLOAD_APP}"

gcloud projects add-iam-policy-binding ${PROJECT} \
    --role roles/iam.workloadIdentityUser \
    --member "principal://iam.googleapis.com/projects/${PROJECT_NUMBER}/locations/${WORKLOAD_IDENTITY_POOL_LOCATION}/workloadIdentityPools/${WORKLOAD_IDENTITY_POOL}/subject/${SPIFFE_ID_WORKLOAD_APP}"
gcloud projects add-iam-policy-binding ${PROJECT} \
    --role roles/iam.serviceAccountTokenCreator \
    --member "principal://iam.googleapis.com/projects/${PROJECT_NUMBER}/locations/${WORKLOAD_IDENTITY_POOL_LOCATION}/workloadIdentityPools/${WORKLOAD_IDENTITY_POOL}/subject/${SPIFFE_ID_WORKLOAD_APP}"
Note:
If your ZTWIM OIDC Endpoint is not signed by a trusted Root CA in the public bundle you must provide it the JWKS key file…regularly. At least every 6 hours at default ZTWIM CA TTLs
# Get the JWKS file
curl -o ./jwks.json -k ${ZTWIM_OIDC_ISSUER}/keys

# Then update the OIDC Provider
gcloud iam workload-identity-pools providers update-oidc ${ZTWIM_PROVIDER_NAME} \
    --location="${WORKLOAD_IDENTITY_POOL_LOCATION}" \
    --workload-identity-pool="${WORKLOAD_IDENTITY_POOL}" \
    --issuer-uri="${ZTWIM_OIDC_ISSUER}" \
    --jwk-json-path=./jwks.json
Whew - Bash or YAML, soup or salad, doesn’t matter cause this is Olive Garden and it’s unlimited!
One last handy command you can run is to generate a JSON file to be used with your application or the gcloud CLI.
# Generate Template JSON
gcloud iam workload-identity-pools create-cred-config \
    projects/${PROJECT_NUMBER}/locations/${WORKLOAD_IDENTITY_POOL_LOCATION}/workloadIdentityPools/${WORKLOAD_IDENTITY_POOL}/providers/${ZTWIM_PROVIDER_NAME} \
    --service-account="${GOOGLE_SA_ID}" \
    --output-file=./google-credentials.json \
    --credential-source-file=/var/run/secrets/gcp/token \
    --credential-source-type=text
…which will generate that ./google-credentials.json file with something similar to the following:
{
  "universe_domain": "googleapis.com",
  "type": "external_account",
  "audience": "//iam.googleapis.com/projects/${PROJECT_NUMBER}/locations/${WORKLOAD_IDENTITY_POOL_LOCATION}/workloadIdentityPools/${WORKLOAD_IDENTITY_POOL}/providers/${ZTWIM_PROVIDER_NAME}",
  "subject_token_type": "urn:ietf:params:oauth:token-type:jwt",
  "token_url": "https://sts.googleapis.com/v1/token",
  "credential_source": {
    "file": "/var/run/secrets/gcp/token",
    "format": {
      "type": "text"
    }
  },
  "service_account_impersonation_url": "https://iamcredentials.googleapis.com/v1/projects/-/serviceAccounts/${GOOGLE_SA_ID}:generateAccessToken"
}
This file is what your application will use define the authentication mechanism to Google Cloud. You don’t need to really worry about creating that file now, it’s just the standard template we’ll use elsewhere.
The Credential Source file path is important - this is where the Google Cloud client will expect to find the exchanged STS token. More on that soon…
Workload Deployment
Wow - finally getting to some different YAML.
So the workload in question is just a simple Python application - it’s not SPIRE-aware, it simply leverages the Google Cloud SDK for access to the cloud platform. Again, the whole idea behind this application is to emulate one that would have typically been running on GKE with Workload Identity, and make it work in OpenShift with ZTWIM with no code changes.
The repo for this application was linked above, but here it is again:
It looks a little something like this:
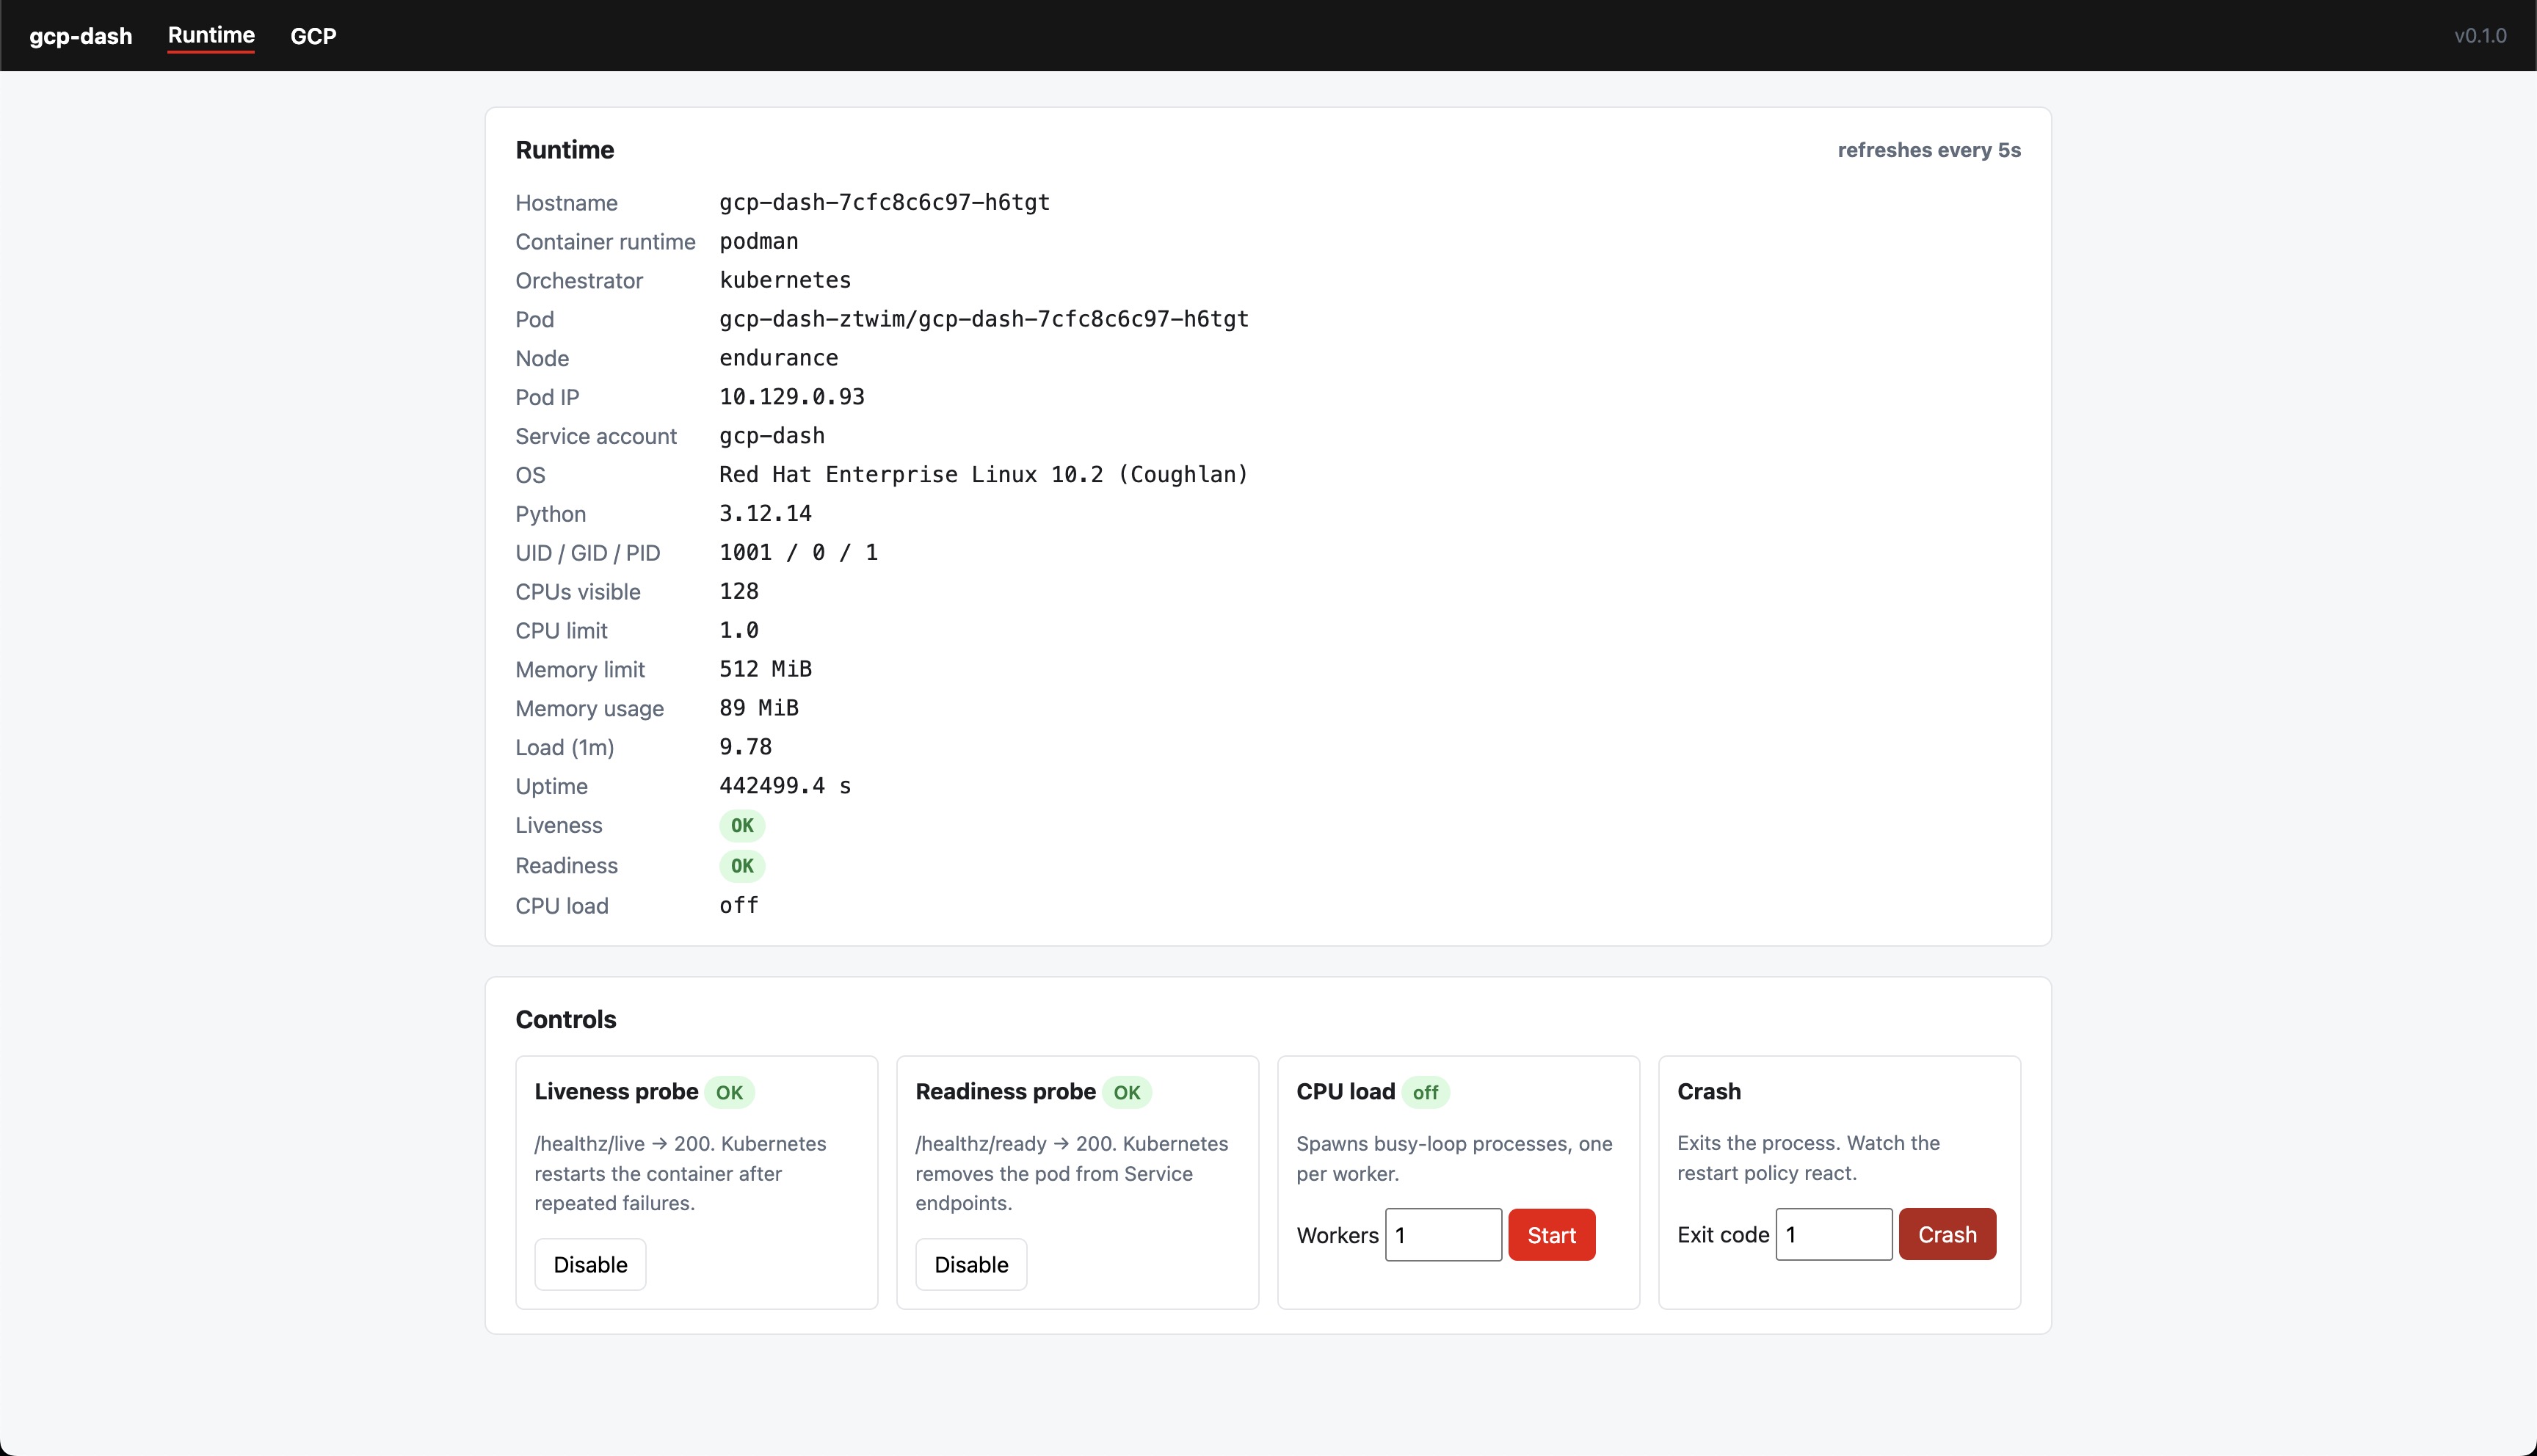
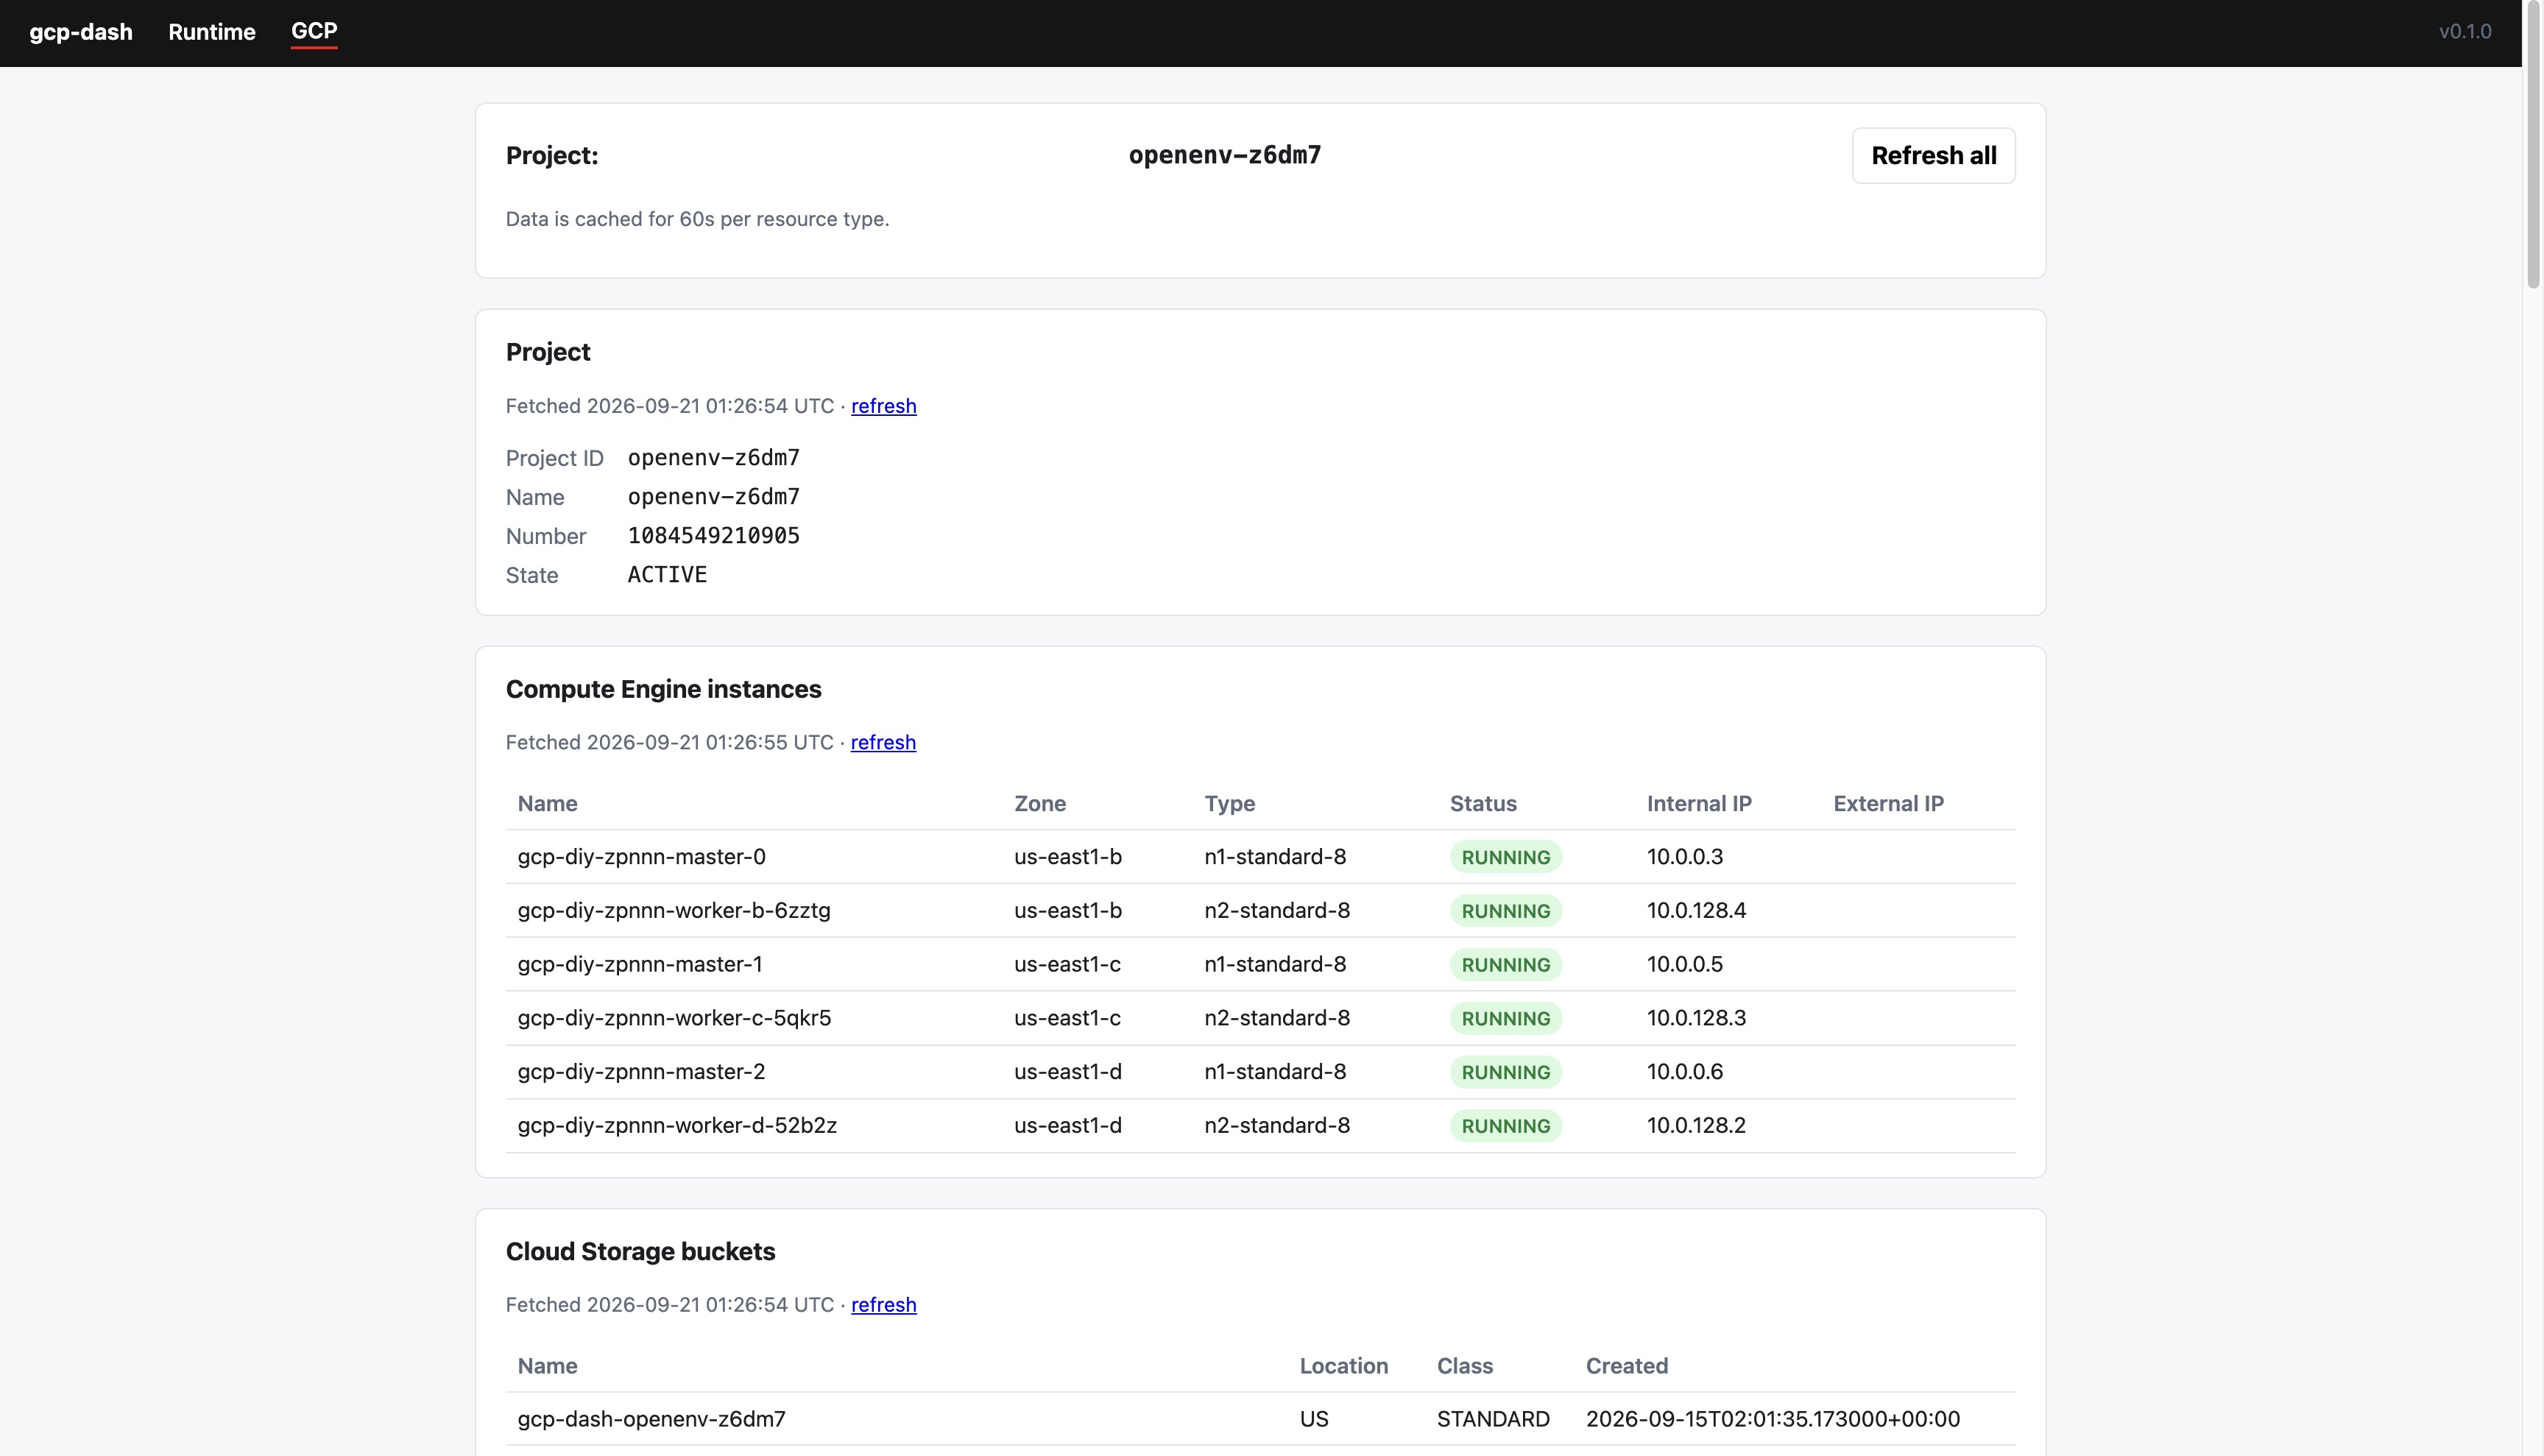

There are multiple options for deploying it - if you have a GKE cluster with Workload Identity enabled you can find the deployment manifests composed with Kustomize in the deploy/gke folder of the repo.
To make it work on GKE, the steps include:
- Create a Google Cloud Service Account [see above]
- Give that GCP SA some permissions [also, see above]
- Annotate the Kubernetes ServiceAccount with the GCP Service Account ID, eg:
---
apiVersion: v1
kind: ServiceAccount
metadata:
  name: gcp-dash
  annotations:
    iam.gke.io/gcp-service-account: gcp-dash@your-project.iam.gserviceaccount.com
    # Not needed, but nice
    iam.gke.io/return-principal-id-as-email: "true"
This annotation is already stubbed in the Kustomization file as an hint, be sure to change it.
But that’s about it for getting Workload Identity running on GKE, just the annotation on the ServiceAccount.
This is because GKE’s infrastructure is running on GCP, which makes it easy to confidently attest and trust the stack - the GKE cluster is running in a known GCP Project so that doesn’t have to be defined, and they have Admission Controller that injects the needed mounts in a Pod definition in order to use a dynamic rotating identity and credentials.
It kinda seems like magic - but it’s just managed Kubernetes using the same sort of technology we’re putting together.
Now to run it on OpenShift…
So to recap…
- We have an OpenShift cluster running with ZTWIM installed and configured
- We have a Google Cloud environment set up with a Service Account
- Trust has been established between ZTWIM on OpenShift and the Google Cloud OIDC Endpoints
Now we just need to deploy the application - same application that can be deployed on GKE, but we’ll need to inject an initContainer that sets up the exchanged SVID for a JWT and keeps it rotated.
In order for our Workload Identity to work against Google Cloud we need to provide it not only the exchanged JWT, but also a JSON file that constructs the identity type. Google Cloud has a few ways to authenticate and the JSON is different for each - in this case we’re doing something called Service Account Impersonation and the JSON looks like the credential file we made earlier.
In the repo I have the JSON file being constructed with a Bash script in a ConfigMap from Environment Variables that are mounted from a Secret - then we progress to the SPIFFE Helper container to maintain the JWT.
This works for quick demonstrations and references, however it’d probably be better to have that data in an ExternalSecret that could be mounted directly and skipping the Bash Script part:
---
apiVersion: external-secrets.io/v1beta1
kind: ExternalSecret
metadata:
  name: my-gcp-creds
spec:
  refreshInterval: 240s
  secretStoreRef:
    name: my-secret-store
    kind: SecretStore
  target:
    name: target-k8s-secret
    template:
      engineVersion: v2
      data:
        key.json: |
          {
            "universe_domain": "googleapis.com",
            "type": "external_account",
            "audience": "//iam.googleapis.com/projects/{{ .project_number }}/locations/{{ .workload_identity_pool_location }}/workloadIdentityPools/{{ .workload_identity_pool }}/providers/{{ .ztwim_provider_name }}",
            "subject_token_type": "urn:ietf:params:oauth:token-type:jwt",
            "token_url": "https://sts.googleapis.com/v1/token",
            "credential_source": {
              "file": "/var/run/secrets/gcp/token",
              "format": {
                "type": "text"
              }
            },
            "service_account_impersonation_url": "https://iamcredentials.googleapis.com/v1/projects/-/serviceAccounts/{{ .google_service_account }}:generateAccessToken"
          }
  data:
    - secretKey: google_service_account
      remoteRef:
        key: my/remote/secret
        property: google_service_account

    - secretKey: project_number
      remoteRef:
        key: my/remote/secret
        property: google_project_number

    - secretKey: workload_identity_pool_location
      remoteRef:
        key: my/remote/secret
        property: google_workload_identity_pool_location

    - secretKey: workload_identity_pool
      remoteRef:
        key: my/remote/secret
        property: google_workload_identity_pool

    - secretKey: ztwim_provider_name
      remoteRef:
        key: my/remote/secret
        property: ztwim_provider_name
Then you’d mount that generated Secret to /var/run/secrets/gcp/ in the Pod - or wherever your application expects it’s credentials. You can pass an override via the GOOGLE_APPLICATION_CREDENTIALS environment variable.
The SPIFFE Helper configuration also needs the audience data, so since this also needs the same sorta Secret data used for the GCP key.json file you could rinse/repeat the ExternalSecret with a similar templated format:
---
apiVersion: external-secrets.io/v1beta1
kind: ExternalSecret
metadata:
  name: my-gcp-spiffe-helper-conf
spec:
  refreshInterval: 240s
  secretStoreRef:
    name: my-secret-store
    kind: SecretStore
  target:
    name: target-k8s-secret
    template:
      engineVersion: v2
      data:
        helper.conf: |
          agent_address = "/run/spire/sockets/spire-agent.sock"
          jwt_svids = [{jwt_audience="https://iam.googleapis.com/projects/{{ .project_number }}/locations/{{ .workload_identity_pool_location }}/workloadIdentityPools/{{ .workload_identity_pool }}/providers/{{ .ztwim_provider_name }}", jwt_svid_file_name="/var/run/secrets/gcp/token"}]
          jwt_svid_file_mode = 0644
  data:
    - secretKey: project_number
      remoteRef:
        key: my/remote/secret
        property: google_project_number

    - secretKey: workload_identity_pool_location
      remoteRef:
        key: my/remote/secret
        property: google_workload_identity_pool_location

    - secretKey: workload_identity_pool
      remoteRef:
        key: my/remote/secret
        property: google_workload_identity_pool

    - secretKey: ztwim_provider_name
      remoteRef:
        key: my/remote/secret
        property: ztwim_provider_name
Then you’d mount that generated Secret to wherever really, /tmp or maybe /etc/spiffe-helper, passing along the path to the SPIFFE Helper -config argument.
Anywho - if you just want it fast and dirty…
- Deploy the Kustomized patch overlay: https://github.com/kenmoini/gcp-dash/tree/main/deploy/ztwim
- Create a Secret like found here: https://github.com/kenmoini/gcp-dash/blob/main/deploy/ztwim/gcp-secret.example.yaml
- Navigate to the Route and check the application
- ???????
- PROFIT!!!!1
And you should see the exact same thing you see on the application running in GKE! Much excite.
Final Notes
A few other thoughs as I worked through this exercise:
- If you want to make it more seamless like on GKE, where all you do is add an annotation or two to the ServiceAccount - this could be done with things like Kyverno/OPA/etc Mutating Webhooks, including the newly GA’d and built into Kuberenetes, Mutating Admission Policies.
- Your application needs to define the default application scope - common to have, unless you’re building some quick vibe coded example…
- For sure check out the other two cloud examples of this ZTWIM application, there are some interesting differences, like how I actually like the EntraID implementation…much easier on the config bootstrapping side of things.
- The GCP Dash application container image has some handy things in there like
gcloudand set of scriptsdecode-jwt.pyandget-spiffe-token.pythat can be used for debugging or learning more about the exchange process and identities.

