

If a Single Node OpenShift deployment crashes at the edge with no one around, does it make a sound?
A question posed by one of the greatest thinkers of our time…
Recently I was tasked with working on a hybrid-multi-cloud deployment of a few different Red Hat OpenShift clusters. I had a self-deployed IPI cluster, a ROSA cluster, and an OSD cluster in AWS, an ARO cluster, and an OSD on GCP cluster.
That’s 5 OCP clusters, and I threw in a GKE cluster for RHACM and ACS to manage as well.
With 6 clusters being managed, I really wanted to hit that lucky number 7…but where…and on what credit card…?
What about OpenShift…at the edge…?
I was warned that “the DNS can be tricky” - but once I heard that I was excited since if split-horizon DNS is the hardest part then I’m in luck.
So that’s when I set out to deploy a Single Node OpenShift instance “at the edge” in my lab and make it accessible to connect to other clusters on the larger public internet.
Deployment Overview
So again, there were the following clusters:
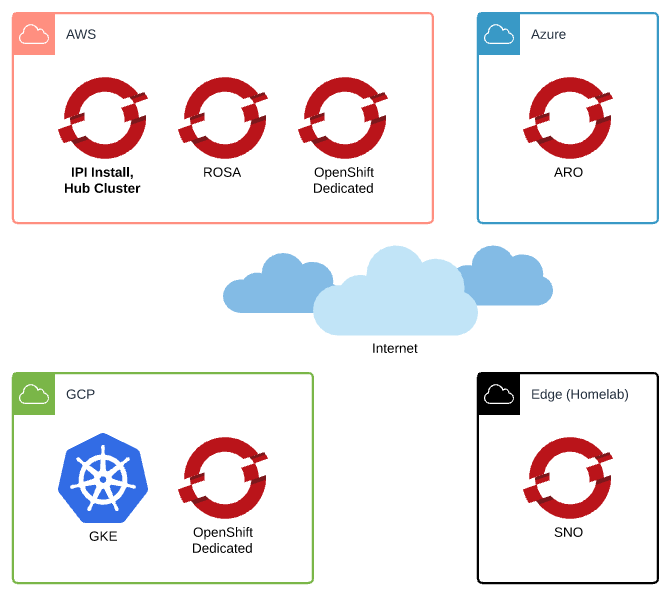
- IPI in AWS, Hub cluster that runs Advanced Cluster {Management,Security}
- ROSA in AWS
- OSD in AWS
- ARO in Azure
- OSD in GCP
- GKE in GCP
All of these clusters had different DNS Zones, different networks, different infrastructure…how do you introduce an edge single-node OpenShift deployment?
Living on the Edge
The edge environment in question is actually just a VM host in my homelab! This is typically a Libvirt host, though it has also been a Nutanix and vSphere host.
The infrastructure doesn’t matter really because as long as we can boot an ISO we’re golden - to create a Single Node OpenShift deployment we’ll be using the Assisted Installer.
I can’t explain how much I love the Assisted Installer. It’s fantastic - you can use the Red Hat hosted service, you can host it yourself and set hardware requirements and versions, most of the processes are automated but also features a high degree of customization.
Anywho, so instead of blasting the vCenter panel out to the Internet and using RHACM to deploy IPI to the infrastructure vCenter is managing, we’ll pretend we’re using something like Redfish to bootstrap a bare-metal system with the Assisted Installer ISO we’ll generate, or as is the actual case for this deployment, just booting a VM on Nutanix’s AHV manually.
Networks
To get a Single Node OpenShift deployment going, you need a single IP address and some DNS to match.
Here in my lab I have a kemo.labs TLD and sub-TLDs with DNS Zones being served via BIND in a container - these Zones do not exist on the Internet and presents a problem.
I also route a few networks, my VM network being 192.168.42.0/24 - this is also inaccessible to the public Internet being a private subnet and all.
To fix these issues, all that’s needed is split horizon DNS with a public TLD, and some firewall rules made to pass some ports to the SNO node.
Split Horizon DNS
Split Horizon DNS is basically just having a DNS server, or a set of them, respond to queries differently depending on who/where the request is coming from.
Public DNS Zone
So for instance, in DigitalOcean’s Domain service, I have the DNS Zone for kemo.network - in that zone I have a few A Records defined:
- sno-ocp.kemo.network > 161.192.161.33
- api.sno-ocp.kemo.network > 161.192.161.33
- *.apps.sno-ocp.kemo.network > 161.192.161.33
All those A Records point to my homelab’s WAN IP, 161.192.161.33, the external IP that my ISP provides.
Private DNS Zone
Now inside my homelab, I run a set of DNS servers via BIND in a container at 192.168.42.{9,10}. On these private DNS servers, I also serve the kemo.network zone with the same A records, but pointing to the internal IP of the SNO instance:
- sno-ocp.kemo.network > 192.168.42.72
- api.sno-ocp.kemo.network > 192.168.42.72
- *.apps.sno-ocp.kemo.network > 192.168.42.72
Note that the clients inside the homelab network need to use the DNS Servers that serve this zone - this is configured via DHCP most often when DNS Servers are not manually set to interfaces - this means that if your client has Cloudflare/Google/etc DNS Servers configured, they’ll pull the records from the Public DNS Server/Zone which isn’t necessarily a bad thing, just not as efficient for network traffic and may increase risks as the hops increase to go out of the network and back in.
With all that what happens is that:
- When clients access
https://console-openshift-console.apps.sno-ocp.kemo.network/from the wider Internet, they get directed to the SNO instance in my network via the WAN IP and some well-placed firewall rules. - When clients inside my network access
https://console-openshift-console.apps.sno-ocp.kemo.network/it directs them to the SNO instance in the network via the internal IP address
You can verify everything is playing nice by doing a dig sno-ocp.kemo.network from inside and outside of the network.
Firewall Rules
This is pretty easy - basically you need to pass ports from the WAN IP to the Internal SNO IP and these are the ports needed:
- TCP Port 80, Ingress HTTP
- TCP Port 443, Ingress HTTPS
- TCP Port 6443, API HTTPS
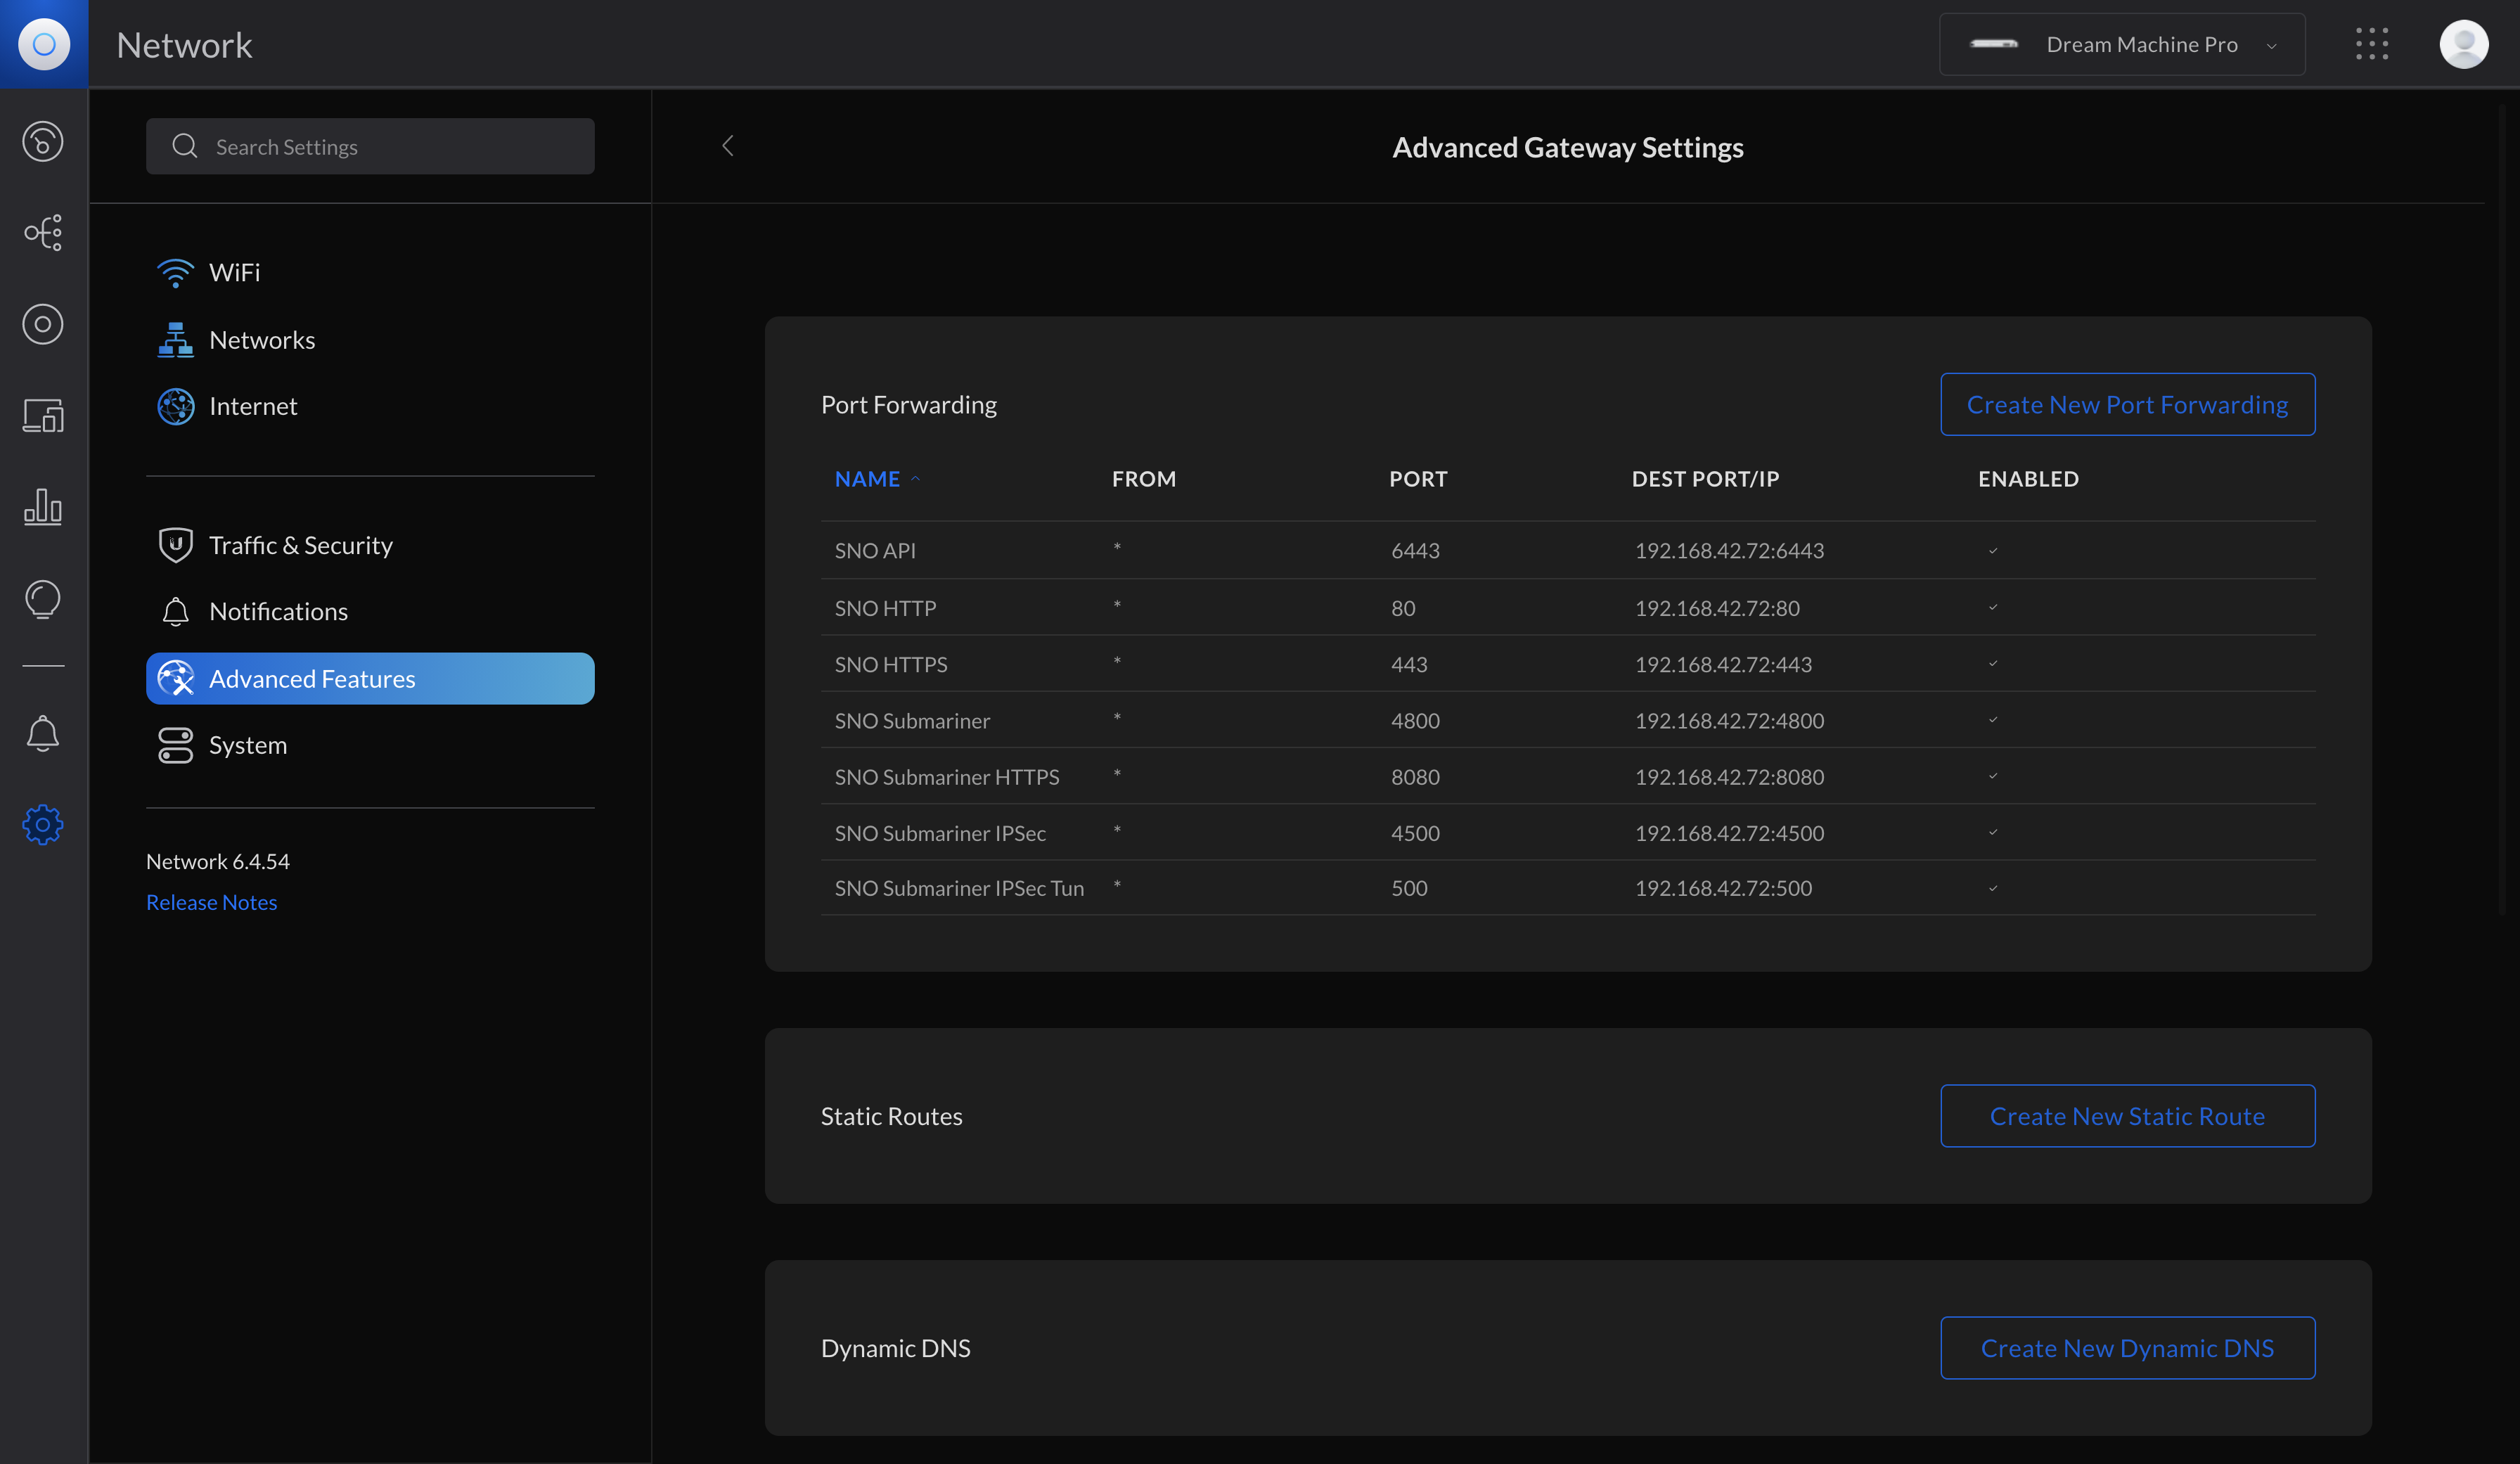
Those are the basic ports needed to access the OpenShift cluster - if you plan on managing it via RHACM you also may need to open the following ports for Submariner:
- UDP Port 500
- UDP Port 4500
- UDP Port 4800
- TCP Port 8080
Deploying SNO via the Assisted Installer
Now that the Public and Private DNS Zones are resolving queries properly and firewall ports are open we can get to deploying the Single Node OpenShift instance.
So again, my “edge” deployment for the previous demo was just a VM on ESXi here in my lab with the networking in place to make it happen. That node recycles so often that it no longer runs ESXi and is running Nutanix’s AHV right now so that’s what I’ll show below.
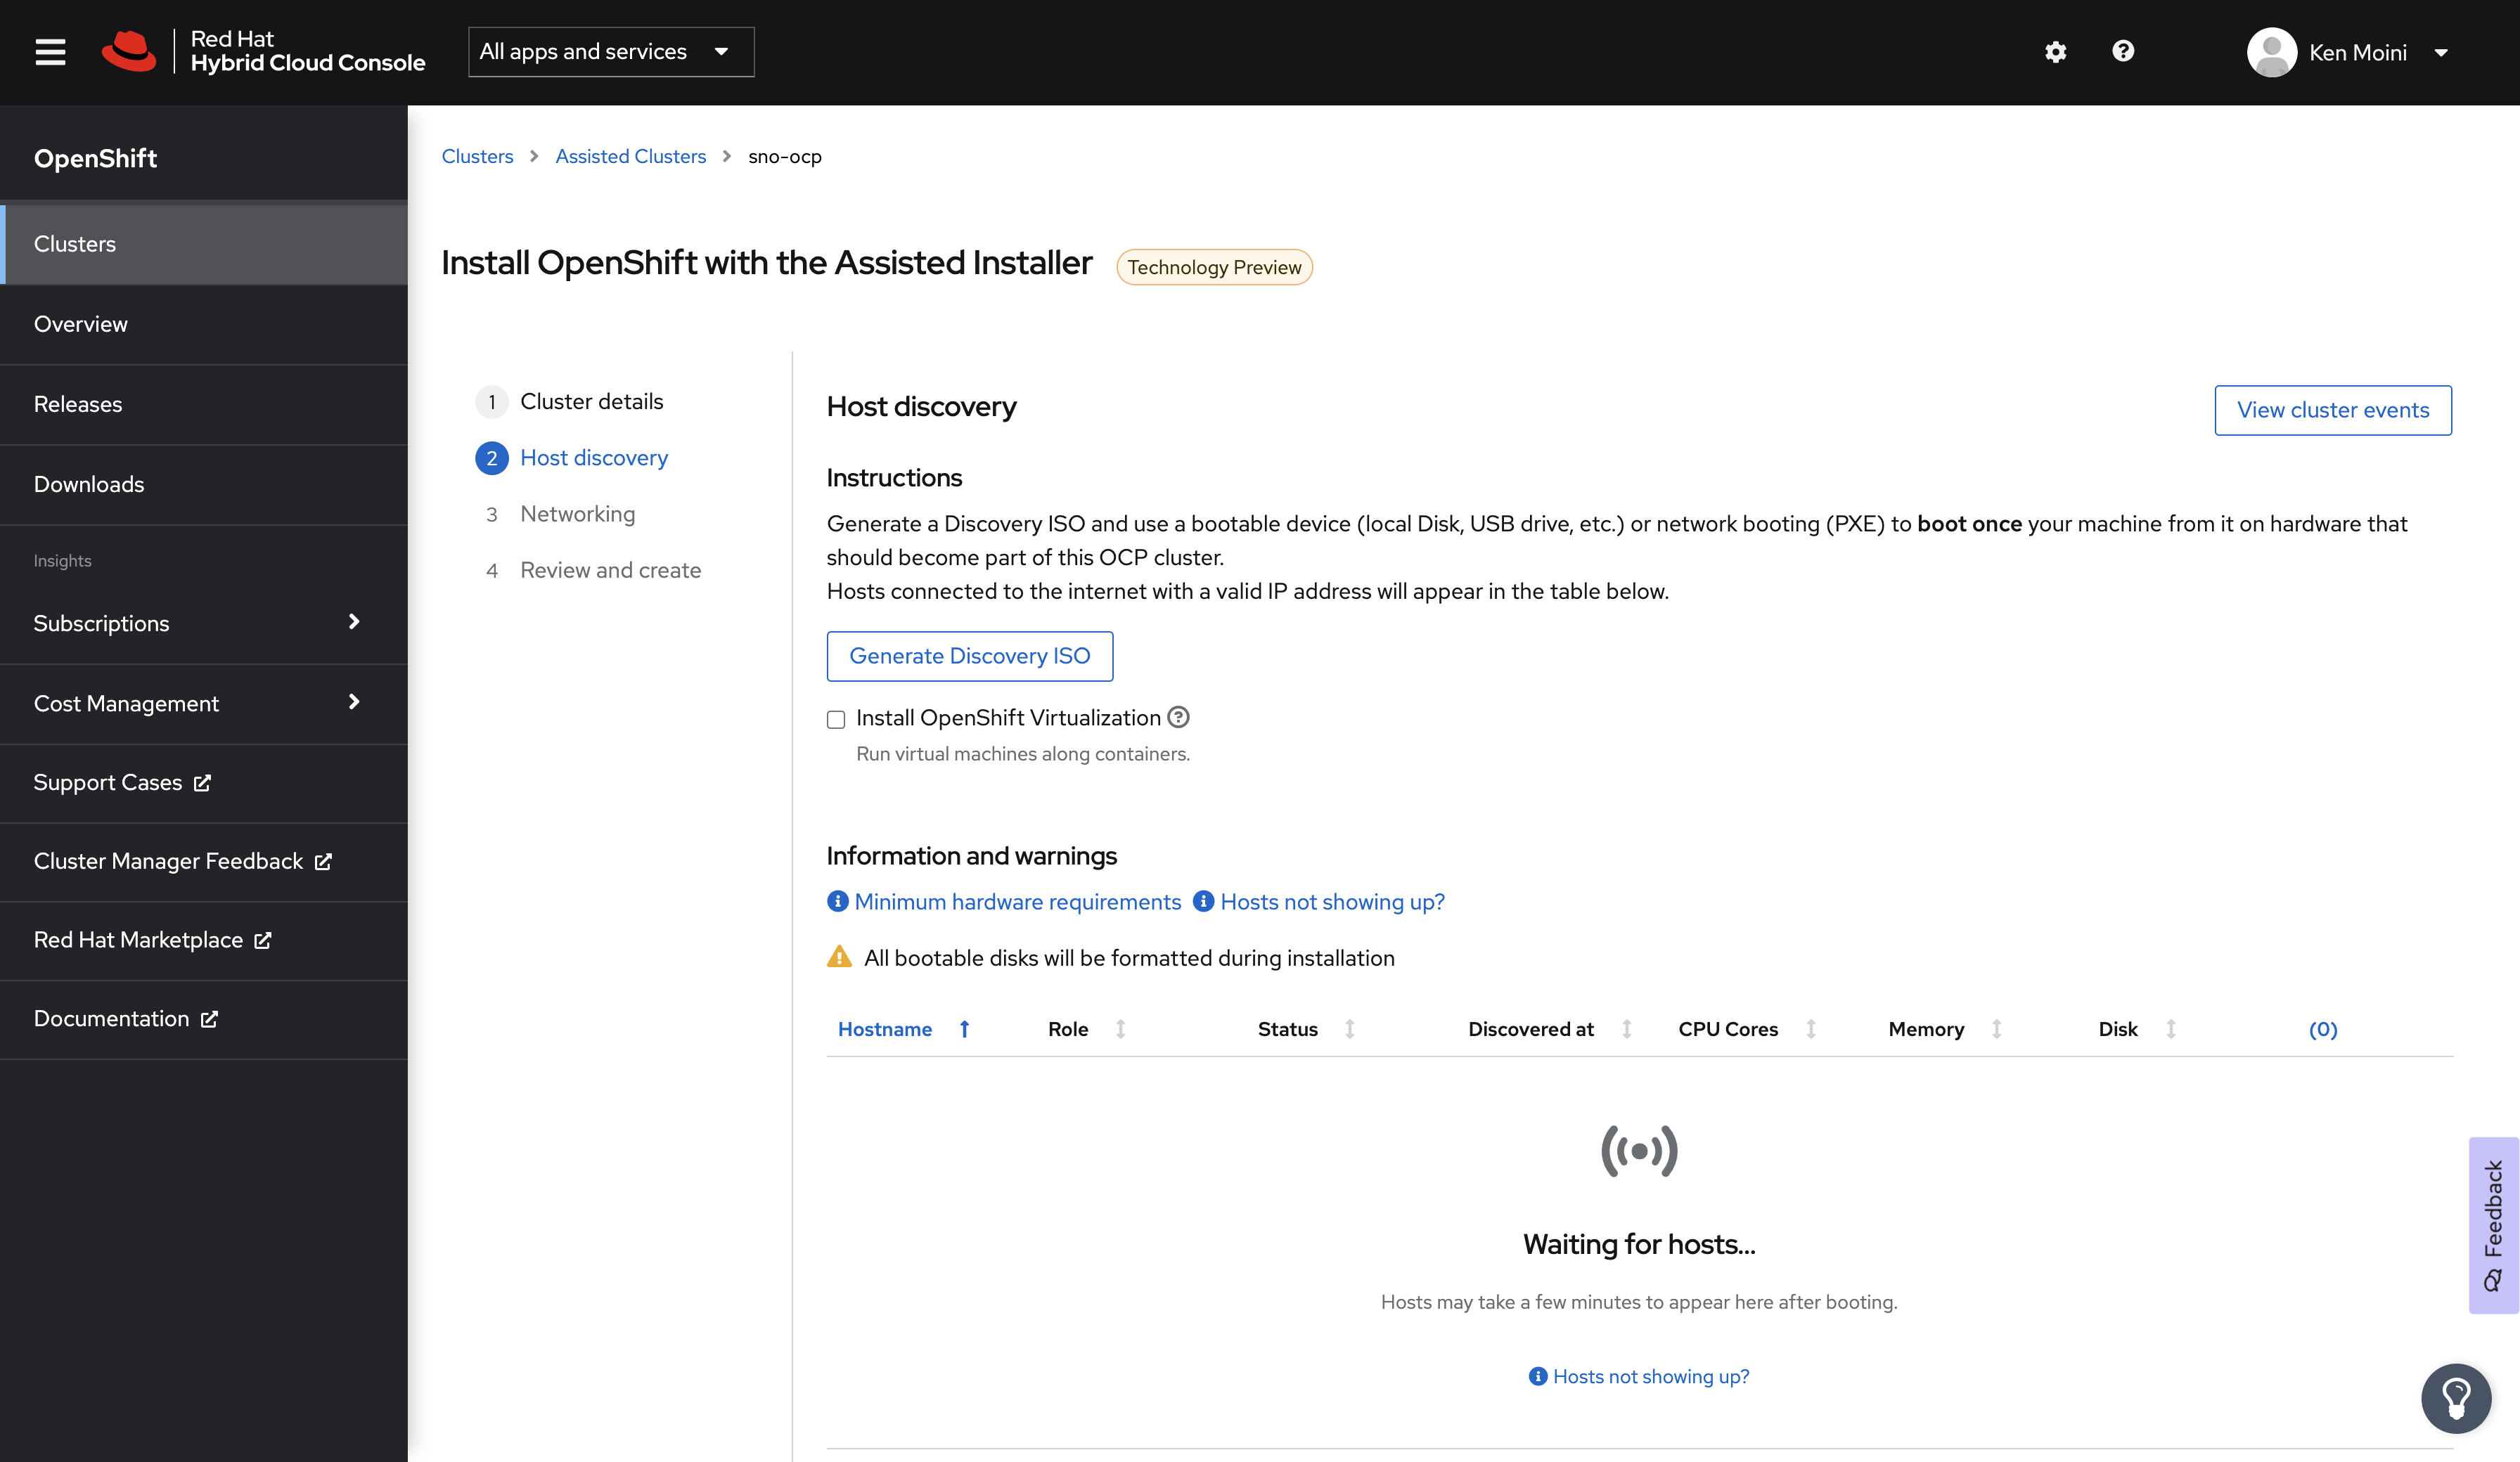
Create the SNO Cluster in the Assisted Installer Service
WARN: Before someone from the BU bursts a vein out the side of their neck I have to mention that the Assisted Installer as of this writing is still in Tech Preview - even though there are customers actively using it and it works brilliantly lol
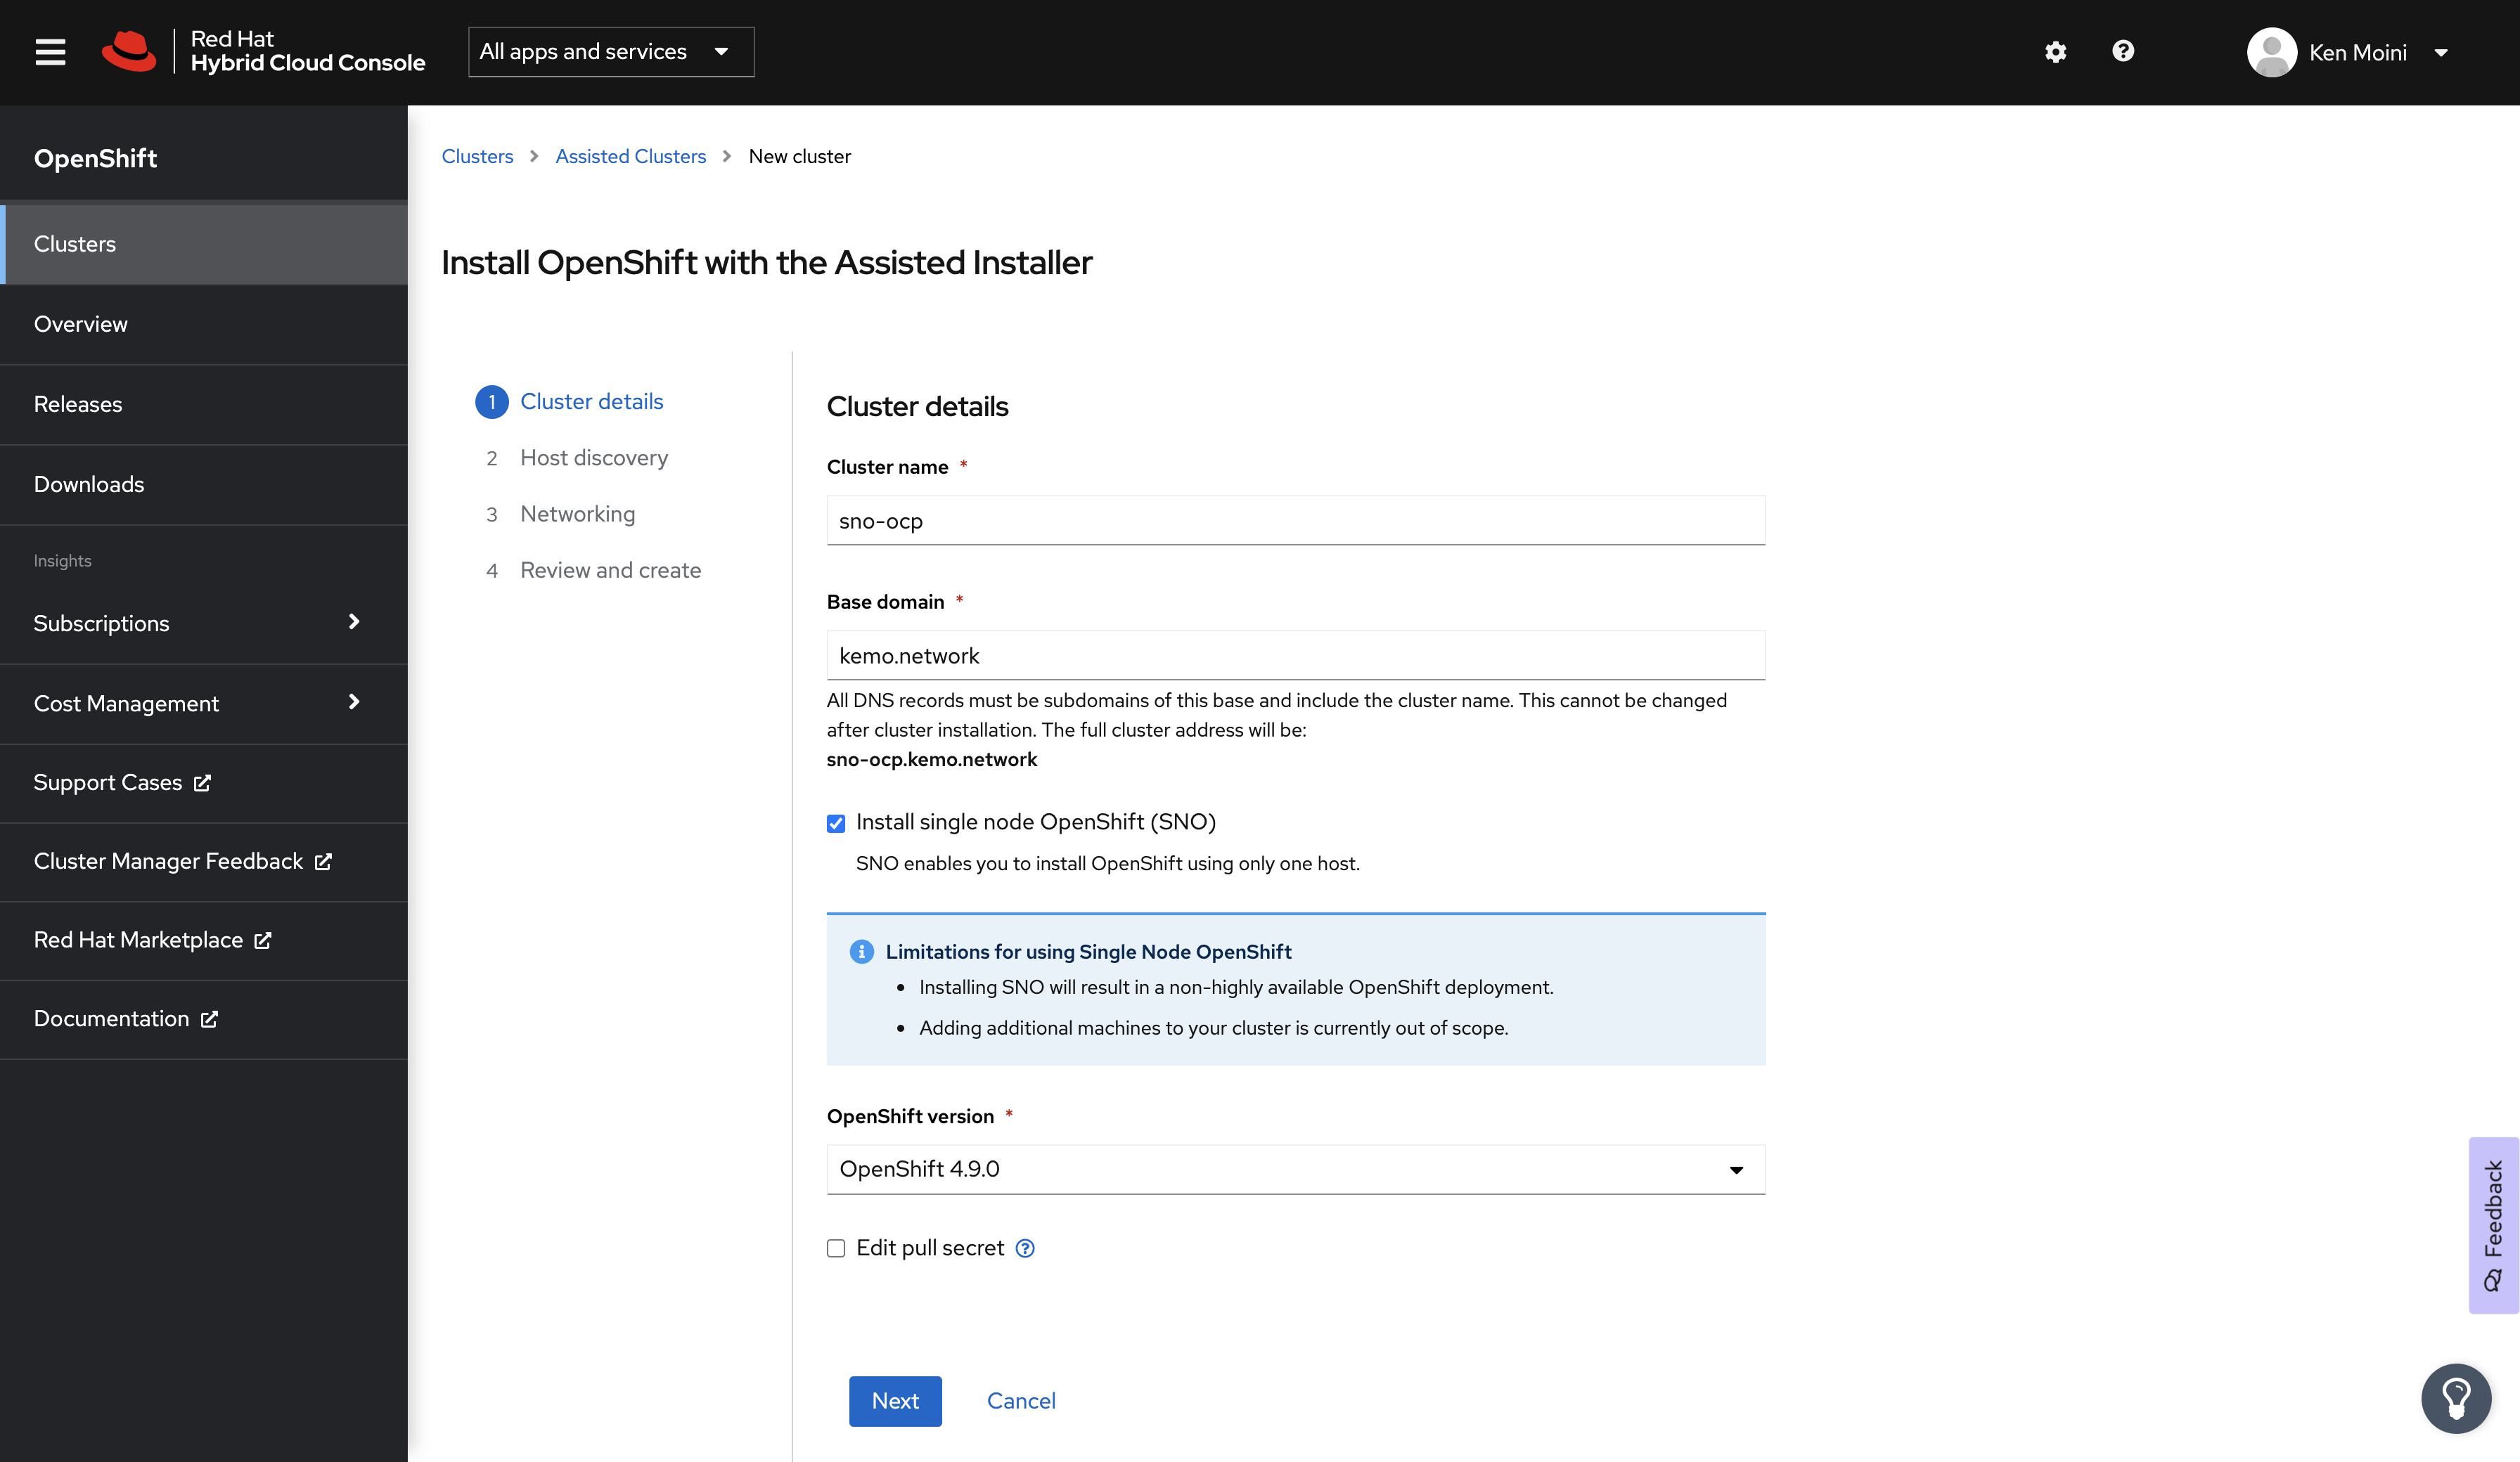
First we’ll navigate to the Red Hat Hybrid Cloud Console and from there navigate to the Assisted Installer service.
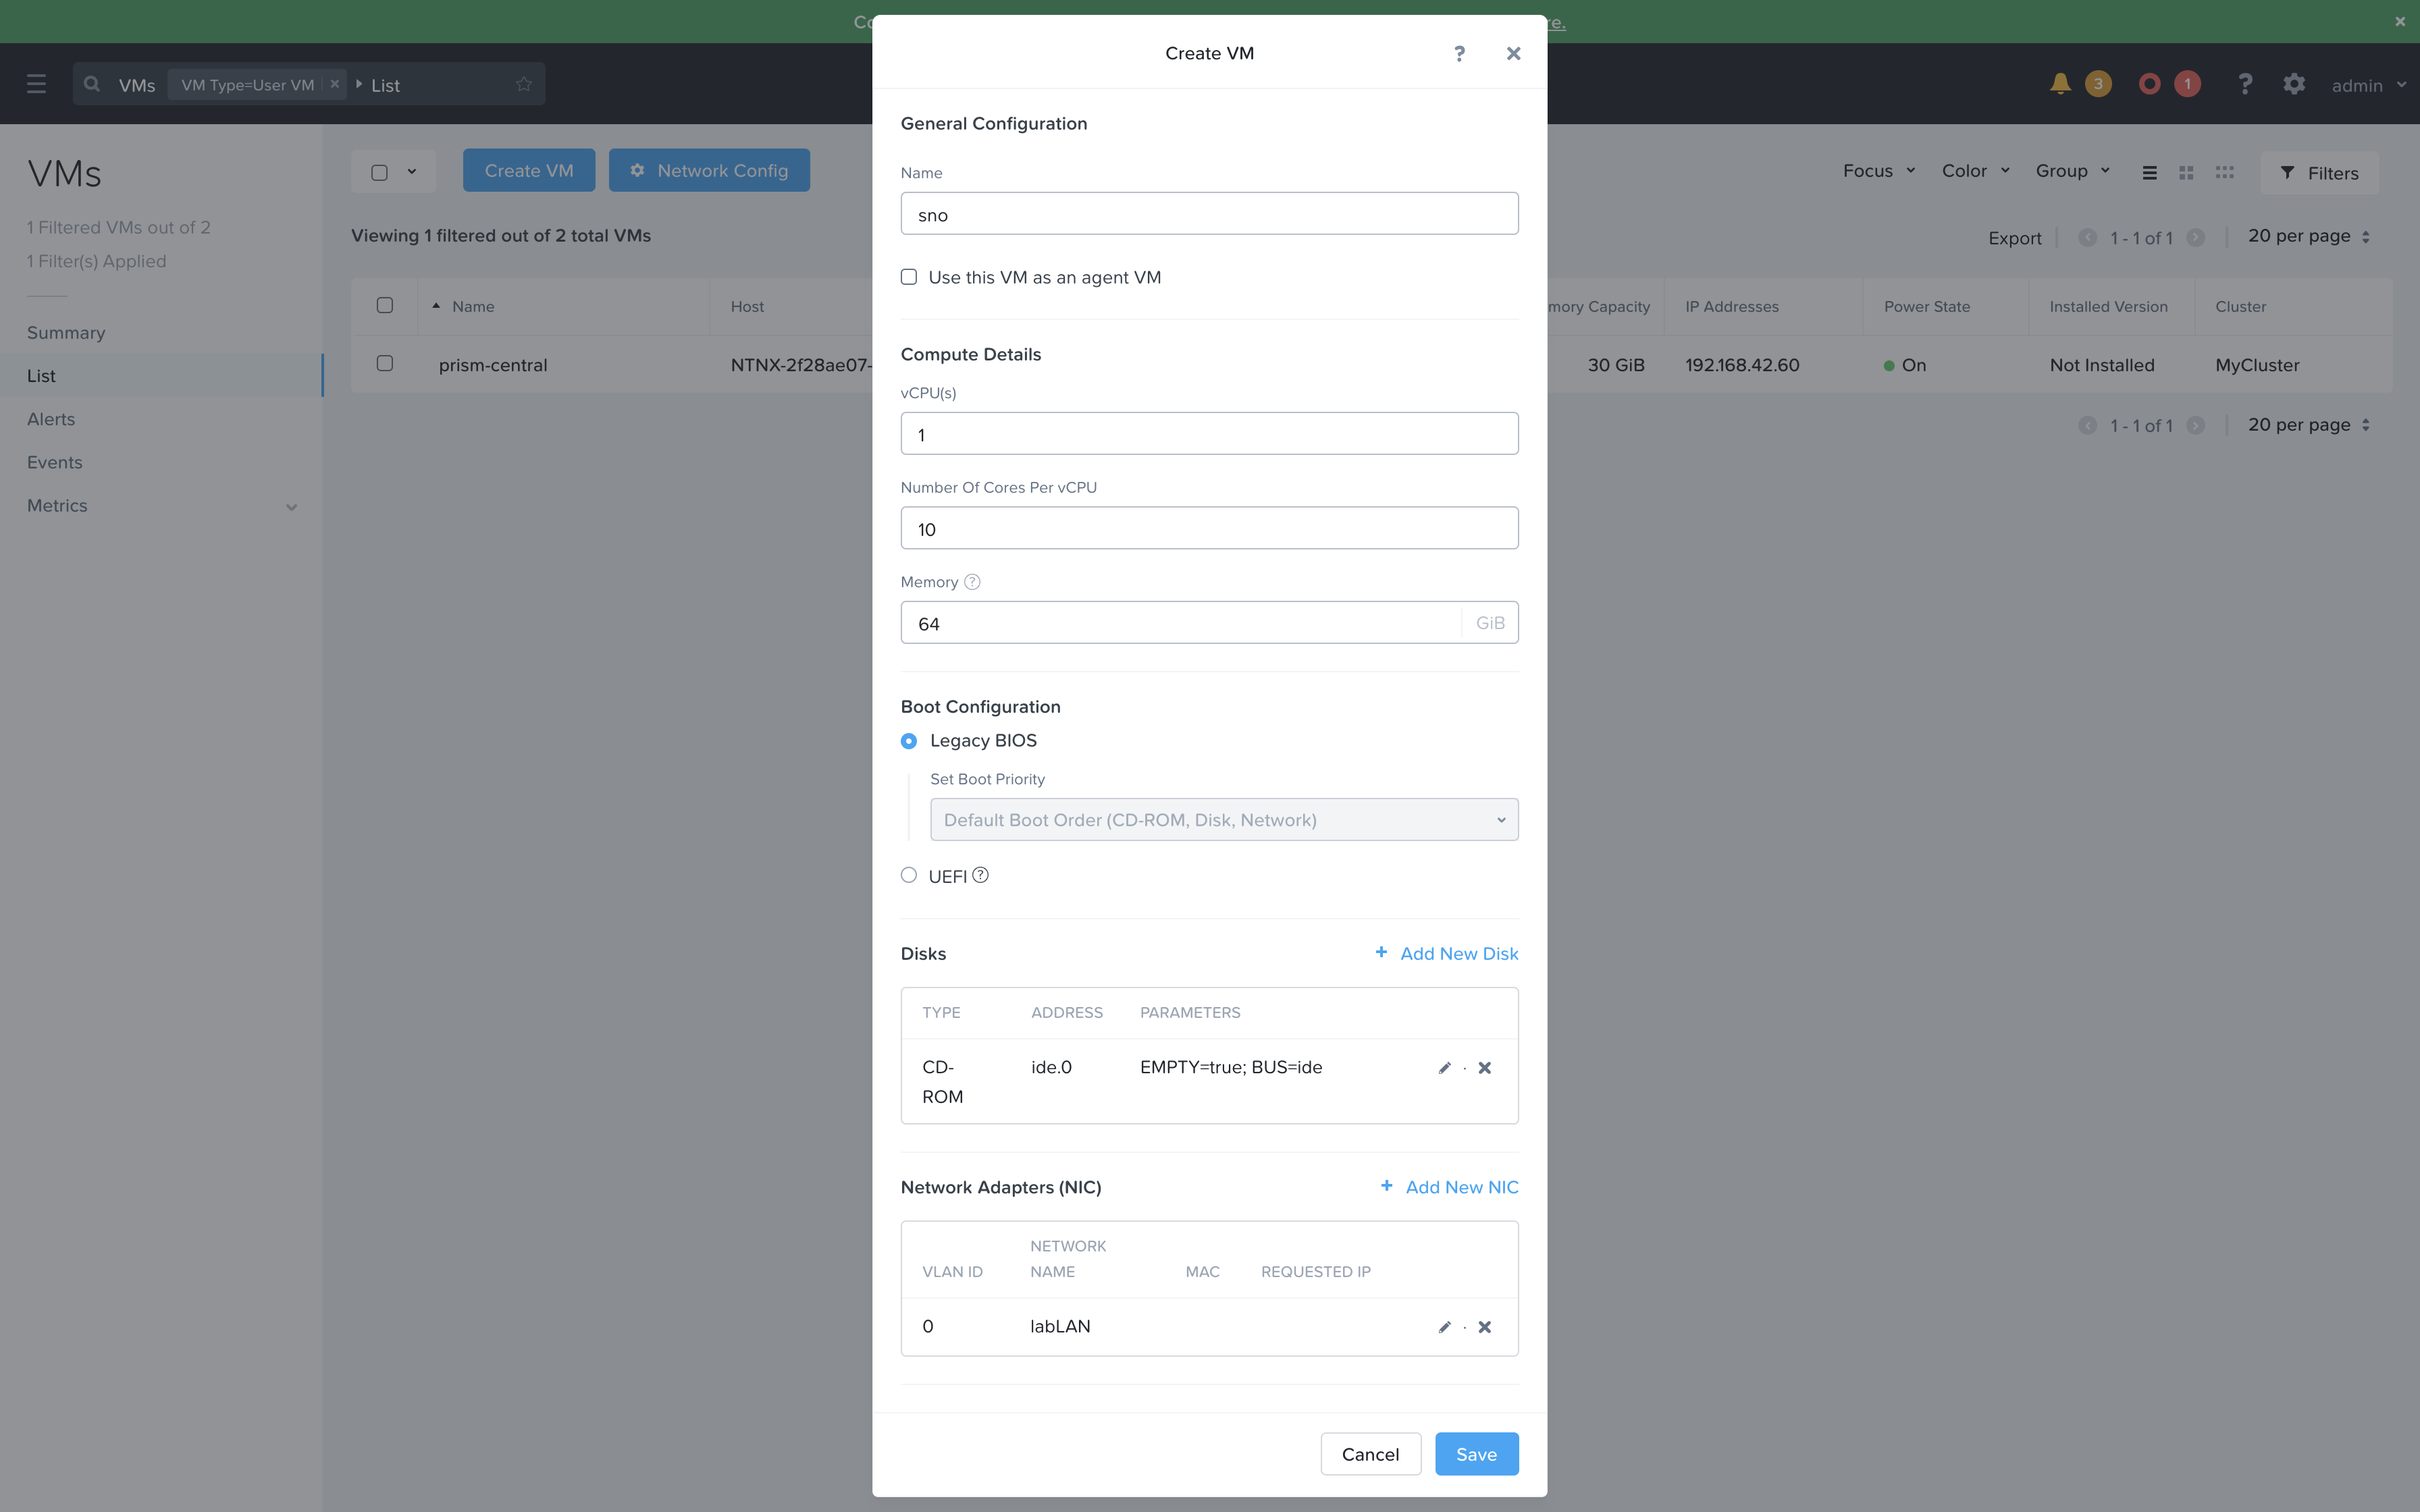
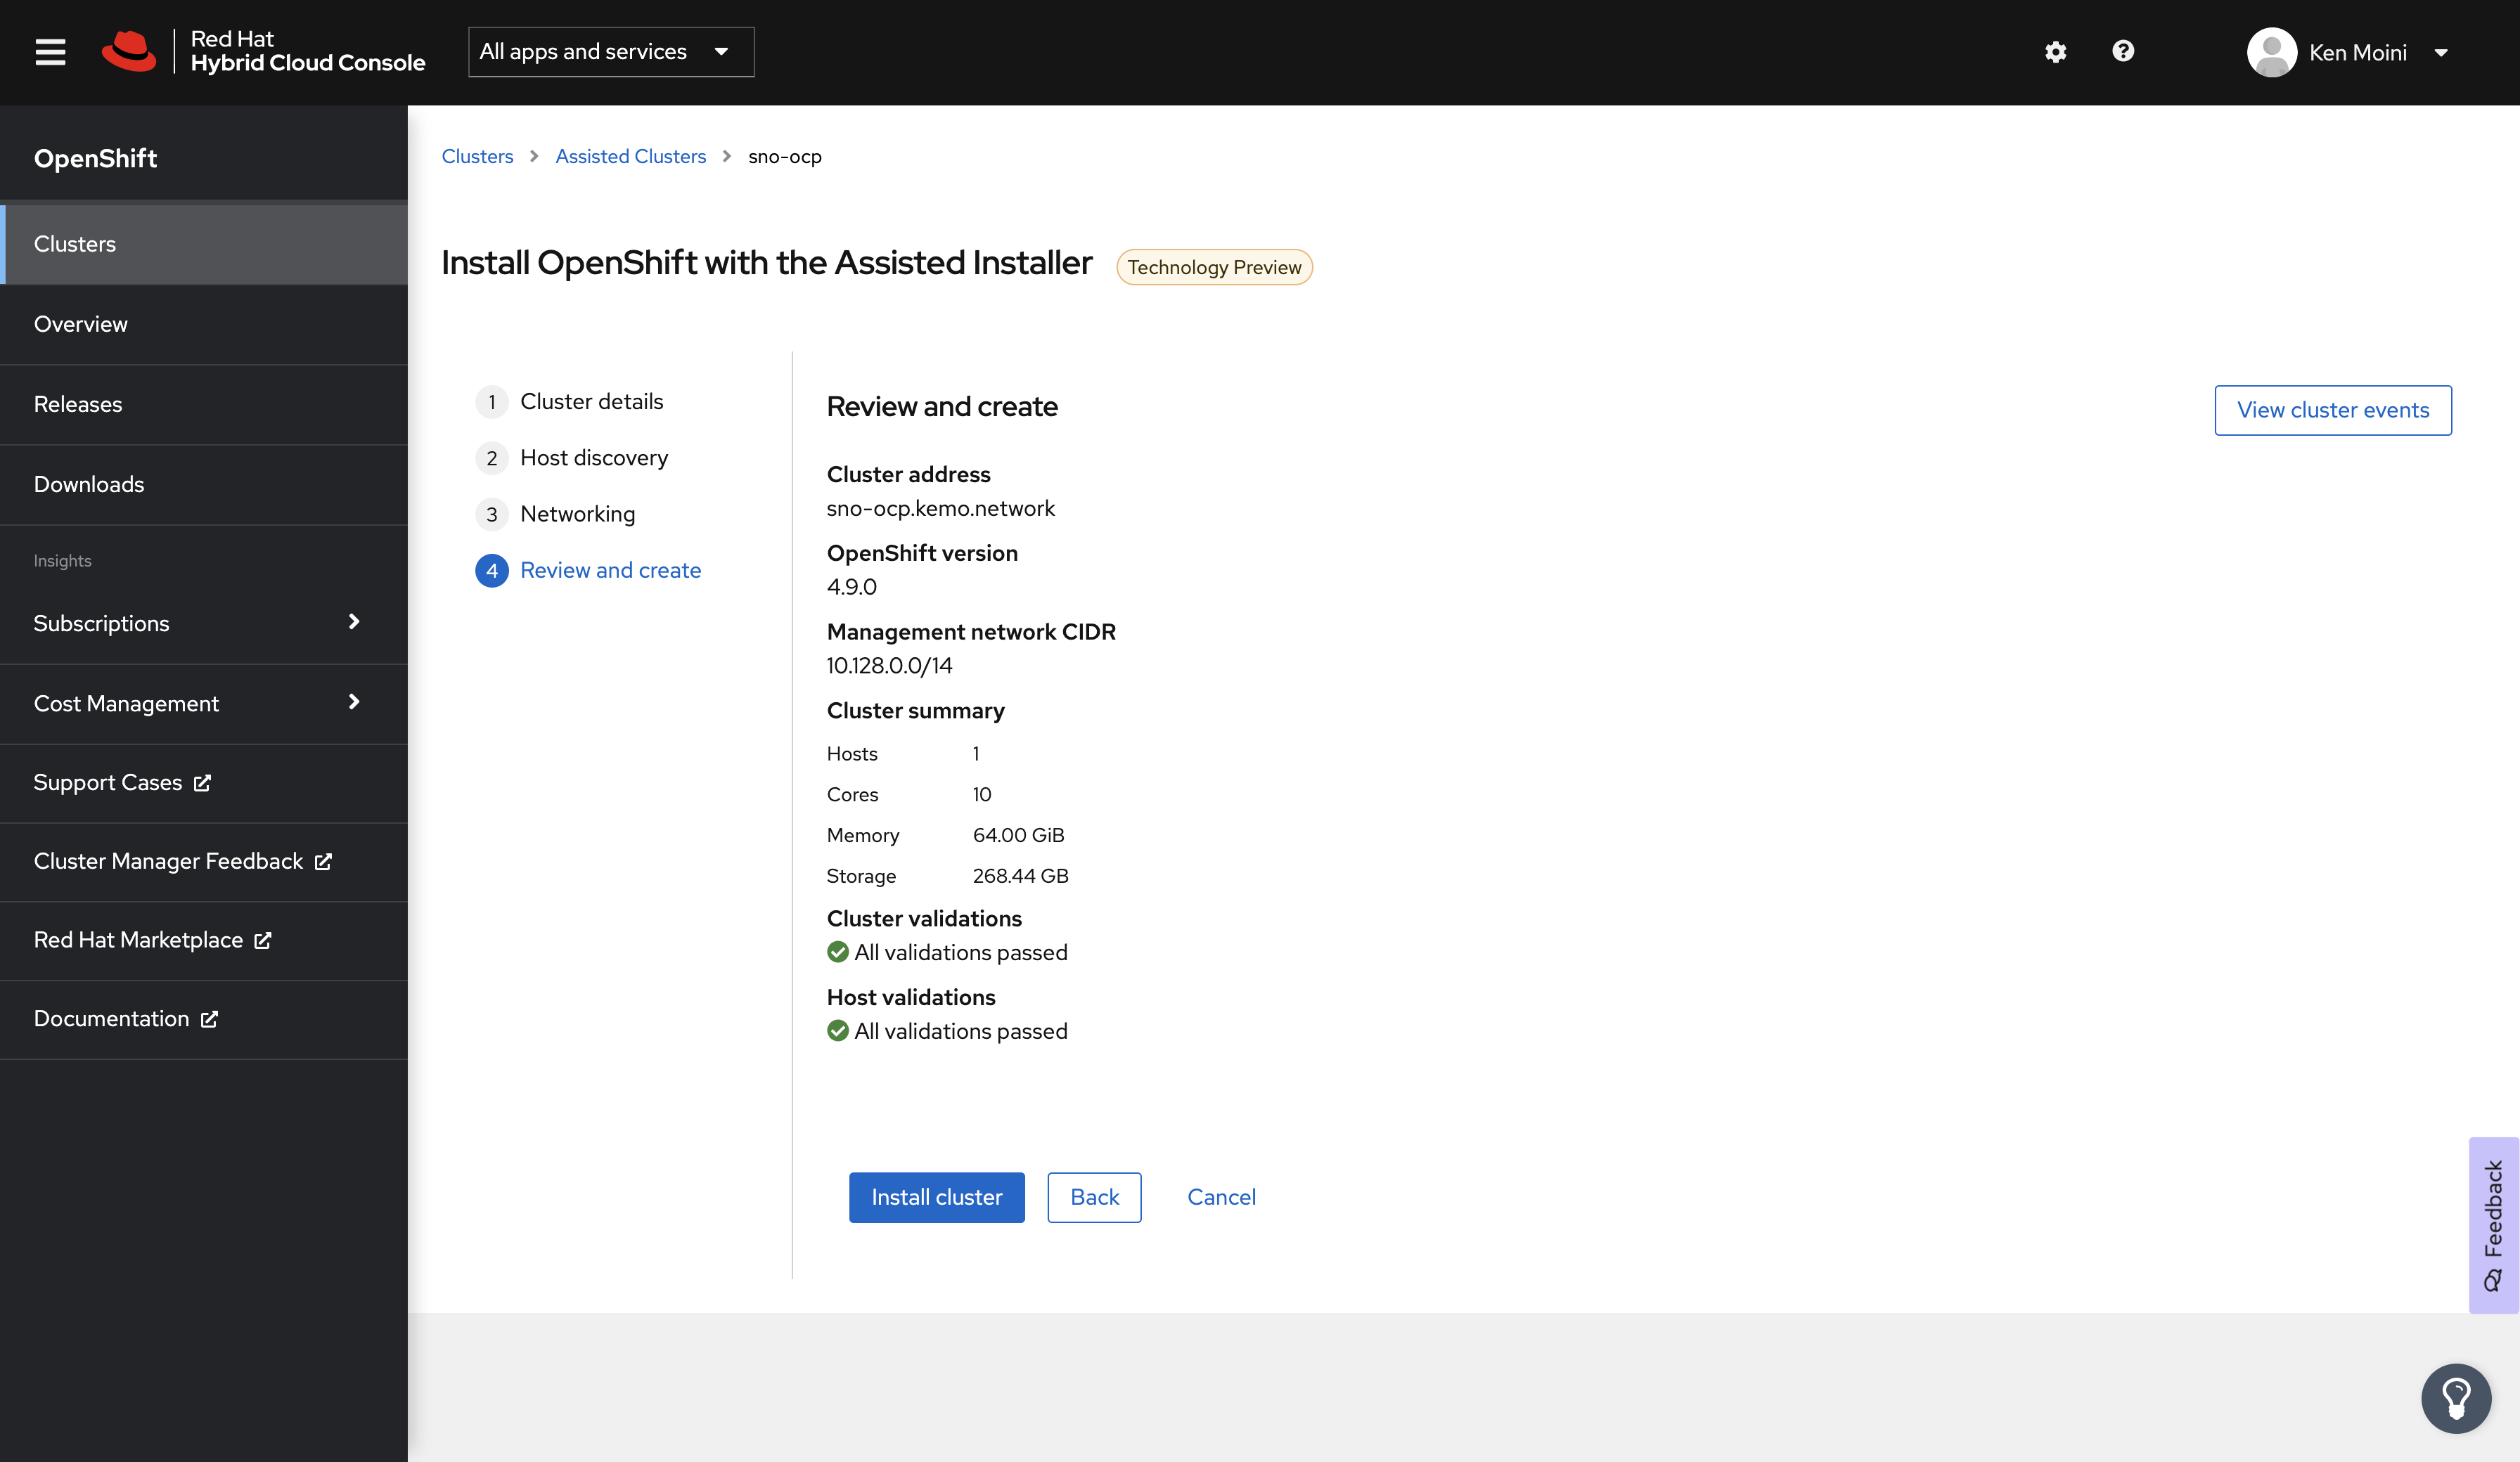
Create a new cluster, give it a Name, in my case this is sno-ocp - give it the Base Domain as well, for me this is kemo.network.
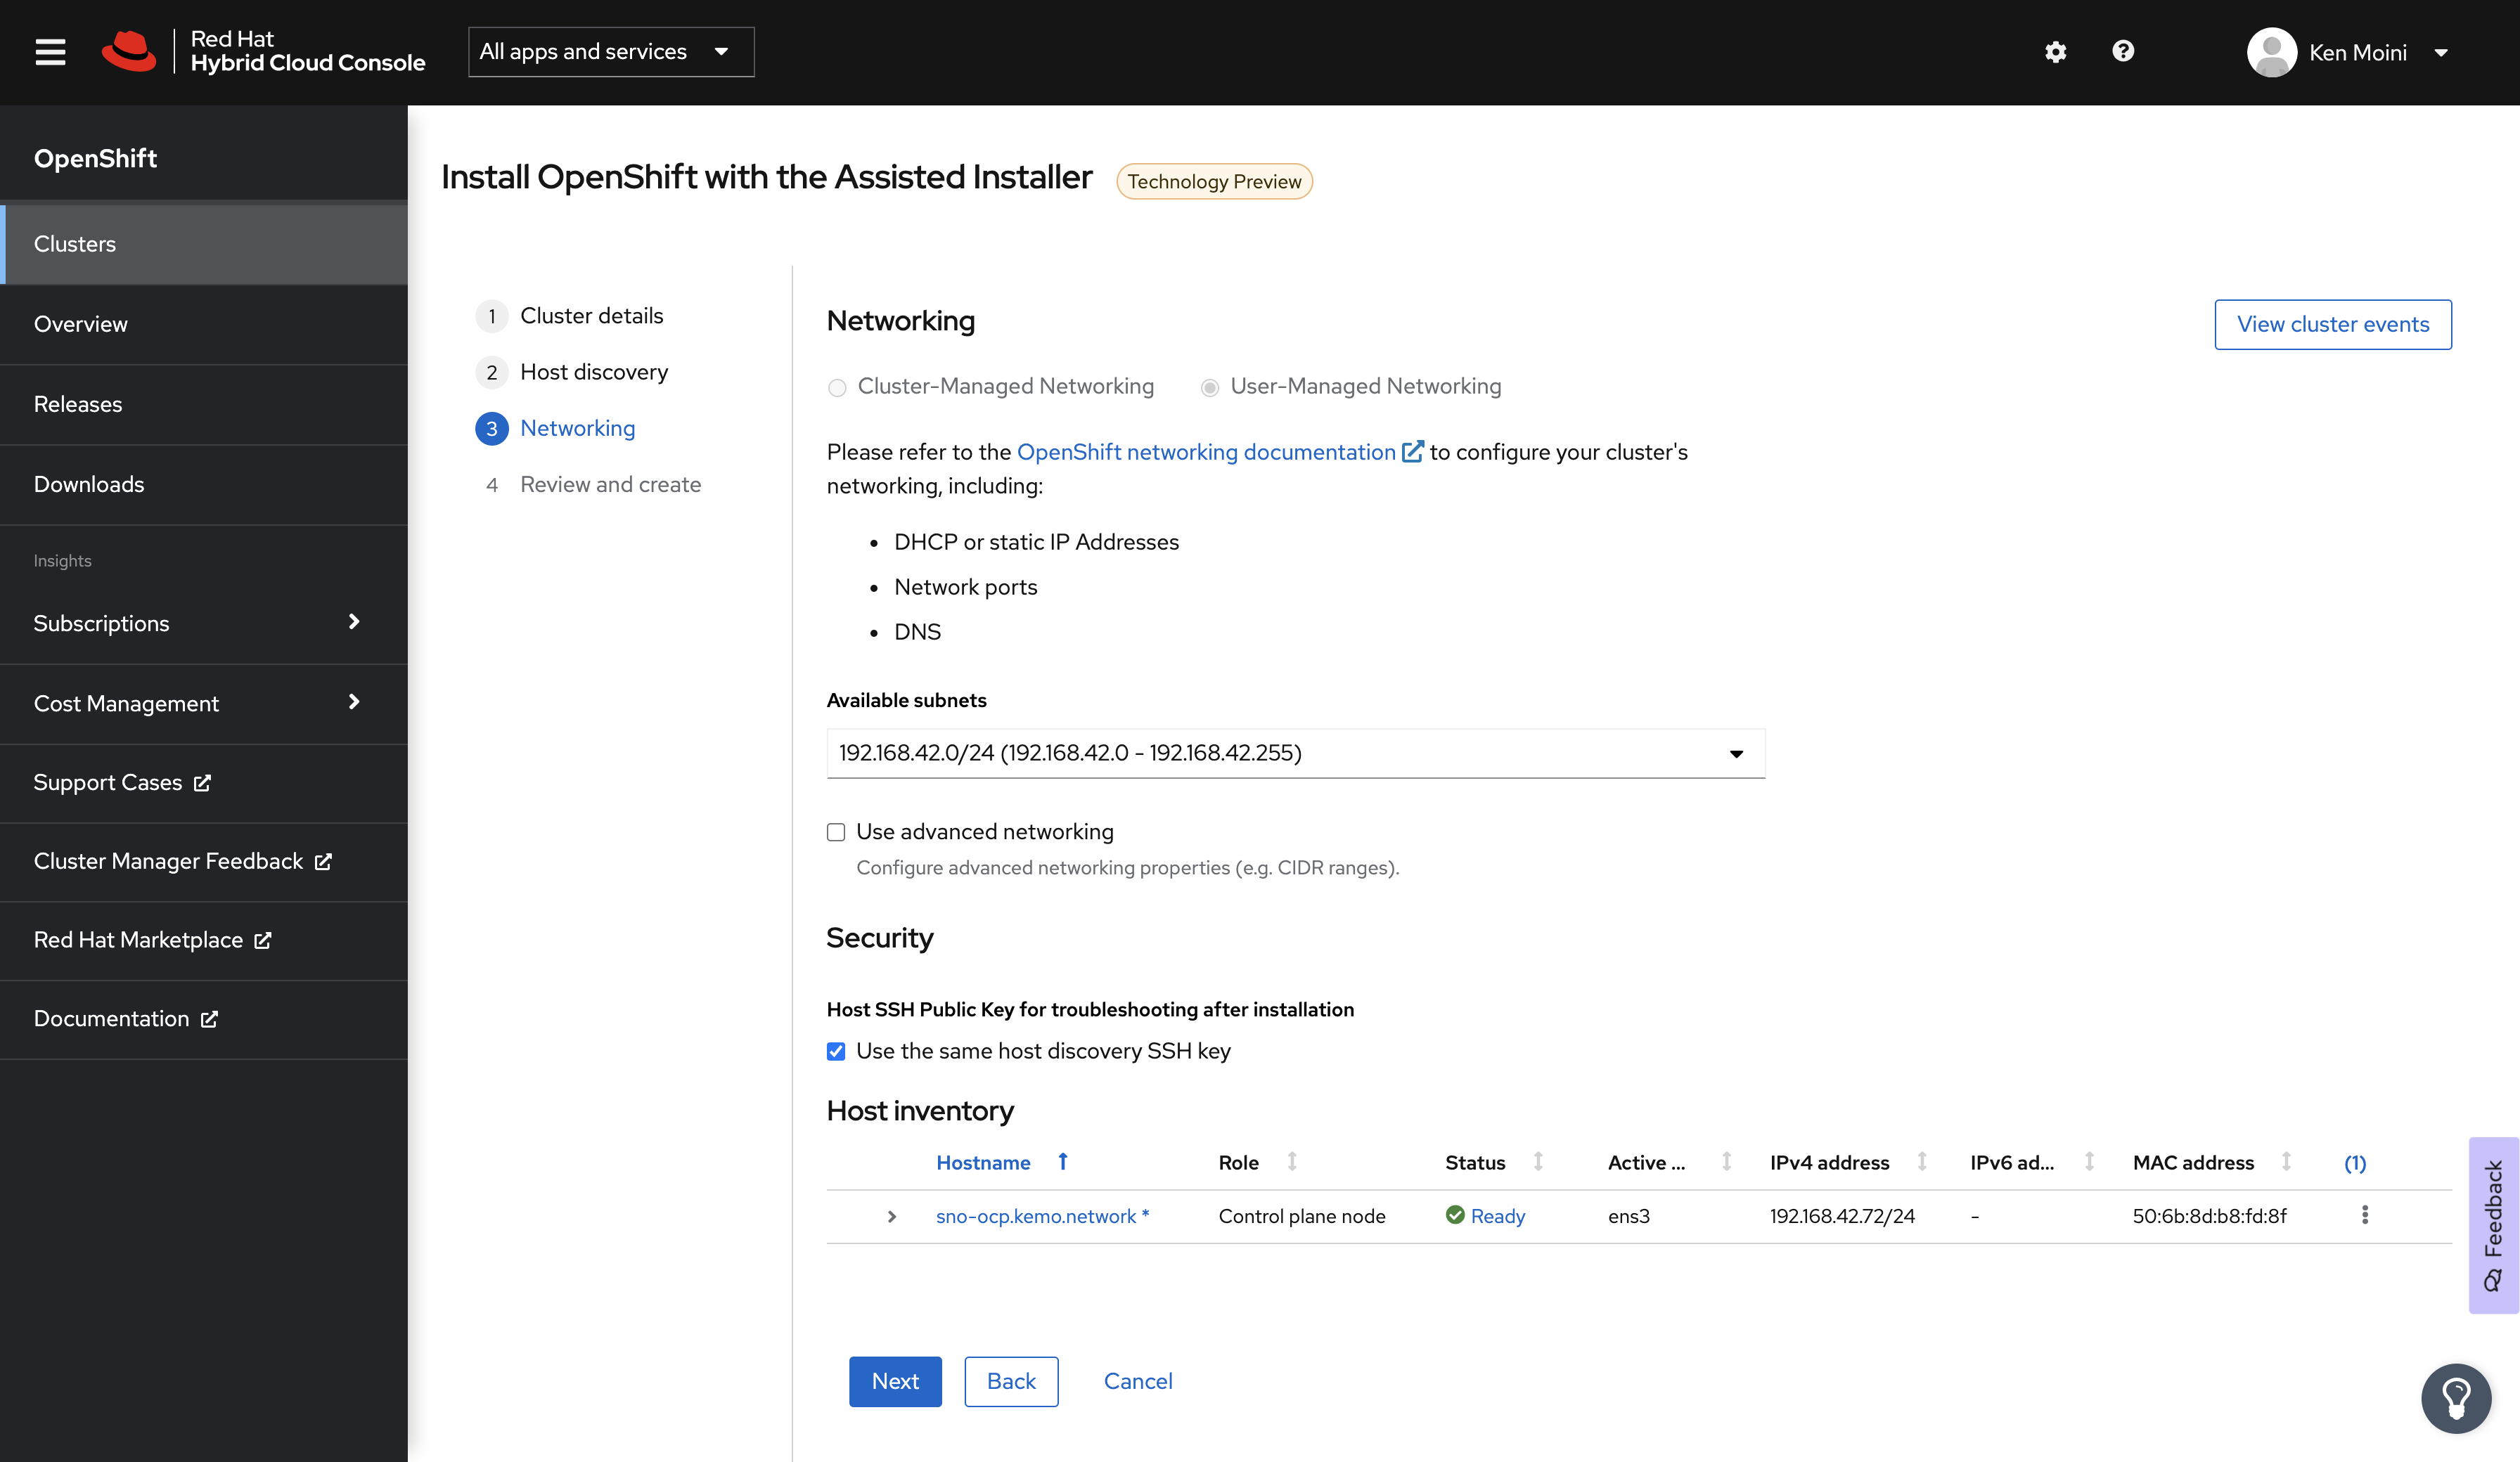
Before continuing, make sure to select OpenShift 4.9 as the Cluster Version and check the box next to Install Single Node OpenShift (SNO) - click next and you’ll be presented with the Host Discovery screen.
Optional - Networking Preflight
Something that would be done now is some networking preflight configuration.
This requires often a combination of setting DHCP Client reservations, Static IP/MAC Address mapping, etc in order to make sure that this SNO instance is where we need it for the DNS and Firewall rules we put in place - so in my environment I have to make sure this SNO node doesn’t use my DHCP pool and instead takes a Static IP of 192.168.42.72.
The way I am accomplishing this is by:
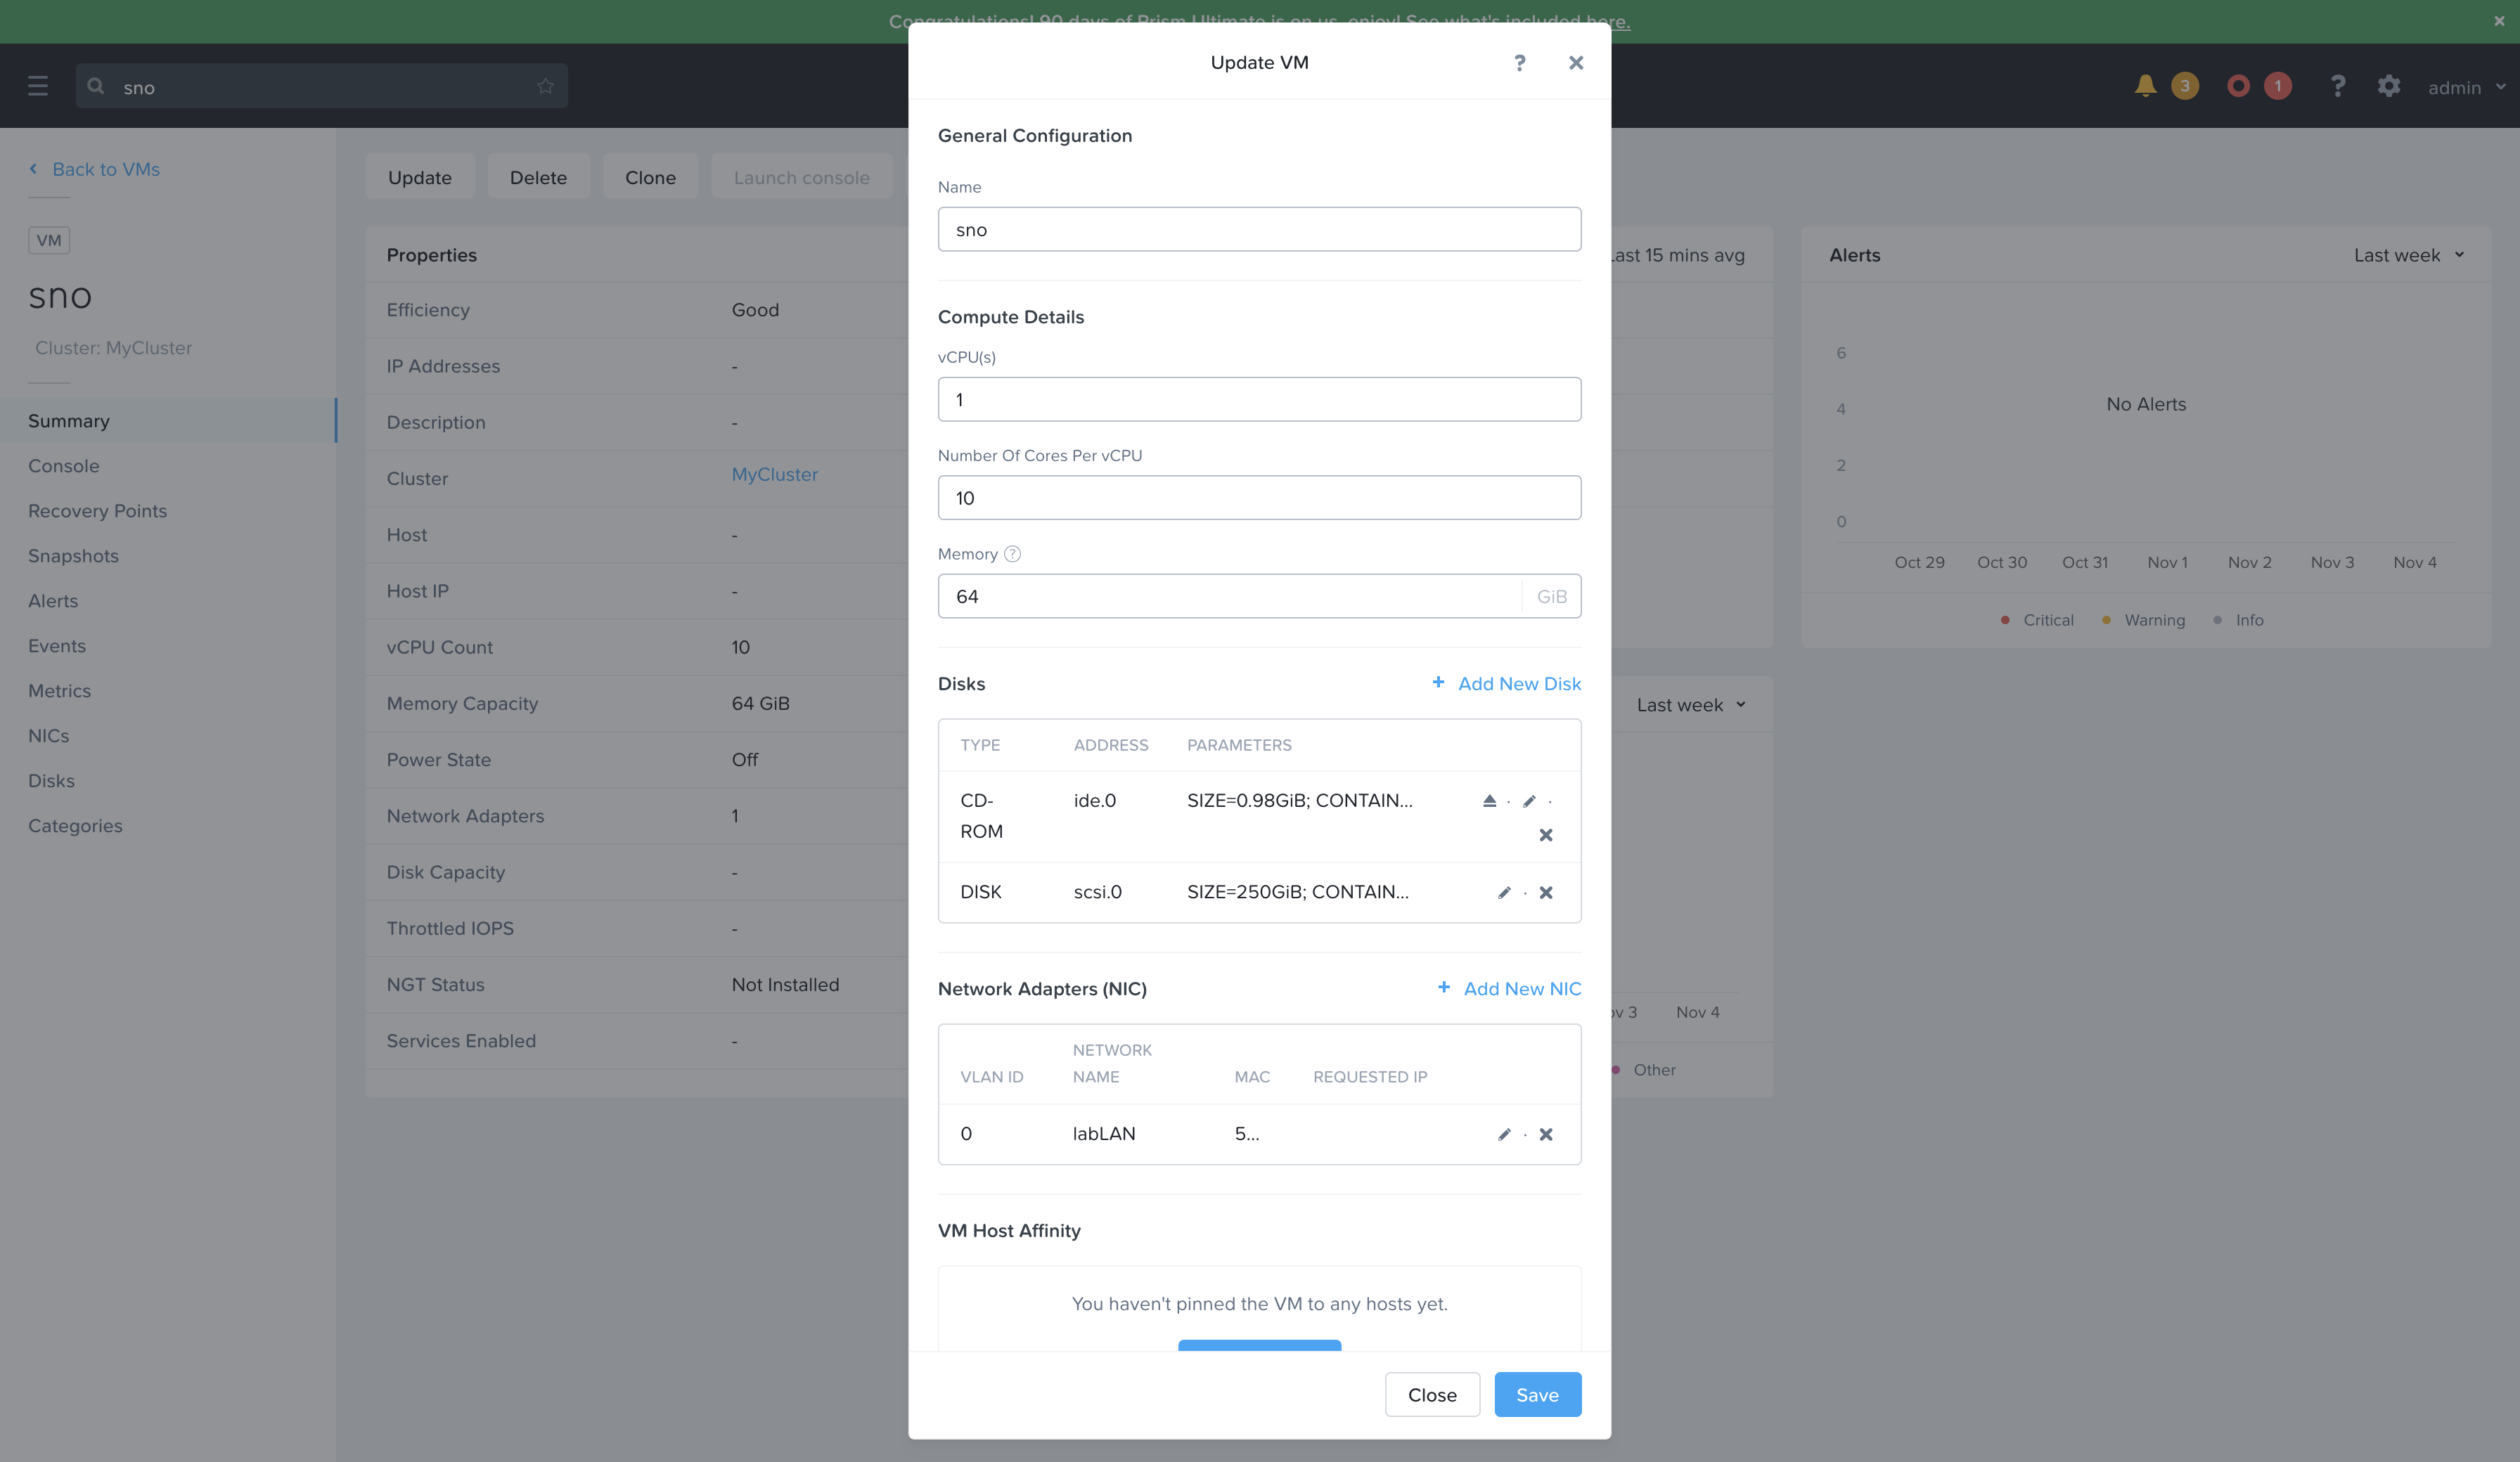
- Create the empty VM in Nutanix’s Prism Central, just need the CPU/RAM/NICs added
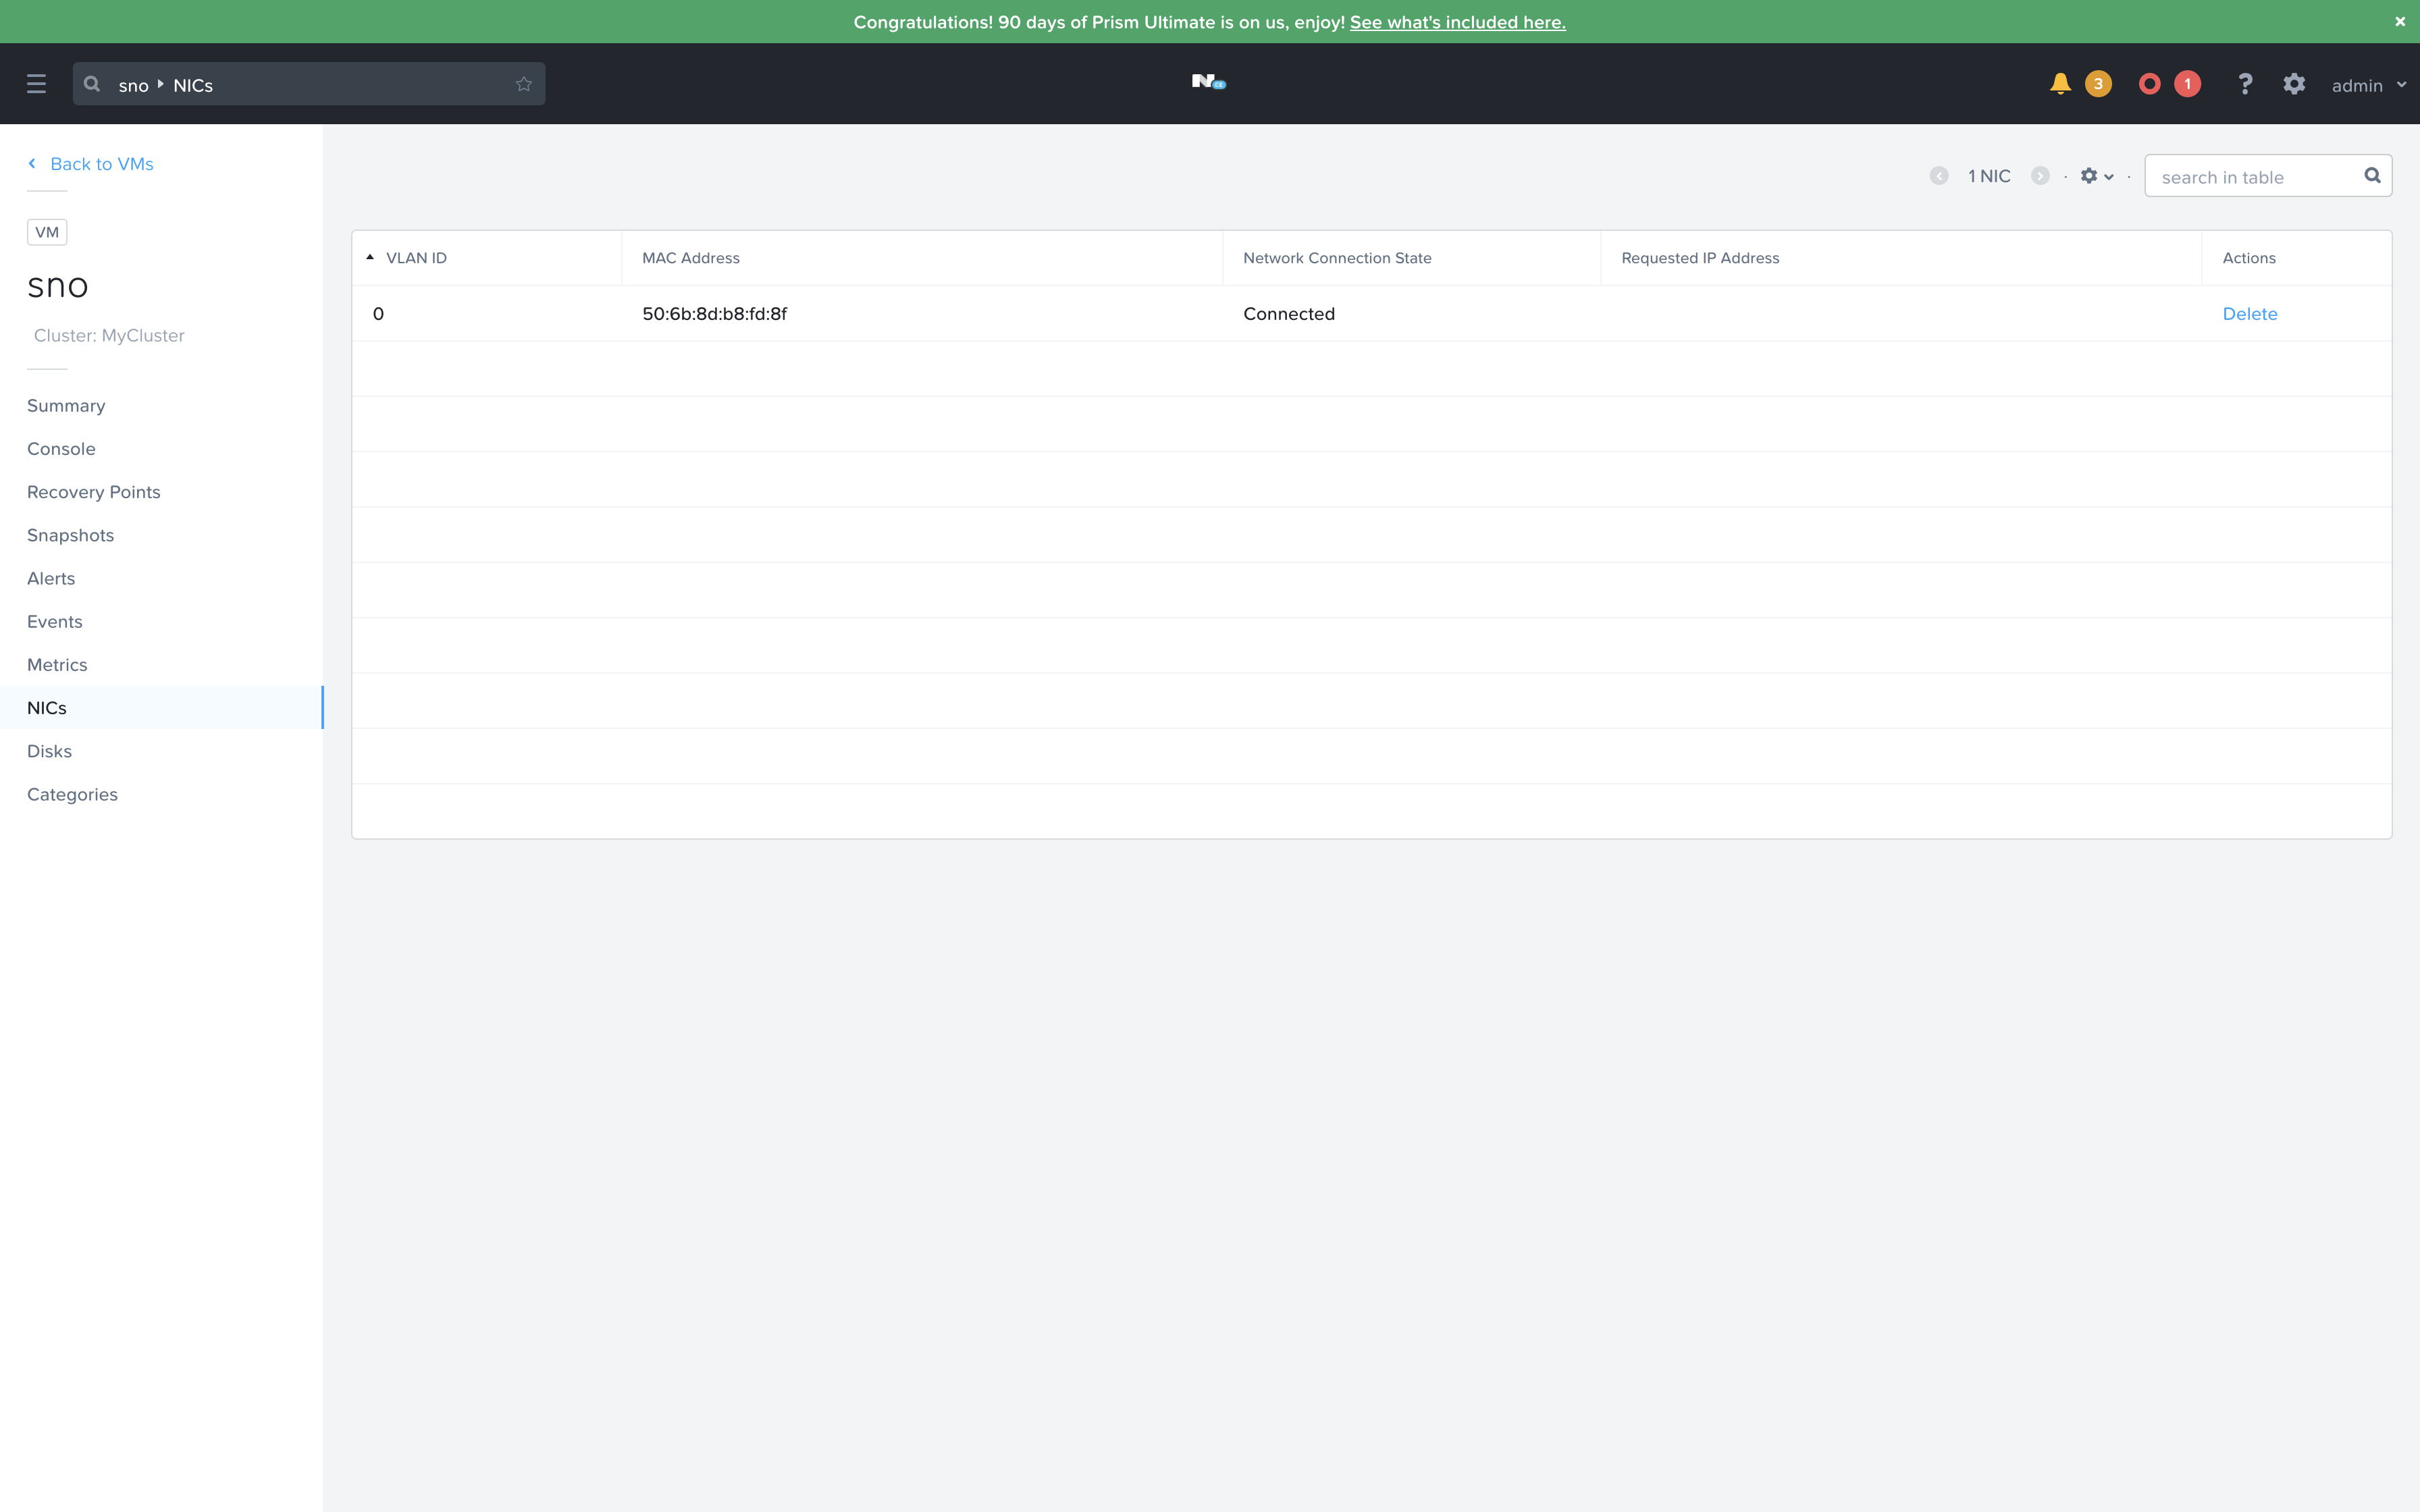
- Once that VM is created, taking note of the MAC Address of the assigned NIC
- Using that MAC Address with NMState to set the Static IP on boot
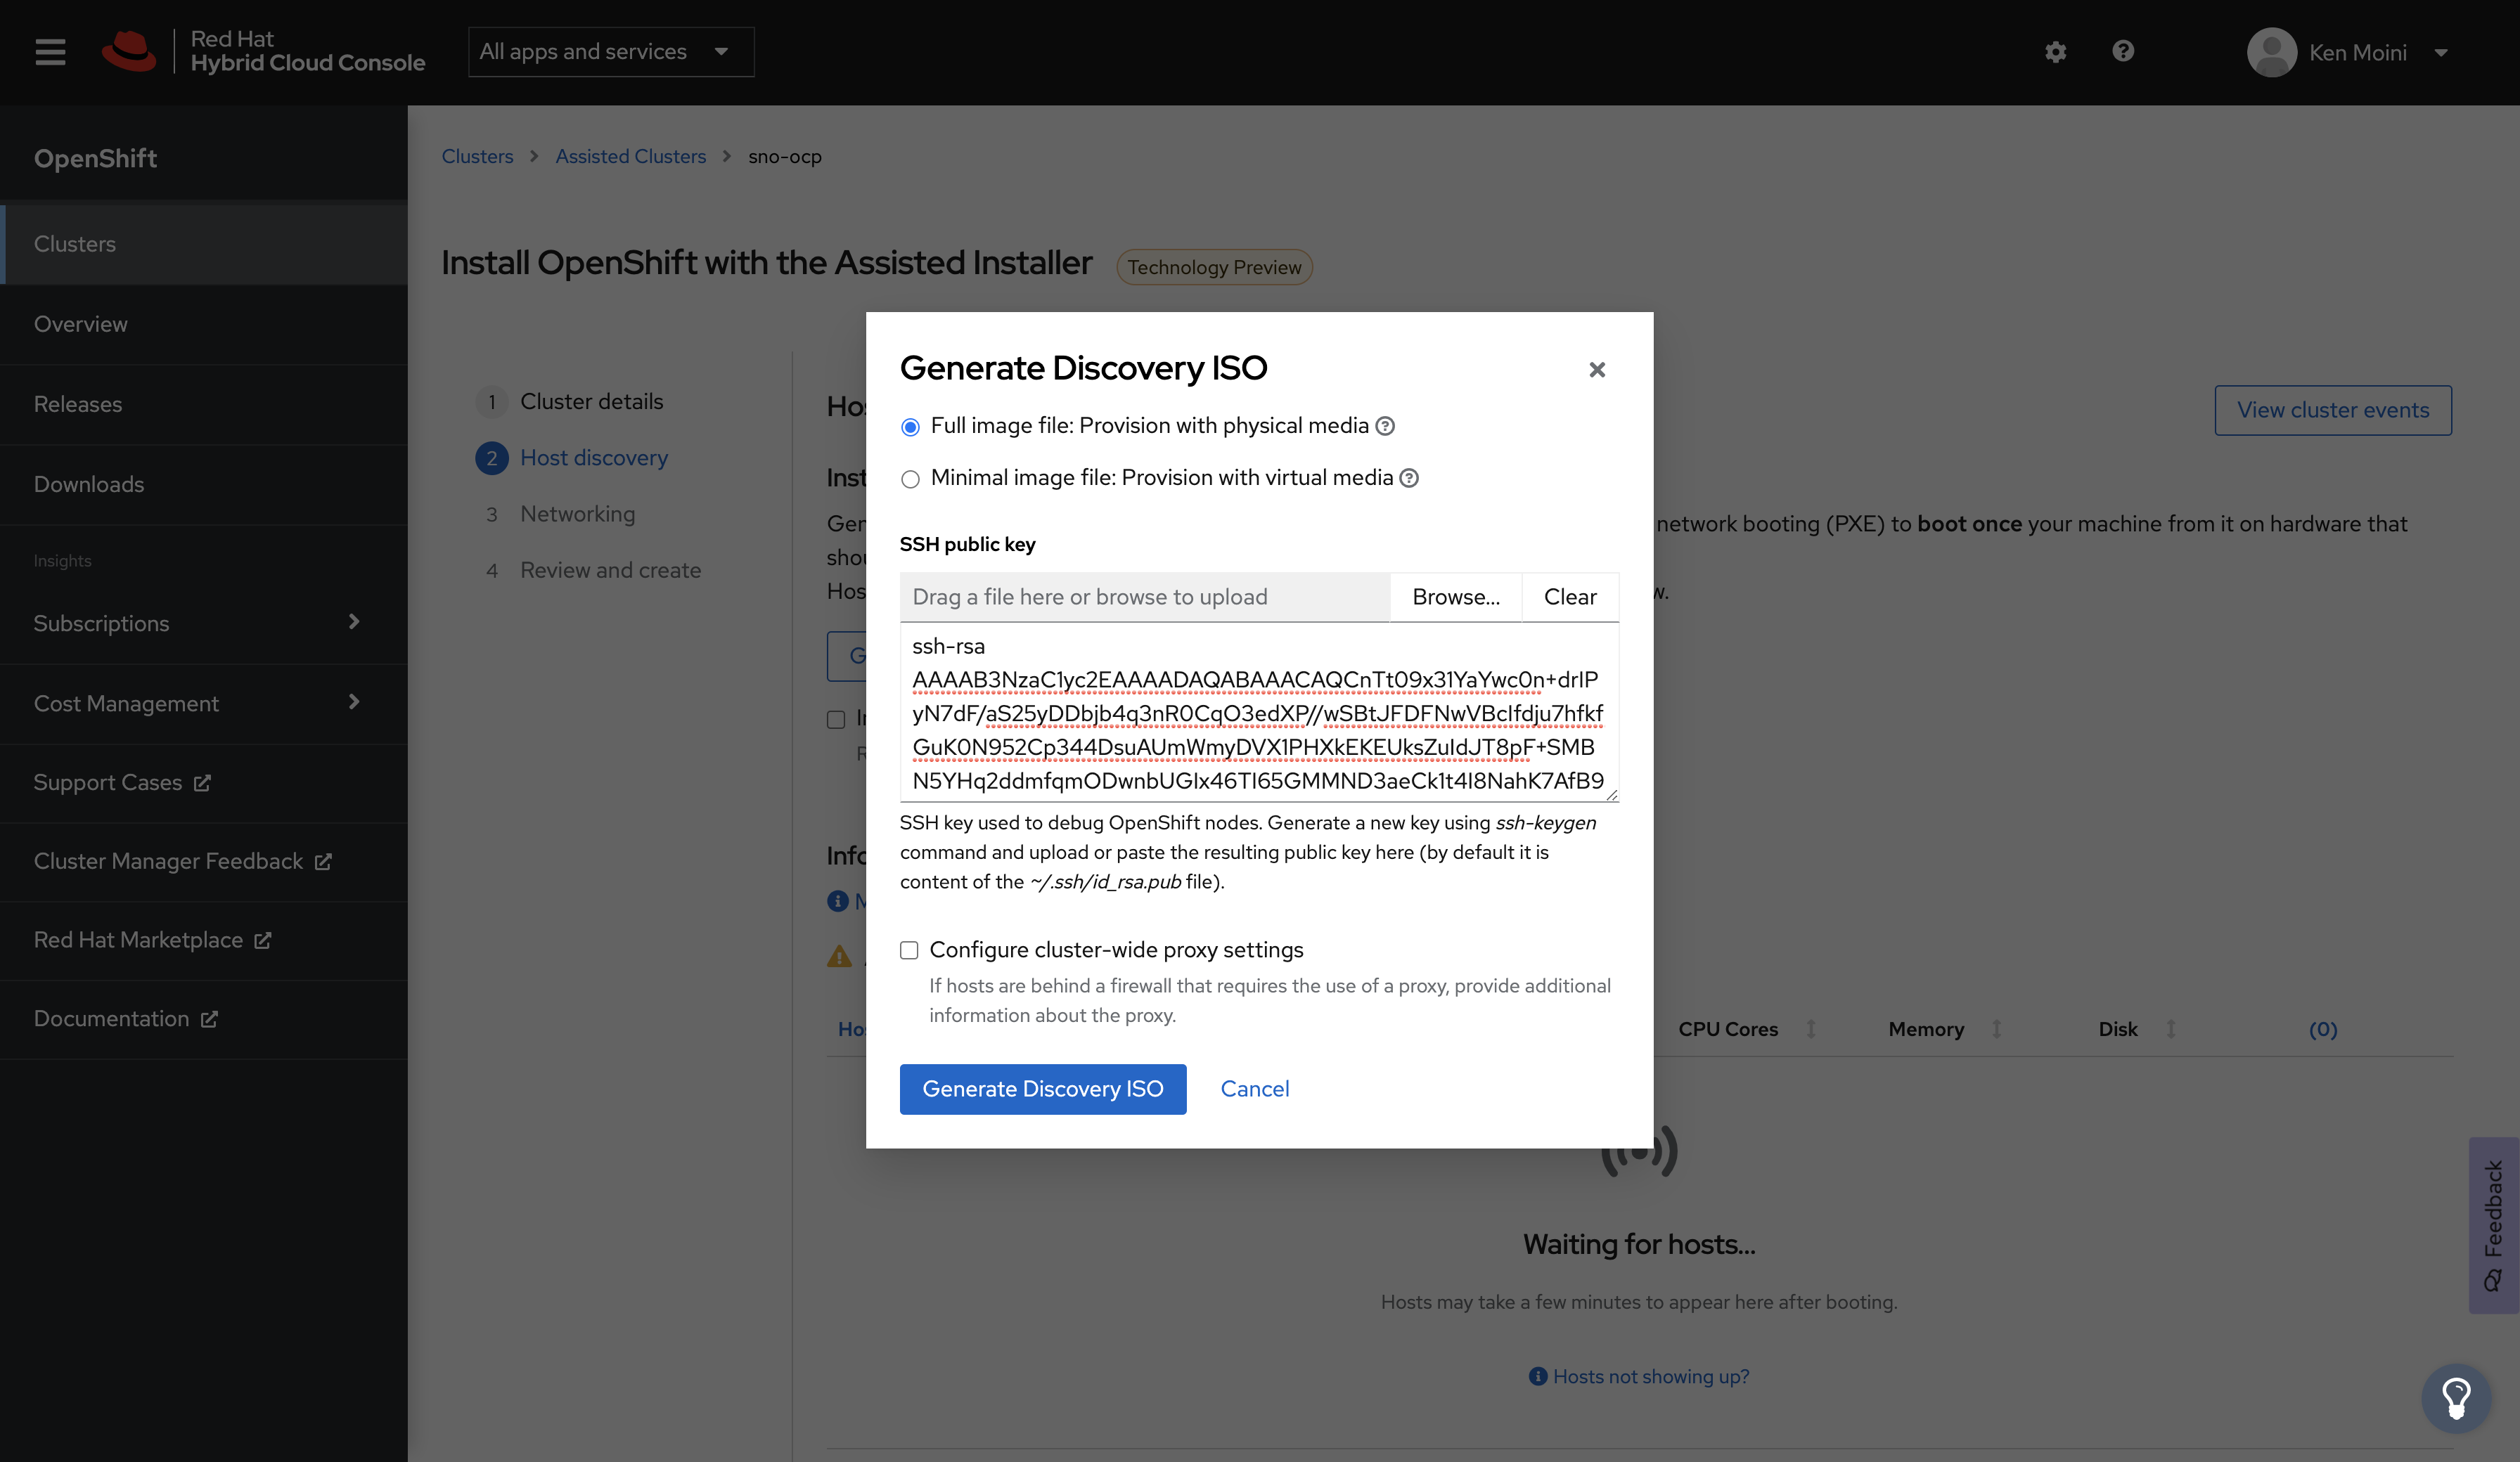
To set NMState configuration with the Assisted Installer service, you have to do so before downloading the Discovery ISO - thankfully, with one machine this is pretty easy to do.
Make sure to get the Cluster UUID from the Assisted Installer Service, it’s part of the URL in the Address Bar of your browser:
###############################################################################
## Change these in case you're using a self-hosted Assisted Installer service
AI_SVC_ENDPOINT="https://api.openshift.com"
AI_SVC_PATH_BASE="/api/assisted-install/v1"

###############################################################################
## Get the UUID of the Cluster from the Assisted Installer Service WebUI's URL Address Bar
AI_SVC_CLUSTER_ID=""
AI_SVC_CLUSTER_SSH_PUBLIC_KEY=$(cat ~/.ssh/id_rsa.pub)

###############################################################################
## Exchange the RH API Offline Token for an active Bearer token
## Get a RH API Offline Token: https://access.redhat.com/management/api
RH_API_OFFLINE_TOKEN=""
AI_SVC_API_TOKEN=$(curl -s https://sso.redhat.com/auth/realms/redhat-external/protocol/openid-connect/token -d grant_type=refresh_token -d client_id=rhsm-api -d refresh_token=$RH_API_OFFLINE_TOKEN | jq --raw-output .access_token)

###############################################################################
## Create the NMState YAML
NMSTATE_BODY=$(mktemp)
cat << EOF > $NMSTATE_BODY
dns-resolver:
  config:
    server:
    - 192.168.42.9
    - 192.168.42.10
interfaces:
- name: ens3
  ipv4:
    address:
    - ip: 192.168.42.72
      prefix-length: 24
    dhcp: false
    enabled: true
  state: up
  type: ethernet
routes:
  config:
  - destination: 0.0.0.0/0
    next-hop-address: 192.168.42.1
    next-hop-interface: ens3
    table-id: 254
EOF

###############################################################################
## Create the complete JSON request body
JSON_BODY=$(mktemp)
jq -n --arg SSH_KEY "$AI_SVC_CLUSTER_SSH_PUBLIC_KEY" --arg NMSTATE_YAML "$(cat $NMSTATE_BODY)" \
'{
  "ssh_public_key": $SSH_KEY,
  "image_type": "full-iso",
  "static_network_config": [
    {
      "network_yaml": $NMSTATE_YAML,
      "mac_interface_map": [{"mac_address": "50:6b:8d:b8:fd:8f", "logical_nic_name": "ens3"}]
    }
  ]
}' > $JSON_BODY

###############################################################################
## Configure the Discovery ISO
curl -s -X POST "${AI_SVC_ENDPOINT}${AI_SVC_PATH_BASE}/clusters/$AI_SVC_CLUSTER_ID/downloads/image" \
  -d @$JSON_BODY \
  --header "Content-Type: application/json" \
  -H "Authorization: Bearer $AI_SVC_API_TOKEN" \
  | jq '.'

###############################################################################
## Optional - Download the Discovery ISO
curl -H "Authorization: Bearer $AI_SVC_API_TOKEN" \
  -L "${AI_SVC_ENDPOINT}${AI_SVC_PATH_BASE}/clusters/$AI_SVC_CLUSTER_ID/downloads/image" \
  -o ai-liveiso-$AI_SVC_CLUSTER_ID.iso

###############################################################################
## Clean Up
rm $NMSTATE_BODY
rm $JSON_BODY
Note: Of course the IP and MAC Addresses have to match but also the logical NIC name, ens3 in this case on Nutanix, needs to match or else the static networking will not take.
You can read more about setting Static Networking via the Assisted Installer Service and NMState here: Static Networking with Assisted-Installer - Cloud Cult DevOps
Set up & Download the Discovery ISO
If you set up Network Preflight Configuration in the previous optional section via NMState then you have already configured the Discovery ISO - simply download the ISO and boot.
If you have NOT set up the Discovery ISO in the previous step during Network Preflight Configuration then configure the Discovery ISO with an SSH Public Key and download it however you need to get it to your hypervisor host.
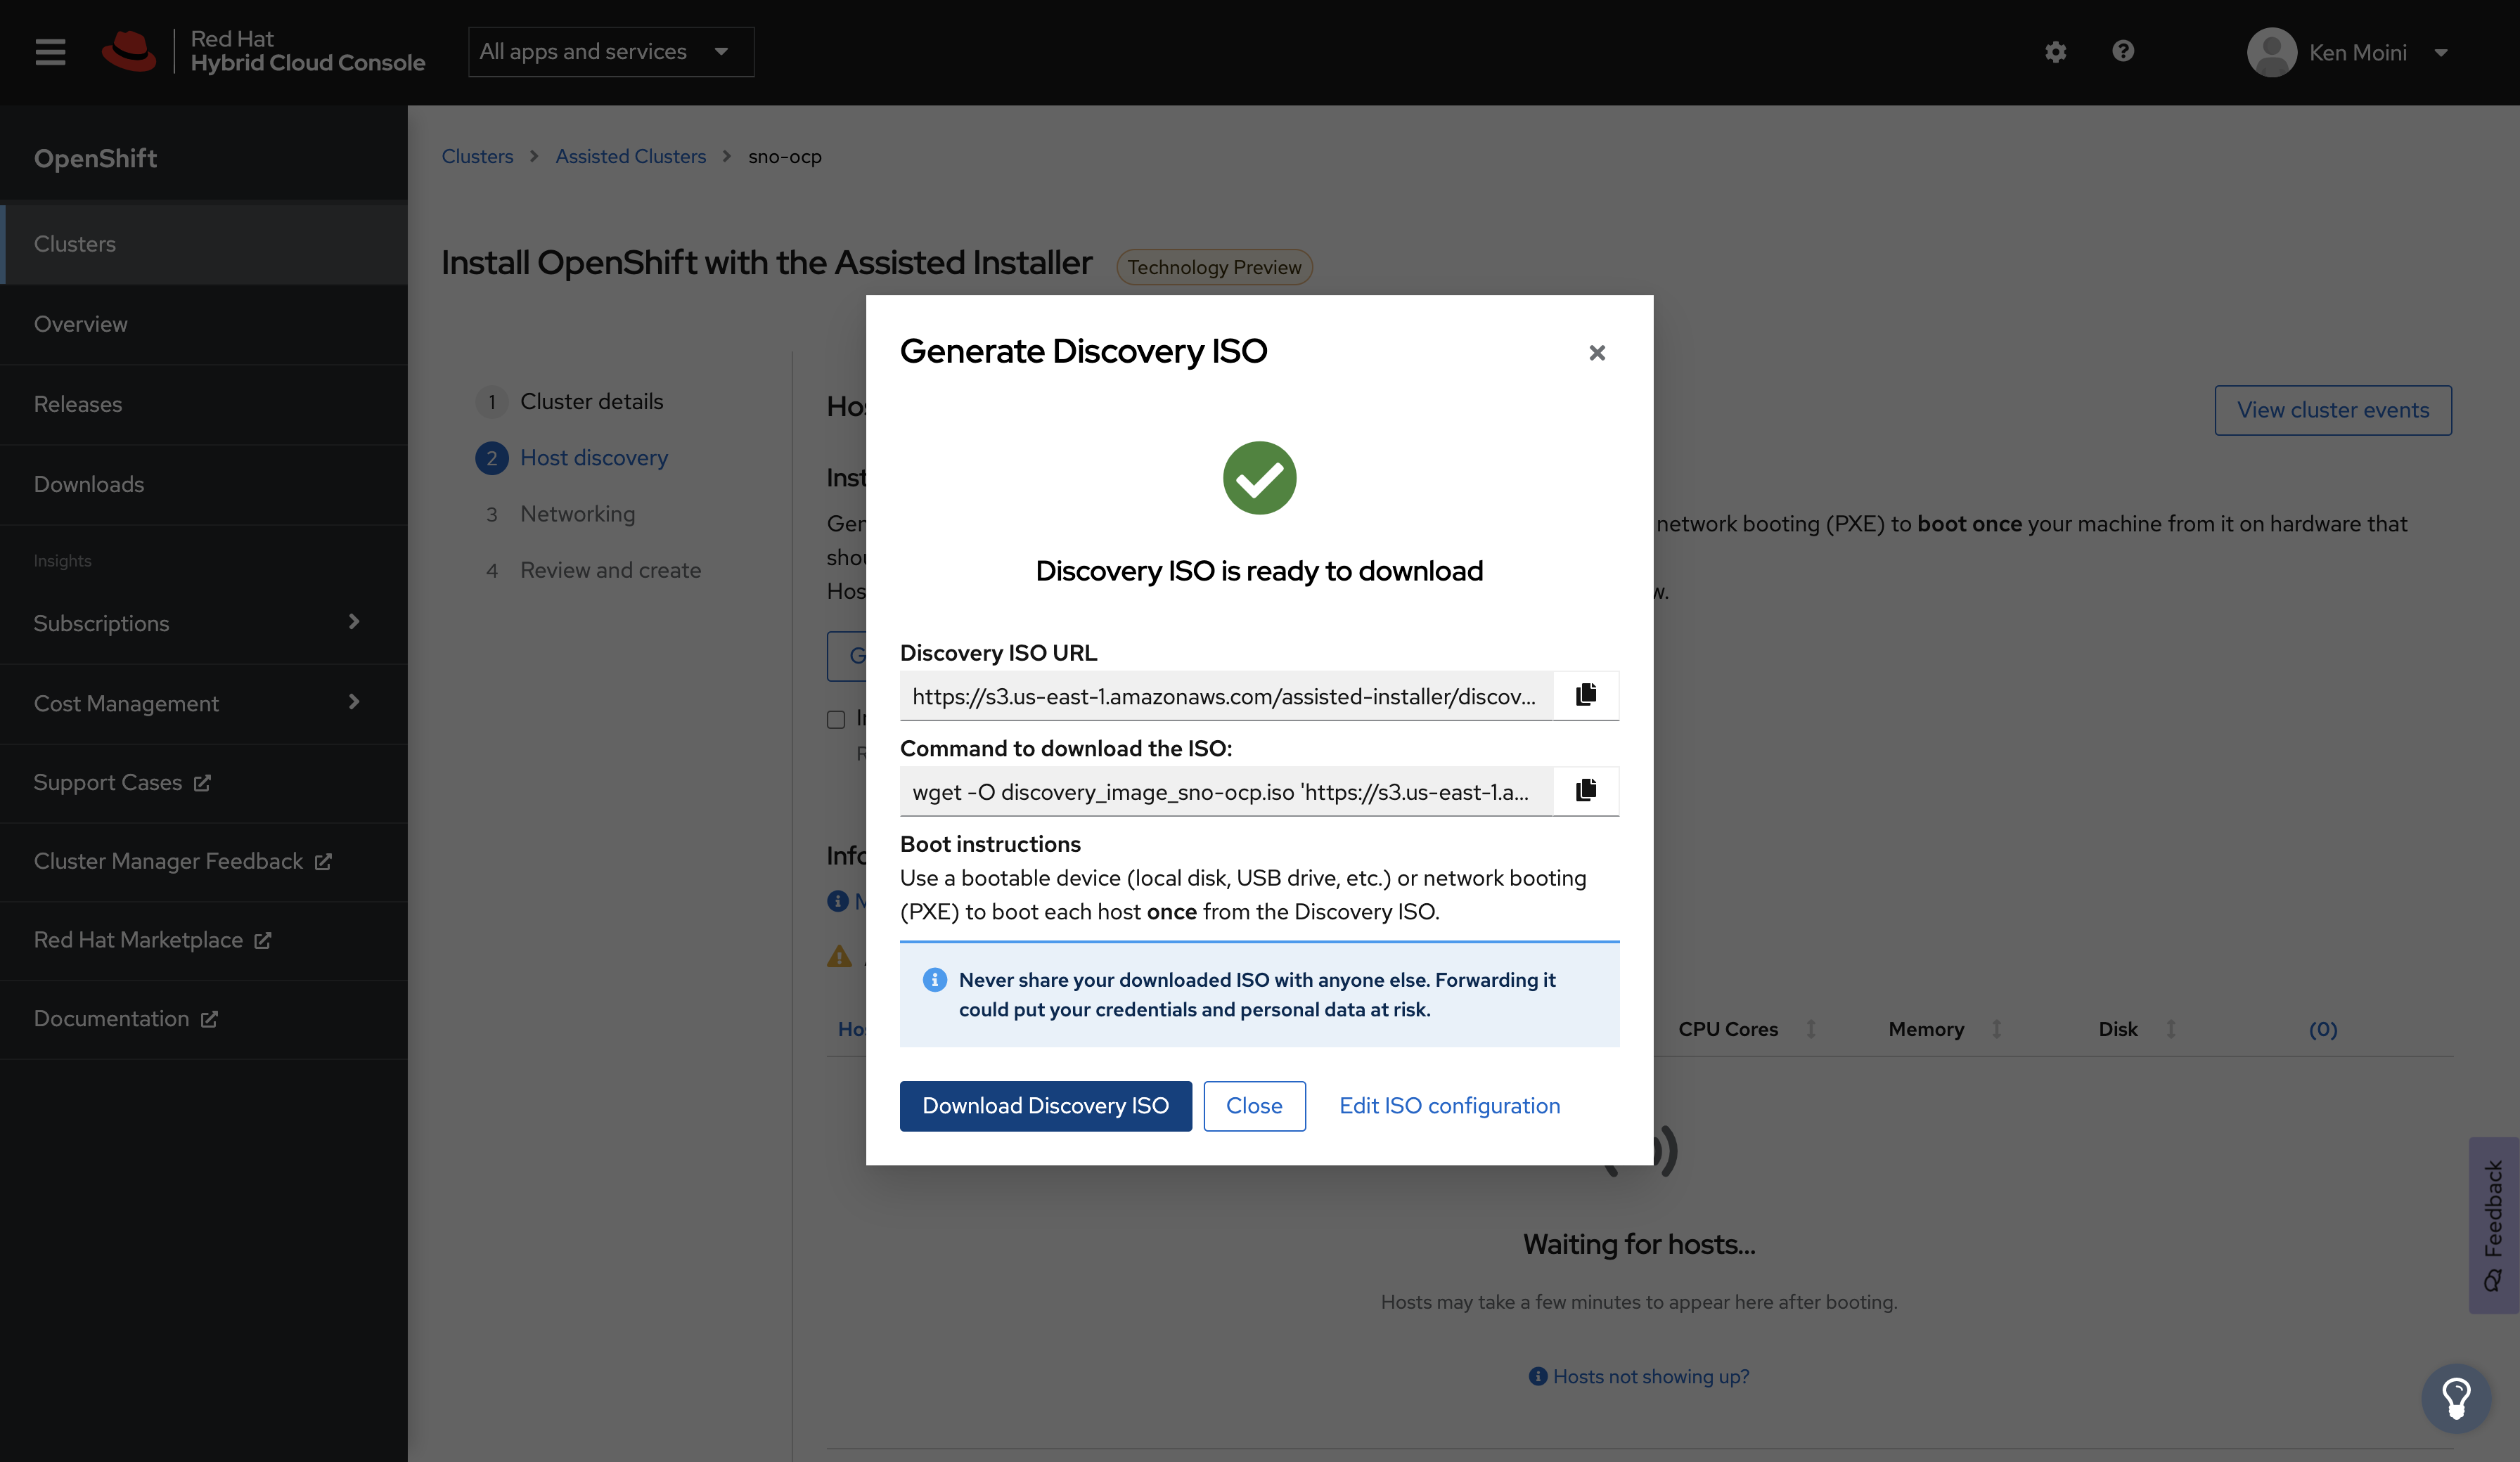
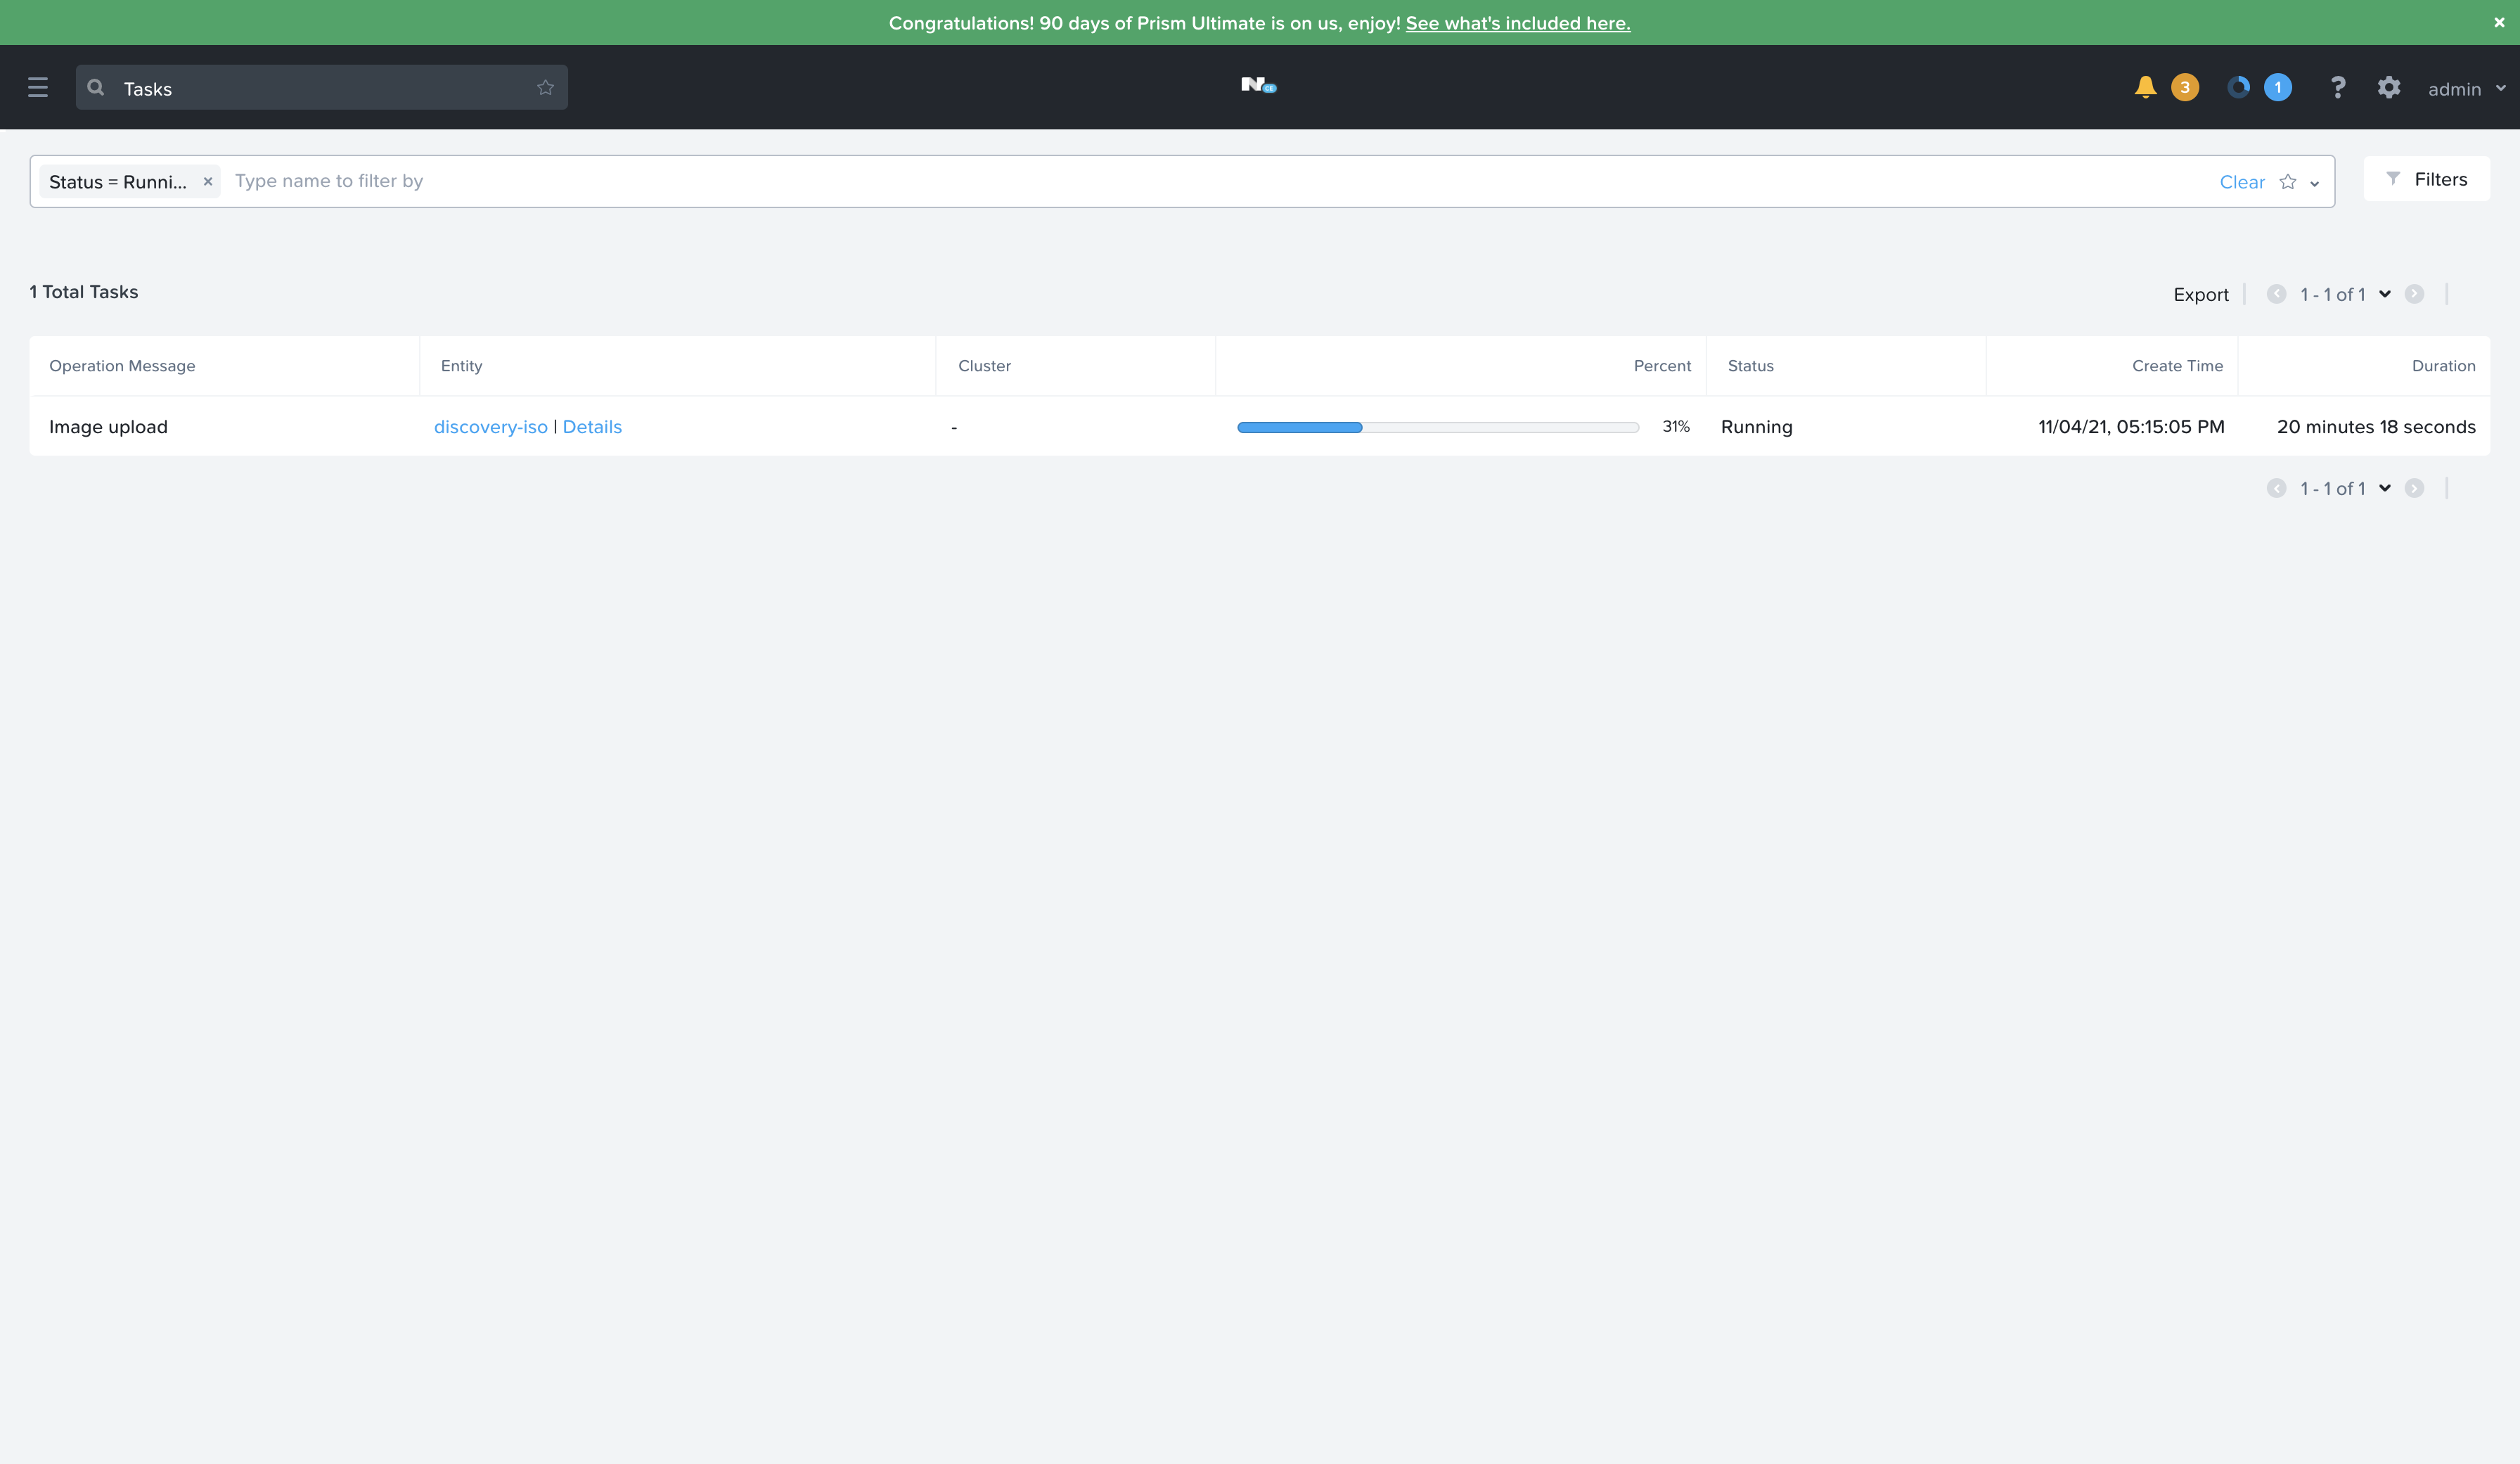
With the Discovery ISO configured and downloaded, upload it to your hypervisor or bare-metal provisioner.
Let it SNO
Now I need to go back to the Nutanix Prism Central Web UI and complete the configuration of that previously created VM with the Discovery ISO, HDD, etc. Then boot the VM and it should report in and be shown in the Host Discovery screen.
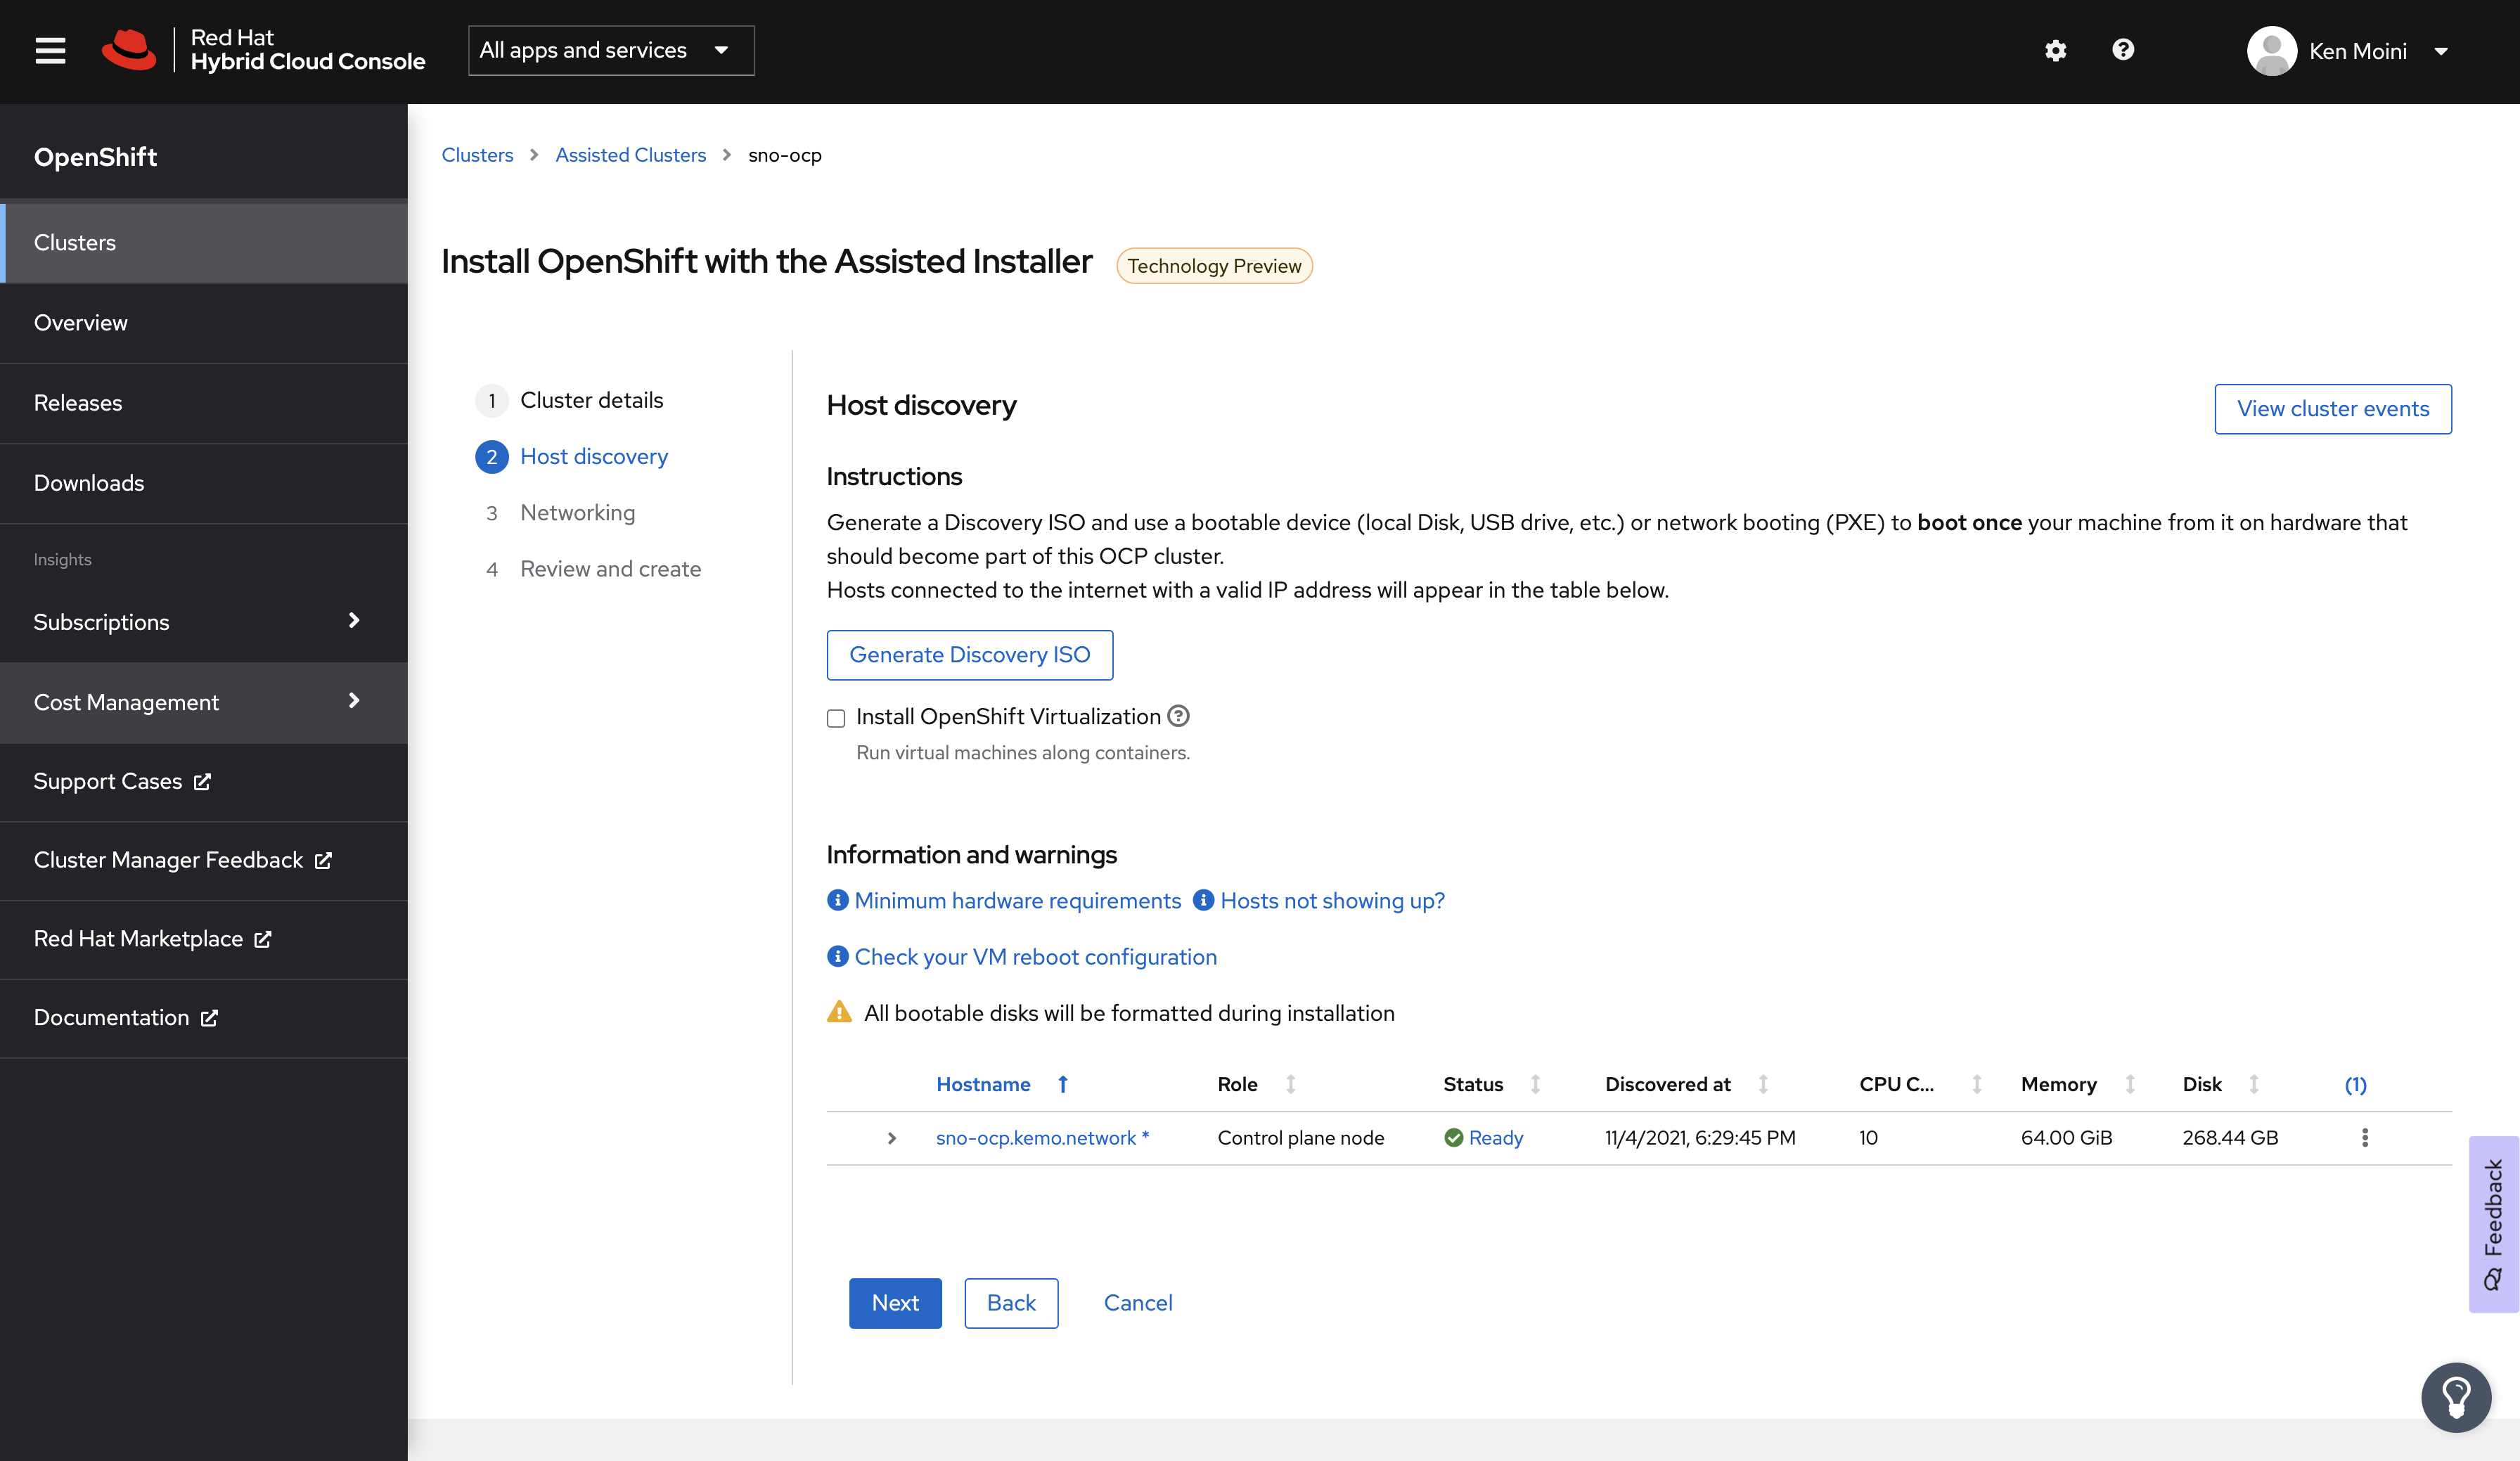
All that’s left to do is click a few buttons in the Assisted Installer Service to start the installation process.
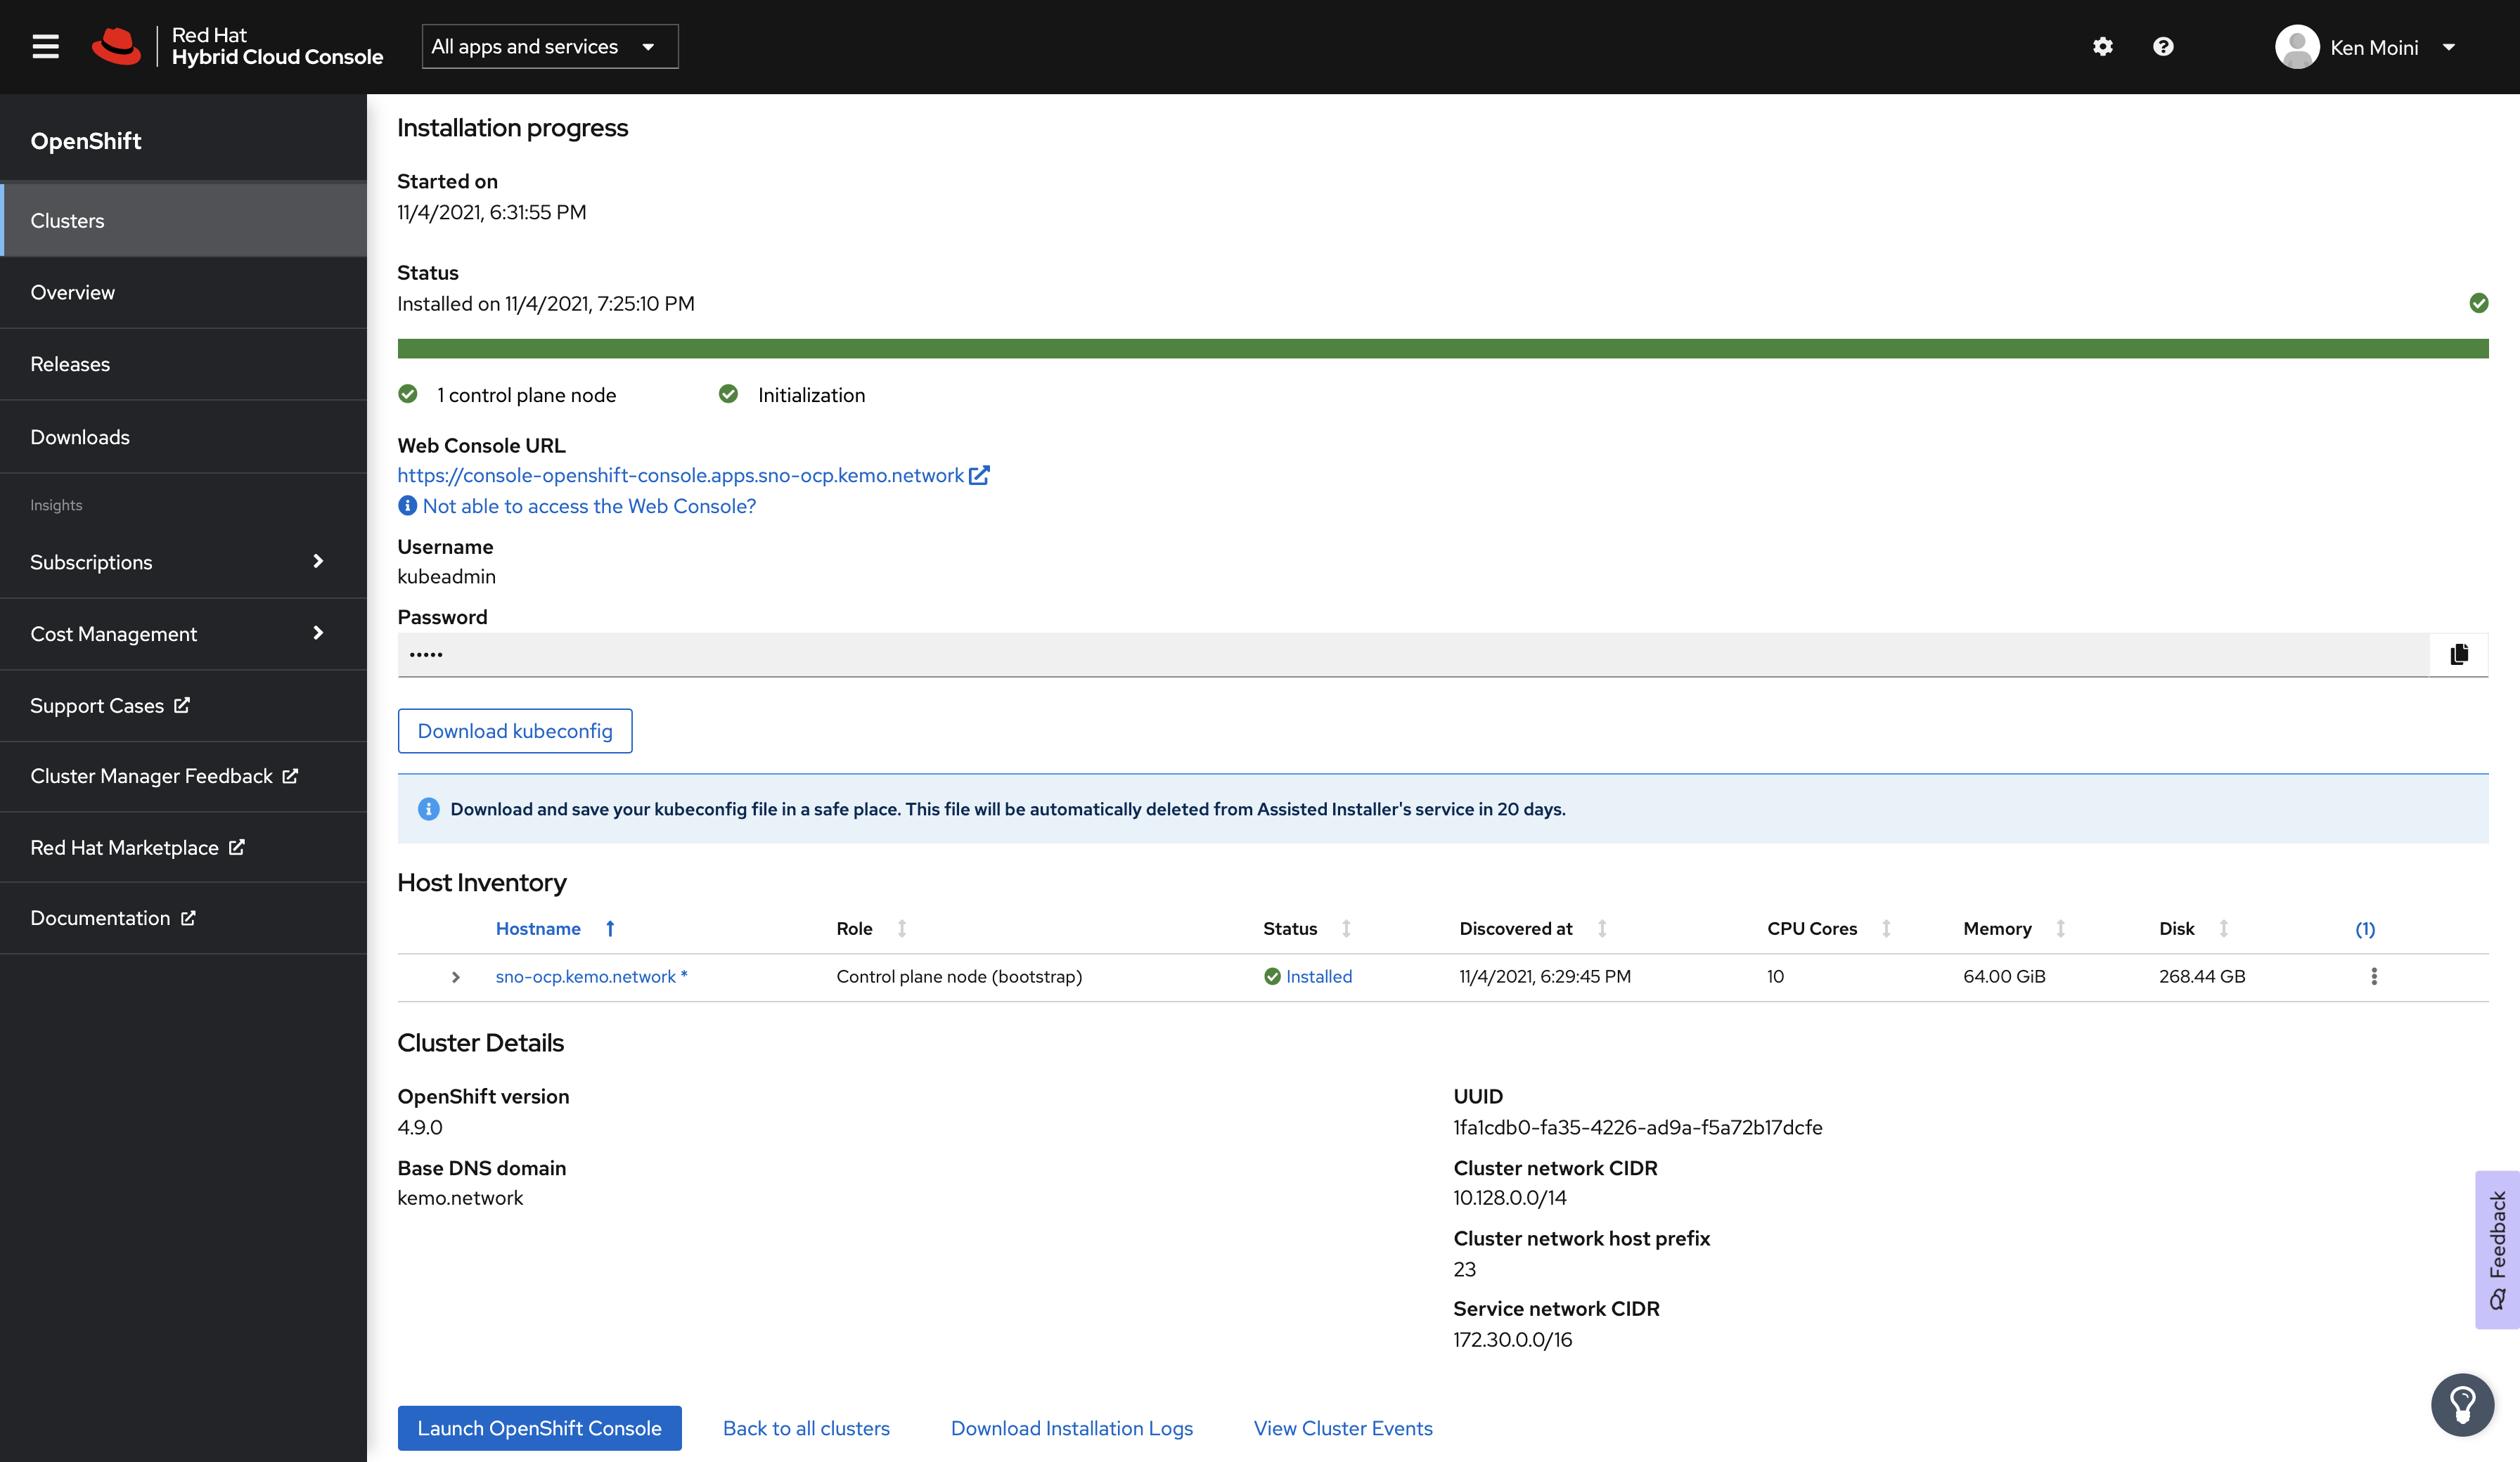
Voila! Single node OpenShift deployed “at the edge” on Nutanix!

